7mmMick
Western Thunderer
Cheers Steph,
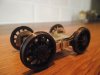
All being well things should fit. I have a shopping list for LG which at the minute totals around £200, the inside motion for the G5 is amongst this lot. until the funds become avaliable and I have the parts in my hand i'm working in the dark a little but i'm not going too far with the frames so this shouldn't be an issue. My intentions are basically to steal ideas of JB ( driving the crank axle by other means ) and yourself ( adhesive on the crank axle ) as this is my first working inside motion S7 build, only a vertical learning curve so not to worry
)")
ATB Mick
All being well things should fit. I have a shopping list for LG which at the minute totals around £200, the inside motion for the G5 is amongst this lot. until the funds become avaliable and I have the parts in my hand i'm working in the dark a little but i'm not going too far with the frames so this shouldn't be an issue. My intentions are basically to steal ideas of JB ( driving the crank axle by other means ) and yourself ( adhesive on the crank axle ) as this is my first working inside motion S7 build, only a vertical learning curve so not to worry
ATB Mick
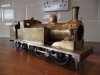


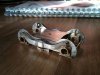


 .......could you describe how you achieved the rust & weathering effects ?
")