7mm 7mm Mick's Workbench - JLTRT Royal Scot

Buckjumper

Flying Squad
Regarding the blower valve - IIRC these were on the left hand side of the smokebox (looking forward) and operated via a rod in the hollow handrail, in which case the operating lever would be inside the cab at the entry point of the handrail. One of the casting suppliers does a cab blower valve handle - is it Gibson's cat.7M750 perhaps? I can't remember - it's been over a year since I last bought one. I'm sure Colin at AG will confirm.
 

Eastsidepilot

Western Thunderer
Excellent job on the G5 cab interior mate, if you have any more shots of the "Buck" I would like some copies if poss.
Here's some shots of the E4 which may, or may not help, incase any of the fittings are similar. :scratch:
You can see the entry points of the handrails and the operating handle for the valves. 
ATB, Col
 

Attachments

  • Suffolk trip & E4 Aug.09 024.JPG
    Suffolk trip & E4 Aug.09 024.JPG
    1.2 MB · Views: 29
  • Suffolk trip & E4 Aug.09 063.JPG
    Suffolk trip & E4 Aug.09 063.JPG
    1 MB · Views: 31

7mmMick

Western Thunderer
Thanks for the help everyone, it's much appreciated.

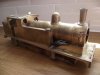
Cheers Rob, all the pipework runs to the floor will have the cut ends hidden by a planked floor as per the prototype. I intend to make this from plasticard so that i'm able to texture the planks to look convincing.

Adrian,
I figure that the more I press gang them now the easier it wil be when they're older. My eldest son who is three already says ' when I'm a big boy I can build trains with you daddy '  :thumbs: :)).

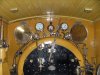
The blower valve location makes sense now you describe it as it's designed to create draft from the smoke box and NE engines have that valve fitting at the end of the handrail on the firemans side, I feel stupid for not putting two and two together  :headbang: 
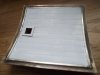
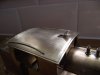
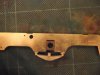
I'll borrow the idea for the cab roof as well if thats ok as the kit supplies some plates to secure it which I don't like. I've got some 1mm brass strip or some 1mm square bar :scratch:. Looking at the E4 the bar looks more appropriate but like you say I may have issues around the spectacles, what would you advise ?

Col,

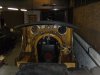
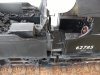
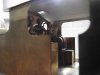
I took about 60 photos of the J69 and got some really funny looks as I was poking my head between the frames and laying on the floor. They've moved it since I was last there to in front of the big window and put benchs around it, so plenty of issues trying to take photos !! Peter asked that I try and obtain measurments of the valve gear but this would have really got me in bother  :)) I have another visit planned later in the year to the search engine to obtain drawings for the A7 build I talked to you about using the pantograph miller so i thought I could look up drawings for the J69 then? I'll give Peter a ring and discuss it with him. Also I'll burn a disc or two with all the imaages on mate and get one to you if that helps?

ATB Mick

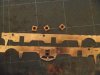
PS is it common for GE engines to have the inside of frames and motion painted yellow??
 

Eastsidepilot

Western Thunderer
Mick,
It seems that the GER painted the insides a pale yellow/buff colour, but I think you will find that later in LNER times and even BR they would have been red. Photo's on a disc would be great, thanks mate.
If your doing a J17 later I'll stick what info I have on disc for you.
As you say, there might be issues around the windows especially as the're hinged but I'm sure you'll work round it.
I'll put the smoke box door ring in the post Monday, can you email your address to me.
One thing that did cross my mind was painting, especially the back head, I have found that it's easier to paint it first and then fit all the fittings, then its just a case of touching up.
With the floors I have often made a sub-base, either brass or plastic, and used 4mm scale thin ply sleeper strip for the floor boards stained with thin out matt black paint, looks quite effective.At the risk of hi-jacking your thread :)) ;D here's the( E4 Pic for example)
ATB, Col   
 

Attachments

  • E4 and Snow 012.JPG
    E4 and Snow 012.JPG
    964.2 KB · Views: 35

7mmMick

Western Thunderer
Thanks for the tips about the timber floor Col, i'll borrow that idea if thats ok as it does look really good and exactly what I hope to acheive. As for the painting there's a good chance i've shot myself in the foot by fixing things at this point, it had crossed my mind when fitting the parts. I think next time i'll adopt your approach and save the painting headache i've got to come  :headbang: :headbang: :)). I'll bob a quick email off with my address mate,

Cheers Mick 
 

Scale7JB

Western Thunderer
Looking really nice mate... Is that the LG backhead? If so, I'm glad you did yours first as there we're a few fittings i couldn't recognise in the kit..

Would I be right in thinking the damper levers would be in the floor to the left, just behind the backhead ?

Be nice to get back onto it soon !! Bit of work at the moment..  :headbang:

JB.
 

7mmMick

Western Thunderer
Hi JB,

Hope Canada went well, from what i've read it did  :thumbs: The Backhead is LG and like all his things it's very good. There are different fittings in the kit depending on which period and loco you're modelling, I managed to get a picture of a G5 cab interior on the scrap line at Darlington and have tried to copy that. It's not a very good one but it's better than nowt !! I think you're right about the dampers, they're usually in that area as would be on the firemans side as it's his job to control them. I'm going to make a start on the frames soon, are you any further forward with your frames as I'm waiting to see how you get on  :thumbs:

ATB Mick
 

7mmMick

Western Thunderer
The good news is i've got a part of the G5 finished  :thumbs:The bad news is it's only the cab roof. Here's a picture of the roof fitted along with the smoke box ring from Col and a few other bits,

[attachimg=1]

I've made the roof vent open but it doesn't work so the sun will always be shining on my layout  :))

[attachimg=2]

I've also used the method that adrian described to make the roof removeable. the brass strip is 1mm strip and works as he described to clip the roof into place. I used some 5 thou plasticard to represent the timber roof when viewed from platform level.

[attachimg=3]

[attachimg=4]

And finally i'd like to add that the bottom sheet of the roof is a new peice of 10thou brass fashioned for scratch builing and other good reasons but the truth is I made a right balls of rolling the one that came with the kit  :headbang: :headbang: :))

[attachimg=5]

Another update soon I hope,

ATB Mick
 

Attachments

  • 2011_0706G5cabroof0025.JPG
    2011_0706G5cabroof0025.JPG
    154.8 KB · Views: 101
  • 2011_0706G5cabroof0024.JPG
    2011_0706G5cabroof0024.JPG
    106 KB · Views: 104
  • 2011_0706G5cabroof0022.JPG
    2011_0706G5cabroof0022.JPG
    106.7 KB · Views: 102
  • 2011_0706G5cabroof0021.JPG
    2011_0706G5cabroof0021.JPG
    94 KB · Views: 104
  • 2011_0706G5cabroof0020.JPG
    2011_0706G5cabroof0020.JPG
    154.5 KB · Views: 110

Scale7JB

Western Thunderer
Thats really flying along now mate !! Looking very impressive..

Unfortunately I still haven't had a chance to look at the G5 frames again... But as soon as I do...  :))

JB.
 

Eastsidepilot

Western Thunderer
Excellent work Mick, Like the roof detail :thumbs:, not many bother to model the underside which on wooden roofs is worth doing.

ATB, Col.
 

7mmMick

Western Thunderer
Thanks Col, i'm hoping you're going to keep me on the right track painting it to look the part :thumbs:

JB, I'm saving that job for another day, the driver's side was such a pain in the backside that i'm putting the fireman's side off for a bit  :headbang: :))
 

micknich2003

Western Thunderer
Mick, a nice bit of work. I pressume you will finish it as a Botanic engine for working on your proposed layout. The finished job will look very nice with two or three ex NE coaches passing the timber stacking grounds. Mick.
 

7mmMick

Western Thunderer
micknich2003 said:
Mick, a nice bit of work. I pressume you will finish it as a Botanic engine for working on your proposed layout. The finished job will look very nice with two or three ex NE coaches passing the timber stacking grounds. Mick.

You've guessed right mate, this G5 will be 67337 in lined black and early BR crest. And it will have a 53B on the smoke box door. The coaches will come later, probably two as I have the drawing from the NRM of the push pull set with all the relevant controls and this only shows two coaches. The idea is to have the driver in the coach end and have them as a permenant set on the layout.

ATB Mick
 

7mmMick

Western Thunderer
A request for a quick bit of advice please  :thumbs: I've done away with the idea of using the fourtrack hornblocks and knocked these up by using some Slaters horn blocks, hopefully giving me maximum room. I cut them down and then made a guide from N/S and brass strip. The end result is that the horn block is 2mm deep on the inside of the frames and in line with the frames on the outside. Will this give me enough room to squeeze in the inside motion??

[attachimg=1]

[attachimg=2]

[attachimg=3]

Also i'm not happy with the white metal springs, I'm using the JB method to retain the hornblock but they seem a bit flimsey to me and there a bit bent as well. I have some LG brass ones which i may use instead  :scratch: thanks in advance for the tips

ATB Mick
 

Attachments

  • 2011_0719FramesG50002.JPG
    2011_0719FramesG50002.JPG
    172.2 KB · Views: 162
  • 2011_0719FramesG50003.JPG
    2011_0719FramesG50003.JPG
    108.7 KB · Views: 161
  • 2011_0719FramesG50004.JPG
    2011_0719FramesG50004.JPG
    195.6 KB · Views: 161

Scale7JB

Western Thunderer
I reckon you should be fine with a little jiggery pokery if it comes to that..

I filed mine right down with a big rough cut file (bloody hurts when it slides off the piece you are working on, onto you fingers) so that they were pretty narrow, but still enough meat to do the job..

JB.
 

7mmMick

Western Thunderer
Cheers Mick, i'll be accross a week on Sunday no doubt to crack on with the J73.

Scale7JB said:
A machine? That's cheating..  ;) :))

JB.

I'm lucky that Mick's workshop is short of nothing and I get chance to use it, only thing is his pilar drill bits a bit harder than a file  :shit: :)) :))

ATB Mick
 

Steph Dale

Western Thunderer
7mmMick said:
A request for a quick bit of advice please  :thumbs: I've done away with the idea of using the fourtrack hornblocks and knocked these up by using some Slaters horn blocks, hopefully giving me maximum room. I cut them down and then made a guide from N/S and brass strip. The end result is that the horn block is 2mm deep on the inside of the frames and in line with the frames on the outside. Will this give me enough room to squeeze in the inside motion??

Mick,

I think you'll be fine.  I thin Martin Finney hornblocks down to 2mm deep to use with beam compensation and working inside valvegear in 'Finescale', so you should be okay.

I can't remember your intentions as to valvegear (etc.) but you should certainly have enough clearance.  Here's a couple of gratuitous shots of my 2251 chassis in it's current state:
index.php
index.php


If it'll help I can check some of the other dimensions for you when I get home this evening - it may confirm what sort of clearances are there.

Steph
 
Top