AdamF
Western Thunderer
Some more paintwork this weekend.
Having primed the wheels, it was time to apply the Indian Red to the spokes. For this, the equivalent colour I had found is a GW acrylic called Mechrite Red. The paint is very thick so I wanted to test how GW acrylics spray. Over to another colour (Calthan Brown) to test. To get a decent consistency, I mixed it 50/50 with Vallejo airbrush thinners and added a couple of drops of Vallejo drying retarder. Spraying it at about 25psi, it came out of the brush very well indeed (ignore the green for now, we'll come back to that )
)

Looks a pretty good representation of LBSCR brown! (Maybe... )
)
So, having established that GW acrylics spray well, I mixed up the Mechrite Red and test sprayed a primed piece of spare etch (again, we'll come back to the green!):

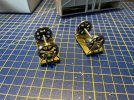
Once again, the paint sprayed very well, so I moved on to the wheels, spraying them by quarter-turns. Having removed the masking, I was pretty happy with the result:


There are a couple of takeaways:
1) Using a maskol fluid can leave a pretty unstable edge to the paint which is supposed to stay behind when it is peeled away. I suspect that the cure for this is to ensure a well cleaned surface for the paint to key into, otherwise there is a danger that lifting the maskol can lift the remaining paint as well.
2) Don't forget to paint the axle ends and fixing nuts (I have ). They will have to be painted at the same time as I spray the outer frames and the valances etc. otherwise I will waste paint mixed a sufficient amount to spay. Hand painting is the other option, I guess...
With the wheels finished, I started thinking about spraying the body of the loco and testing the Lifecolor BR Standard Green I have lined up for the job. I think the match is pretty good, as I think shows in this pic of a (harlequin-esque) chassis test spray piece

But I found the Lifecolor acrylic difficult to calibrate. I think I overthinned this batch - the paint is already quite thin in the pot and I am wondering whether it is best sprayed neat, or the pressure turned up for this paint. I didn't feel the same level of control which I had with the GW paints and ended up with a sort of orange peel effect but which did not feel as if it was caused by quick drying

Next test, I think I will try a higher pressure to try and get more atomisation. Has anyone used Lifecolor acrylics and got any tips which have worked for them? I think it is great paint and has a good finish to it so I am keen to learn how to use it.
More soon. (How am I going to line all of this?? )
)
A
Having primed the wheels, it was time to apply the Indian Red to the spokes. For this, the equivalent colour I had found is a GW acrylic called Mechrite Red. The paint is very thick so I wanted to test how GW acrylics spray. Over to another colour (Calthan Brown) to test. To get a decent consistency, I mixed it 50/50 with Vallejo airbrush thinners and added a couple of drops of Vallejo drying retarder. Spraying it at about 25psi, it came out of the brush very well indeed (ignore the green for now, we'll come back to that
 )
)
Looks a pretty good representation of LBSCR brown! (Maybe...
 )
)So, having established that GW acrylics spray well, I mixed up the Mechrite Red and test sprayed a primed piece of spare etch (again, we'll come back to the green!):

Once again, the paint sprayed very well, so I moved on to the wheels, spraying them by quarter-turns. Having removed the masking, I was pretty happy with the result:


There are a couple of takeaways:
1) Using a maskol fluid can leave a pretty unstable edge to the paint which is supposed to stay behind when it is peeled away. I suspect that the cure for this is to ensure a well cleaned surface for the paint to key into, otherwise there is a danger that lifting the maskol can lift the remaining paint as well.
2) Don't forget to paint the axle ends and fixing nuts (I have
 ). They will have to be painted at the same time as I spray the outer frames and the valances etc. otherwise I will waste paint mixed a sufficient amount to spay. Hand painting is the other option, I guess...
With the wheels finished, I started thinking about spraying the body of the loco and testing the Lifecolor BR Standard Green I have lined up for the job. I think the match is pretty good, as I think shows in this pic of a (harlequin-esque) chassis test spray piece

But I found the Lifecolor acrylic difficult to calibrate. I think I overthinned this batch - the paint is already quite thin in the pot and I am wondering whether it is best sprayed neat, or the pressure turned up for this paint. I didn't feel the same level of control which I had with the GW paints and ended up with a sort of orange peel effect but which did not feel as if it was caused by quick drying

Next test, I think I will try a higher pressure to try and get more atomisation. Has anyone used Lifecolor acrylics and got any tips which have worked for them? I think it is great paint and has a good finish to it so I am keen to learn how to use it.
More soon. (How am I going to line all of this??
 )
)A


