Bow Creek Wharf. c.1946. S7

Eastsidepilot

Western Thunderer
Hi Col. I missed your post above questioning the SB position. Did you resolve that one?
Hi Chris,
In a way I did, I didn't really get any feed back on the question but I have at the moment gone for a central position between the station throat , dock junction and the level crossing which you'll see on the above plan. I have tentatively drawn in a crossing keepers hut as the crossing is only there for the engineering works during working hours, I'm assuming that the crossing keeper would be in contact by phone ?
 

Eastsidepilot

Western Thunderer
Continuing with an explanation of the plan at post #360 looking at the far right you will see two trapezoidal shaped baseboards with no scenery, these are right in front of the entrance door so these will be a movable unit with one hinged to fold back over the top of the other built not unlike a tall tea trolley with casters. I'll use some form of clip to hold them to the fixed baseboards. They will only be used when running the continues circuit as the layout is operated as end to end.
This movable board can be stowed away to one side when not in use. Looking at the junction station , lower right the idea is that trains can terminate here and be ran round or loco's exchanged but can also continue round behind the terminus and be shunted into the cassette top right corner. Alternatively they run straight into the cassettes ( Stratford and rest of the system) for a change of stock lower right corner on the plan.
This idea fitted the layout design better than say having storage road sidings which I didn't really need.
The branch service is non-corridor suburban stock, 3-car off peak and 5-car at peak times. LNER F4 and 5's will operate this service with Westinghouse fitted J69's occasionally standing in for emergency cover.
The parcels will be in the hands of a V1 2-6-2 and alternatively a D15 4-4-0.
Goods will be in the hands of any number of J tanks 66, 67, 68 or 69's, J15 and 17's. The yard pilot will be a J66 or J69. The wharf shunter will be a Hill 0-4-0t being helped occasionally by a Sentinel 0-4-0.
On the LMS side with running powers on the line to their dock would be 3F 0-6-0t & 4F's, N. London 'Park' 0-6-0t and L.T&S.R. 0-6-2t.
There are other scenario's that could be modelled such as P.W trains, weed killing etc.

The first job though is to work out shape and size of baseboards, as it's not going to be ( couldn't be) an exhibition layout these can be quite large to a certain extent.
 
Last edited:

Eastsidepilot

Western Thunderer
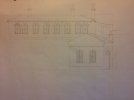
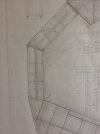
I mentioned in post #360 that the junction station buildings are based loosely on Bethnal Green, from what little photo's I've managed to source, certainly no drawings or plans, I have drawn up my version albeit a mirror image to fit the layout situation.

IMG_0212.JPG
The beginnings of the front elevation, drawn to 7mm/ft. after a lot of blowing up images and brick counting plus some knowledge of building practice.

Col.
 

Eastsidepilot

Western Thunderer
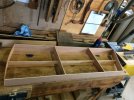
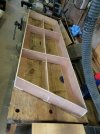
Well after 13 years from the original concept I find myself in the position of actually building the first baseboard :D. Although it is mainly a test piece to prove the basic construction method I would like to use for all the boards I have built it to the dimensions and shape to one of two non scenic boards.
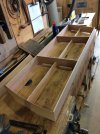
This will form a type of swing bridge to allow access to the entrance door. It will be hinged at one end and have a support leg and castor to allow it to swivel around to meet the second non scenic board which itself will be mounted on a 'tea trolley' type support on castors. The idea being that I can wheel the two boards out of the way when bringing large items such as timber etc.
The plan below ( a section of my main baseboard plan currently on the drawing board ) should be self evident. The dotted outline showing the stowed position. To the left is the end wall and the faint arc of the door, enough to allow initial access.
Dimension of this board is approx. 1100 mm x 350 mm

IMG_0281.JPG

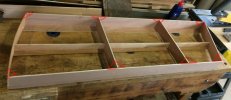
Wanting to save on cost and at the same time make it as light as possible I have used some 5mm ply that I had in the rack. The basic design is an inverted 'T' section rail, the pieces housed together,( I used the router for this work ), fitted lengthwise down the centre and 'L' sections ( also housed together) used on the outer frame. Cross members fitted at the ends and centres are slotted on the centre 'T' rail and sit in the outer angles. The whole lot is glued and pinned, in this case panel pins as my electric nail gun, which is ideal for this sort of work, is down at the Love Lane base.

IMG_0277.JPG

The curved end is a piece 3mm ply to allow it to flex.
This board will support a double line of curved and elevated track on a slight gradient, ply supports for this can be easily fitted in between the frame work of this board where required. Once that is built I could skin the top of the board with 3mm ply, this will help to strengthen the frame of the baseboard.
IMG_0278.JPG

IMG_0279.JPG

Before the glue has a chance to go off I have weighed the board down on the bench, which is perfectly level.

IMG_0280.JPG

I'd like to use this construction method for the large scenic boards, on these I'd use two 'T' rails for the extra width as some are a metre deep and odd shapes. I'm of a mind to use 6mm ply for main construction and skin the tops with 3mm ply and build the track work on 3mm MDF or ply bases which can be raised to different levels where needed, the ground, buildings, roadways and other features can be added in separate jigsaw fashion, fixed from underneath, which will eliminate board joints running through the scenic sections.

Col.
 

Yorkshire Dave

Western Thunderer
This board will support a double line of curved and elevated track on a slight gradient, ply supports for this can be easily fitted in between the frame work of this board where required. Once that is built I could skin the top of the board with 3mm ply, this will help to strengthen the frame of the baseboard.

Rather than skin the entire board (and boards) I'd just add 3mm ply triangular plates, whether cut in or on top, to add strength to the frame with minimum weight.

dhy16pkr.jpg
 

SimonT

Western Thunderer
Best you crack on then!:p

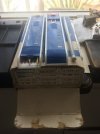
Very envious that you still have one of the Faber clutch pencils. I bought mine when I was 15 and it fell apart last year after fifty years use; I probably got my money out of that one. I am now searching to see if they are still available.
 

simond

Western Thunderer
Best you crack on then!:p

Very envious that you still have one of the Faber clutch pencils. I bought mine when I was 15 and it fell apart last year after fifty years use; I probably got my money out of that one. I am now searching to see if they are still available.
They’re brilliant for putting 10 or 12BA nuts onto screws. Might work for 14, don’t know, don't recall trying.

boot fairs…
 

SimonT

Western Thunderer
New pencil on the way from Pencils4Artists. Dreadful name. Hope I get another fifty years out of this one...... God what am I saying, fifty more years of lying, cheating politicians (Of all flavours, obs)
 

Eastsidepilot

Western Thunderer
Best you crack on then!:p

Very envious that you still have one of the Faber clutch pencils. I bought mine when I was 15 and it fell apart last year after fifty years use; I probably got my money out of that one. I am now searching to see if they are still available.
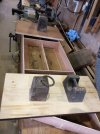
Mine is about 50 years old, never been with out it, picked up a load of leads including colours at a boot sale some years back for a nicker.

IMG_0285.JPG
Col.
 
Last edited:

SimonT

Western Thunderer
The plastic of mine went brittle and than fell apart. I hope that the sharpener is still in the top but they now sell a sharpener specially for these pencils. Another solution looking for a problem?
 
Top