Dan Randall
Western Thunderer
Sunday, 23rd February 2025
I don’t seem to have posted much in the way of workbench activity for several years, most likely, because I’ve been flitting between umpteen assorted (and unfinished!), projects with very little to show, or messing around with CAD and 3D printing.
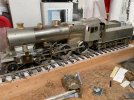
However, I’ve been building an MOK Ivatt 4MT 2-6-0 on and off for about the past four years and it’s been sitting there on my workbench all that time, gathering dust. This is the current state of play….

About two or three months ago, I did actually crack on with the running plate assemblies and fire-iron tunnel, before other projects got in the way again….

Before these can be fitted though, I need to join the smokebox/boiler to the firebox and fit the boiler bands, washout plugs etc. Last night, I thought I’d take a look at getting the chimney fitted to the smokebox. However, the hole in the smokebox was much smaller than the internal diameter of the chimney, which would have looked a bit naff when looking down from above.
Therefore, I enlarged the hole in the smokebox with this fellow, until it was a fraction smaller than the hole in the chimney….

A side effect of this, was a raised burr around the edge of the hole, both inside and out. The inside burr was quite minimal and was removed by sticking a small square of abrasive paper to my middle fingertip with double-sided tape and rubbing vigorously inside the smokebox.
The outside was trickier though, as I didn’t want to use a file and potentially form a series of flats on the surface and I certainly didn’t want to accidentally remove any rivet detail. The burr can be seen here as a whitish outline (with apologies for the smaller pictures - they were taken on my phone and Bluetoothed to my iPad, but seem to have passed through a shrink-ray en route!)….

I decided to design a tool with a concave surface (the same diameter as the outside of the smokebox, but allowing for the thickness of some abrasive paper and double-sided tape), knocked up a quick drawing of said tool in Fusion 360, then put the 3D printer to work….

As you can see, I also designed a tool for the inside of the smokebox, with a central spigot to accurately locate the chimney for gluing or soldering.
I printed two of each tool, in case something went Pete Tong, but only needed to use one set in the end. However, I did cut the sanding tool I was using in half, as in its full width mode, it was getting too close to some rivet detail for my liking! The serrated edge gives a nice grip, when pushing to and fro….

Much better, especially after a bit of buffing with some Brasso wadding….

Here’s the internal print, doing its job….


I never got round to attaching the chimney yesterday, but the plan is to clamp it in place over the spigot with a toolmaker’s clamp with a suitable compression spring between (that will fit snugly over the rim), forcing it downwards onto the smokebox whilst the Araldite sets, or the solder melts - I haven’t decided which method I’ll go for yet, but most likely, the latter.")
That’s all for now - happy modelling!
Regards
Dan
I don’t seem to have posted much in the way of workbench activity for several years, most likely, because I’ve been flitting between umpteen assorted (and unfinished!), projects with very little to show, or messing around with CAD and 3D printing.
However, I’ve been building an MOK Ivatt 4MT 2-6-0 on and off for about the past four years and it’s been sitting there on my workbench all that time, gathering dust. This is the current state of play….
About two or three months ago, I did actually crack on with the running plate assemblies and fire-iron tunnel, before other projects got in the way again….
Before these can be fitted though, I need to join the smokebox/boiler to the firebox and fit the boiler bands, washout plugs etc. Last night, I thought I’d take a look at getting the chimney fitted to the smokebox. However, the hole in the smokebox was much smaller than the internal diameter of the chimney, which would have looked a bit naff when looking down from above.
Therefore, I enlarged the hole in the smokebox with this fellow, until it was a fraction smaller than the hole in the chimney….
A side effect of this, was a raised burr around the edge of the hole, both inside and out. The inside burr was quite minimal and was removed by sticking a small square of abrasive paper to my middle fingertip with double-sided tape and rubbing vigorously inside the smokebox.
The outside was trickier though, as I didn’t want to use a file and potentially form a series of flats on the surface and I certainly didn’t want to accidentally remove any rivet detail. The burr can be seen here as a whitish outline (with apologies for the smaller pictures - they were taken on my phone and Bluetoothed to my iPad, but seem to have passed through a shrink-ray en route!)….
I decided to design a tool with a concave surface (the same diameter as the outside of the smokebox, but allowing for the thickness of some abrasive paper and double-sided tape), knocked up a quick drawing of said tool in Fusion 360, then put the 3D printer to work….
As you can see, I also designed a tool for the inside of the smokebox, with a central spigot to accurately locate the chimney for gluing or soldering.
I printed two of each tool, in case something went Pete Tong, but only needed to use one set in the end. However, I did cut the sanding tool I was using in half, as in its full width mode, it was getting too close to some rivet detail for my liking! The serrated edge gives a nice grip, when pushing to and fro….
Much better, especially after a bit of buffing with some Brasso wadding….
Here’s the internal print, doing its job….
I never got round to attaching the chimney yesterday, but the plan is to clamp it in place over the spigot with a toolmaker’s clamp with a suitable compression spring between (that will fit snugly over the rim), forcing it downwards onto the smokebox whilst the Araldite sets, or the solder melts - I haven’t decided which method I’ll go for yet, but most likely, the latter.
That’s all for now - happy modelling!
Regards
Dan