Lyndhurstman

Western Thunderer
I recall reading something about this type of continuous check rail on the late Peter Johnson’s Canada Street (the later layout bearing the name), but I could be wrong?

Jon
Hi Jon,
Yes... A lot of "inset" trackwork had a finer 'check rail' ( https://bristolharbourrailway.co.uk.../01/95e2c558-1184-4d84-bb8d-69b4ea15a030.jpeg ) whilst some seems to have had none at all ( ). I've gone with the 'heavy stuff' partially to acknowledge the intense building effort that went on across the river at Rotherhithe during the later war years - they prepared the concrete caissons for the Mulberry harbour at Arromanche (Mulberry Harbours at Rotherhithe's South Dock in the Second World War).

Cheers

Jan
 

jonte

Western Thunderer
Hi Jon,
Yes... A lot of "inset" trackwork had a finer 'check rail' ( https://bristolharbourrailway.co.uk.../01/95e2c558-1184-4d84-bb8d-69b4ea15a030.jpeg ) whilst some seems to have had none at all ( ). I've gone with the 'heavy stuff' partially to acknowledge the intense building effort that went on across the river at Rotherhithe during the later war years - they prepared the concrete caissons for the Mulberry harbour at Arromanche (Mulberry Harbours at Rotherhithe's South Dock in the Second World War).

Cheers

Jan

All looks well to my beady, Jan :thumbs:

Jon
 

Lyndhurstman

Western Thunderer
Buses, and their synchronised arrival
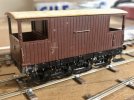
Whilst titivating the 48DS yesterday, I happened across this:

IMG_2569.jpeg

... A D&S GNR 8 Wheel Brake. Not sure when I built this - lost in the mists of time.... but it' suffered in the interim; those steps are AWFULLY delicate; i resoldered som last night (what do you mean you can't tell? :D) It's a wonder of Danny's work, and my hamfistedness. I'll have to revist thise handrails (I've improved my skills in that department, at least!). And it's GNR browness, too. Back in the BR EFG...

It's fully compensated, with two 'bogie' plates hosting a pair of W irons. Not much movement in amongst all the gubbins, and the 0.3 mm brass 'stretchers' I've soldered underneath the opposing footboards. It also needs a step at the bottom of the body, so someone can change the sidelamp (also needing adding)...

Still, it was a fun moment in the incessant downpour yesterday afternoon.


Cheers

Jan
 

Lyndhurstman

Western Thunderer
Paint Stripping with Kling Strip
For those unaware (as I was) I’ve been using the above as a replacement for a jar of ModelStrip that had gone hard (a common occurrence, it seems). I found reference to it on another modelling forum.

According to the website (www.stripperspaintremovers.com) Kling Strip paste works - when applied thickly to the surface (1 - 2mm worked for me on both metal and plastic) that gradually dissolves the paint to a water-soluble residue, and - as long as it’s been applied where it needs to go - can be cleaned off by washing down under a tap. There should be no scraping necessary. It comes in a ‘Trial Pack’ and was £7.50 inc. post. If your lucky - unlike me -when it comes to washing down, you’ll remember to put the plug in, which will save you having to take the swan neck off from under the sink to rescue some bits….

I attach two cleaned examples; one whitemetal, the other plastic. Both had the gunk applied for 2 hours. In both cases, the white paste became tinged with yellow, which suggested to me that it was doing its thing (the paste contains Sodium Hydroxide.). Needless to say, I took note of all safety instructions…

This is the link to the safety sheet. IMG_2810.jpeg

Cheers

Jan
 

Attachments

  • Kling-Strip-Usage.pdf
    142.9 KB · Views: 2

jonte

Western Thunderer
Paint Stripping with Kling Strip
For those unaware (as I was) I’ve been using the above as a replacement for a jar of ModelStrip that had gone hard (a common occurrence, it seems). I found reference to it on another modelling forum.

According to the website (www.stripperspaintremovers.com) Kling Strip paste works - when applied thickly to the surface (1 - 2mm worked for me on both metal and plastic) that gradually dissolves the paint to a water-soluble residue, and - as long as it’s been applied where it needs to go - can be cleaned off by washing down under a tap. There should be no scraping necessary. It comes in a ‘Trial Pack’ and was £7.50 inc. post. If your lucky - unlike me -when it comes to washing down, you’ll remember to put the plug in, which will save you having to take the swan neck off from under the sink to rescue some bits….

I attach two cleaned examples; one whitemetal, the other plastic. Both had the gunk applied for 2 hours. In both cases, the white paste became tinged with yellow, which suggested to me that it was doing its thing (the paste contains Sodium Hydroxide.). Needless to say, I took note of all safety instructions…

This is the link to the safety sheet. View attachment 227687

Cheers

Jan
Thanks for sharing, Jan.

Not heard of this product, but did strip paint from an American HO switcher several years ago after leaving it to soak in a closed jar containing a solution of Dettol.

No harm to the surface and came off quite easily with some strokes of a toothbrush, but this sounds the part.

Jon
 

Lyndhurstman

Western Thunderer
Thanks for sharing, Jan.

Not heard of this product, but did strip paint from an American HO switcher several years ago after leaving it to soak in a closed jar containing a solution of Dettol.

No harm to the surface and came off quite easily with some strokes of a toothbrush, but this sounds the part.

Jon
Hi Jon,
Thanks. Yes... I've seen various folk going down the Dettol route. I've not tried it; mostly because I don't have suitably-sized containers for the bigger stuff.... And I was looking for something that was non-impactful within the confines of the house, and this stiff is nasally inert, so I'm happy (all safety considerations met) to use this during the winter, when the garage is too cold to work in. It's easier to apply than ModelStrip (I managed to save enough from the hardened lump that Tad kindly sent me), but will need pushing into all those Important Little Places with a cocktail stick (or similar).

Cheers

Jan
 

Lyndhurstman

Western Thunderer
5 + 0.5 = 21
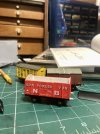
The ex-GWR ABS kit has been reworked. I took it apart and re-glued it, gave it a new floor, and bought it forward 35-odd
years.

It started life as a single-sided two-show 05, but these were reworked to meet the RCH requirements for brake levers both sides, the GWR not bothering to go full Morton, but opting instead for the addition of a single brake on one wheel. It’s an odd arrangement, and one that would have made the wearers prime candidates for the chop. That this one has managed to last as long as it has is more credit to its being forgotten amongst the myriad yards and odd sidings that stretch finger-like down to and beside the Thames.

The body has been Araldited together. Poorly-matching mitres made this a very frustrating assembly. In the end, I assembled the floor and one corner, letting it set overnight before adding its opposite pairing.
IMG_2818.jpeg
The half-brake is from Stores; an old Parkside sprue, suitably trimmed down. The V is D&S. The lever and guard is Craig Welsh, the former trimmed to fit this application. I’ve left the ABS casting on the other side. Hooks are Exactoscale. Links are Kean Maygib. I’d like it to have spoked wheels, but Stores are out at the moment.

The Paint Shop Boys report that conditions are not conducive to painting at the moment, so the bedecking will have to wait for warmer weather.

Cheers

Jan

EDIT: I’ve been made aware that it has grease axleboxes. I’ll plead ignorance in all things GWR, so the shape passed me by…
 
Last edited:

Lyndhurstman

Western Thunderer
Energies - such as they are - have been severely depleted these past few days, and The Will To Do has been overshadowed by Tissue Mountain. But yesterday afternoon, I managed to corral some miasmic mitochondrial motivation into outputting some Craig Welsh Morton bits (lovely etchings) and a D&S brake V-hanger into something resembling GNR practice.
9A2A5F4C-9813-4FF6-8121-F94FAB71C4FA.jpeg
Then, in a spurt of something that wasn’t sneezed out of me (whisper it, it may have been mojo….) I fitted the assembly to the wagon. I had to raise (lower) the brake shoe assembly to get it to line up with the V.
76EFFBA5-5F2E-43E8-B950-9BB3B7884890.jpeg
Once you get your eye in, V’s are a fascinating little micro-hobby in their own right… or is that just me?

Cheers

Jan
 

Lyndhurstman

Western Thunderer
Thanks, @John57sharp. So do I. These came from the Scalefour Society, and Craig thoughtfully added a bending jig (basically a slot shaped as of looking down upon the lever) to the etch. I’ve waxed lyrical about the origami of the accompanying brake lever guards before…As ever, there’s a cross-border conflagration between practicality, survivability, and finesse. The Venn Diagram is skewed toward the latter for me, generally.

Cheers

Jan
 
Last edited:
Top