You are using an out of date browser. It may not display this or other websites correctly.
You should upgrade or use an alternative browser.
You should upgrade or use an alternative browser.
LSWR G6 0-6-0 tank engine
- Thread starter Jon Nazareth
- Start date
Jon Nazareth
Western Thunderer
Thanks, Garry, but one would have thought that they could have come up with something a bit more technical than a cork! 
Jon
Jon
Jon Nazareth
Western Thunderer
Paul
Thank you for the pictures. I have that picture of 257 but when I tried to enlarge it, it just blurred.
Jon
Thank you for the pictures. I have that picture of 257 but when I tried to enlarge it, it just blurred.
Jon
JimG
Western Thunderer
Thanks, Garry, but one would have thought that they could have come up with something a bit more technical than a cork!
I think you would be hard pressed to find an alternate material that would do the job as well as a cork does.
")
Jim.
Dog Star
Western Thunderer
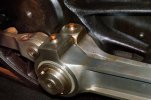
On the GWR... a cork with a piece of split cane down the centre of the cork. The cane was to allow the oil reservoir to "breath" as (a) oil was used and (b) the air in the reservoir expanded (thereby stopping the cork from being blown out of the aperture and oil forced into the bearing).I think you would be hard pressed to find an alternate material that would do the job as well as a cork does.
regards, Graham
Jon Nazareth
Western Thunderer
Dog Star
I've seen out of focus pictures of coupling rods and have noticed something thin sticking out of the top and wondered what it was. Now I know!
Jon
I've seen out of focus pictures of coupling rods and have noticed something thin sticking out of the top and wondered what it was. Now I know!
Jon
Jon Nazareth
Western Thunderer
I soldered the rear spacer plate on the wrong way around and had to make some new holes.
Jon

Jon
Jon Nazareth
Western Thunderer
Nick Baines very kindly lent me his 3D print file for a pair of LSWR whistles. I sent the file at first to Ian Turner who very bravely had a go with his printer but the whistles print wasn't a success. I then sent the file to Ian MacCormac, of this parish, and her kindly printed me off what you see in the picture. I'm sure that you can appreciate that they haven't been cleaned up as yet.
Thank you to both Nick and Ian.
Jon

Thank you to both Nick and Ian.
Jon
Jon Nazareth
Western Thunderer
I haven't started the body as yet but, I was looking at the spectacle plates and wondered how to glaze the holes therein. From the photos that I've looked at, these windows (not sure what they are called) were made opening inwards. Not only that but they were top hung with some sort of catch on the lower edge. The 'windows' that I've turned up are glazed with a microscope slide cut to fit the rebate. When the time comes, I'll most probably glue them in place.

The top three are glazed and have the inner and outer frame fitted together.

In this picture, the glass is laying in the frame rebate on the left and the upstand on the frame on the right will fit into it holding the glass in place. Originally, I had allowed for a glass thickness of 0.016" as that is what the thickness measured at. When I came to actually cut the glass, I realised that when I measured the thickness of the glass, two pieces had stuck themselves together and the real measurement was 0.008". It all turned out okay in the end, though.
Jon
The top three are glazed and have the inner and outer frame fitted together.
In this picture, the glass is laying in the frame rebate on the left and the upstand on the frame on the right will fit into it holding the glass in place. Originally, I had allowed for a glass thickness of 0.016" as that is what the thickness measured at. When I came to actually cut the glass, I realised that when I measured the thickness of the glass, two pieces had stuck themselves together and the real measurement was 0.008". It all turned out okay in the end, though.
Jon
Jon Nazareth
Western Thunderer
I've made a start on the body. I found the soldering a bit of a problem as I hadn't done any for some years but started to get the knack towards the end of the session. I noticed that number 257 has a row of rivets just below the roof line on the spectacle plates and so I've included them on my version. The brass, I decided, was too thick to impress and so I drilled out for 1/32" brass rivets, peened them over on the back and filed off any excess. I did have some 1/16" copper snap head rivets that I had used on enigma but there weren't enough left for this job. I would have ordered some more but couldn't remember where I bought them and couldn't find any o the internet either. I think that I ordered the originals from Reeves 2000 but they weren't listed on their website. A shame as I would have liked to have used them on Jennifer Who when I get a round to her.
Jon

Jon
Jon Nazareth
Western Thunderer
The LSWR fitted a sort of socketed lamp bracket to some of their locomotives and number 257 was one such loco. Nick Baines has made some really nice ones but, then he would wouldn't he.
Mine aren't so good but they will have to do. I have some spare scale brackets that came with a kit and I'm using these as a basis. Onto these I've soldered a piece of brass channel that was made by milling off 26thou from one side of a length of 3/32" square brass tube. It's not very square as can be seen in one of the photos but, I don't think that I've ever seen truly square brass tube. There are three mounted on the frosnt of the smokebox and, I think, five on the rear of the bunker.
Jon
Jon Nazareth
Western Thunderer
I've also noticed that on the roof of 257, there is no downstand around the edge of the roof but there is a drip rail(?) fixed onto the roof just above the cab openings. Some drawings show an handrail on the outside of the rear wall of the cab. The drawing that I have shows this but it also shows the roof having a downstand. I wonder if 257 has the handrail though, Mmm.
Jon
Jon
Jon Nazareth
Western Thunderer
I'm not so sure about these lamp brackets now after thinking about it for a while. They need to be a tad larger and I'm stuck with the size of the existing T style lamp iron. I'll have to give it some more thought.
Jon
Jon
Paul Tomlinson
Western Thunderer
Jon, Nick Dunhill's build of a pair of "02's" (a close relative of the G6) might be of interest? 257 originally had a longitudinal rainstrip (as in the photo you posted earlier) which was replaced by 1922 by the more familiar transverse central stiffener and what I take to be a gutter or downstand around the roof. I've one or two photos (which I'll pm to you) which suggests to me that 257 might've had the handrail added in Southern days..I've also noticed that on the roof of 257, there is no downstand around the edge of the roof but there is a drip rail(?) fixed onto the roof just above the cab openings. Some drawings show an handrail on the outside of the rear wall of the cab. The drawing that I have shows this but it also shows the roof having a downstand. I wonder if 257 has the handrail though, Mmm.
Jon
Nick Dunhill's workshop - LSWR/SR 02 0-4-4T locos from Connoisseur Models kits.
Morning Nick, you had me worried for a while that I'd fitted a hatch to my 30200. Thankfully I haven't but I'm now wondering if the roof itself is wrong as I've fitted the edges and rib. I need to find a shot looking down onto the real loco. Sadly all my reference photos are in my RMweb...
www.westernthunder.co.uk
NickB
Western Thunderer
Jon,
Flattery will get you nowhere (but please don't stop trying)
Concerning cab roofs, photos show that there were changes over the years that are most likely impossible to document. Steam locos, when they went into the works for a "heavy", were dismantled and those parts needing work were moved to the appropriate shop. In some shops they were marked and progress chasers would ensure that they found their way back to the original loco. Crewe and Swindon appeared to be pretty good at that, but I suspect that at Eastleigh, when it came to reassembly, the shop used the nearest part at hand. So many parts were swapped around unwittingly. Hence the warning that if you want an accurate model, you need a dated photograph.
Nick
Jon Nazareth
Western Thunderer
Yesterday afternoon was spent cleaning off the excess solder for the joins inside of the cab, a tedious job. While my mind wandered to other things, I thought about the frames that I had made for the portholes(?) and how I thought that they were too wide. Well, someone else thought the same and so, after mowing the lawn this afternoon, I decided to reduce them. I have a set of soft jaws for one of my 3 jaw chucks and they were still machined up for the frames and, luckily, they managed t grip the small rebates enough for me to reduce the frames without mishap. I managed to reduce the diameter from .900" to .800", any further than that, I think that they would have fallen apart.
Jon

The before and after

I've also managed a bit more on the body including the roof. Looking at this picture, the rain drip looks a bit tall but, I think that it's shadow.
I posted an item for the Questions and Queries section but while here, I may as well ask the same question.
The insides of the frames are stated as being Tan. I have the standard RAL fan but there isn't a colour there that makes me think of Tan. Can anyone suggest a BS colour or even a Halfords rattle can colour, please?
Jon
Jon
The before and after
I've also managed a bit more on the body including the roof. Looking at this picture, the rain drip looks a bit tall but, I think that it's shadow.
I posted an item for the Questions and Queries section but while here, I may as well ask the same question.
The insides of the frames are stated as being Tan. I have the standard RAL fan but there isn't a colour there that makes me think of Tan. Can anyone suggest a BS colour or even a Halfords rattle can colour, please?
Jon
oldravendale
Western Thunderer
From my personal knowledge of the G6 class there were many variants even from new, further complicated by various works' attention. I can't give you chapter and verse but just a word to the already wise - make sure you have a photo of your prototype before you show your model to anyone. There are some people out there in anoraks who know...
Brian
Brian
Have a look at this, may help.
Jon Nazareth
Western Thunderer
GaryHave a look at this, may help.
I did find that on the internet and copied it down. The problem is that I haven’t a clue how to decipher it.
Jon
Yorkshire Dave
Western Thunderer
I did find that on the internet and copied it down. The problem is that I haven’t a clue how to decipher it.
These are HTML colour codes. Just need to find a converter on-line.
In order they are RGB, # HEX, Munsell, CMYK
| Tan Cab, inner frame | 213.164.83 #D5A453 (10YR 6.5/8) 16.35.67.0 | |
| Vermilion | 219.62.49 #DB3E31 (7.5R 4.5/16) 13.75.80.0 |
Using this on-line RGB to RAL Classic converter 213.164.83 - RAL closest match is RAL 1002 Sand Yellow
Using this on-line HEX to RAL Classic converter #D5A453 - RAL closest match is RAL 1017 Saffron Yellow
Using this om-line CMYK to RAL Classic converter 16.35.67.0 - RAL closest match is RAL 1002 Sand Yellow
Edit - this is cross posted with your other thread. And to add: The closest to RAL 1002 and RAL 1017 is British Standard (BS4800) Beige (08-C-33)
Last edited: