Modelling GWR 4-plk opens in 7mm... which kit to choose?

Rob R

Western Thunderer
I think the planks on these wagons are about 2 3/8" thick, certainly going by the LMS drawings I have, I wood imagine the GWR wagons would have been similar. So the ply would need to be 1.4mm.

Col.
Col,
No doubt someone will correct me if I am wrong but I believe you can usually only laser cut from one side, so if you want your planks marking inside and out you need to use two layers.
 

adrian

Flying Squad
Col,
No doubt someone will correct me if I am wrong but I believe you can usually only laser cut from one side, so if you want your planks marking inside and out you need to use two layers.
I'm not entirely sure that is the case anymore. I've not seen any results to confirm accuracy but the latest Emblaser cutters and include a camera alignment combined with the Lightburn software. If my understanding is correct you could etch and cut out from one side then turn over the side and using the camera to align it etch the planking on the reverse side.
 

JimG

Western Thunderer
Col,
No doubt someone will correct me if I am wrong but I believe you can usually only laser cut from one side, so if you want your planks marking inside and out you need to use two layers.

Rob,

I've laser cut and etched from both sides on an Emblaser 1. I've got a guide set up to the 0,0 point on the bed of the Emblaser and I butted the material up to this for repeatable positioning. When doing the drawings you've got to remember that one side is the mirror of the other in the X axis. You've also got to cut the material to an accurate length in the X axis so that when the material is flipped in the x-axis to deal with the second side, everything lines up.

I did this some years ago to produce some S scale open wagon bodies and it worked quite well. But I remember that the main consideration when flipping the material for the second cut was, as well as butting the material into the 0,0 guide, that the material had to be at exactly the same angle along the X axis or you got registration wandering off along the X axis. I think I tried to avoid that problem by making the drawings and material short in the X direction and tall in the Y direction to minimise drift due to any X axis misalignment.

I use Cut2D Laser to produce the files for the Emblaser and I think the latest version can handle both side etching. I haven't had a need to do both side etching since I upgraded to the latest version so I'm not sure how much help it is. But I'll maybe go and have a look now. :)

Jim.
 

Overseer

Western Thunderer
I was hoping to combine Slaters/Cooper Craft bodies with highly accurate etched underframes, I like the sharp moulded detail polystyrene kits provide. However it seems the Slaters/Cooper Craft kit body side strapping is inaccurate, at least on kit 7011 for a Dia. O4, which if used unaltered would for me defeat the object of what is trying to be achieved.
Comparing a kit 7011 side against a sole bar and also measuring with Vernier callipers, it seems the door is undersize width wise resulting in the adjacent strapping and hinges being incorrectly positioned. I first noticed this when attempting to line up a side with a sole bar – they don’t! The inside height appears spot on. The dimensions were checked against GW wagon drawing number 20157.
It is possible to remove the offending moulded strapping and replace it with new, but that would be quite a job.
I think you are right. I don't have a four plank kit handy but the 3 plank kit has side doors 33mm wide instead of 35 plus a bit (for the splay in the door) to match a 5 foot clear doorway. Easy enough to cut each side into four pieces and remove a millimetre from each end of the sides and add a couple of mm to the centre of the door. OK for one or two wagons but doing more would be no fun.

Unsurprisingly, the ABS white metal kit has the doors the correct width and the body length and height correct. I am pretty sure David Parkins does not have any stock of the dia. O5 four plank but does have a few of the broad gauge version (kit O-249) with the same sides, the ends would need to be cut down for standard gauge and the grease axleboxes swapped for OK oil axleboxes.
 

djparkins

Western Thunderer
I think you are right. I don't have a four plank kit handy but the 3 plank kit has side doors 33mm wide instead of 35 plus a bit (for the splay in the door) to match a 5 foot clear doorway. Easy enough to cut each side into four pieces and remove a millimetre from each end of the sides and add a couple of mm to the centre of the door. OK for one or two wagons but doing more would be no fun.

Unsurprisingly, the ABS white metal kit has the doors the correct width and the body length and height correct. I am pretty sure David Parkins does not have any stock of the dia. O5 four plank but does have a few of the broad gauge version (kit O-249) with the same sides, the ends would need to be cut down for standard gauge and the grease axleboxes swapped for OK oil axleboxes.
And of course the 0.5 will return in much upgraded format both top and bottom - but I’m saying no more about this at present. It is, after all only one of over 200 wagon kits to be released/re-released.
 

Tim Giles

Member
Etch looks very good and could be useful for lots of wagons.
What brakes do you use to complete the chassis.
Do you sell these or are they just for your personal use ??
Rgds Keith
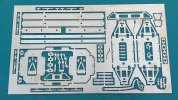
The etches were for my own use, but maybe I could be persuaded to get some more made if there is sufficient interest.
The observant will notice a mistake I made with the artwork leaving the W irons separate instead of half fold lines which is now corrected. So if I ran off some more then I would have the photo tool updated.
As far as the remaining components are concerned I produced springs, brakes and axleboxes on the companies 3D resin printer, a facility no longer available to me as I have left that company. However ABS DC3 brake castings are suitable substitutes as well as spring and axlebox mouldings from the Slaters cattle wagon and Peco Buffer/Coupling Set RO-3.

Diag O4 Lot 423 DC1.jpg
 

djparkins

Western Thunderer
The etches were for my own use, but maybe I could be persuaded to get some more made if there is sufficient interest.
The observant will notice a mistake I made with the artwork leaving the W irons separate instead of half fold lines which is now corrected. So if I ran off some more then I would have the photo tool updated.
As far as the remaining components are concerned I produced springs, brakes and axleboxes on the companies 3D resin printer, a facility no longer available to me as I have left that company. However ABS DC3 brake castings are suitable substitutes as well as spring and axlebox mouldings from the Slaters cattle wagon and Peco Buffer/Coupling Set RO-3.

View attachment 179093
Looks very nice. Only fair to point out that the ABS packs will not be available once existing stocks are sold - see ludicrously low prices on our web site. I never intended keeping them available, other than from the complete sets we inherited.

Such parts will be heavily adapted in the complete wagon kits, when they return. These sets result in too much inventory when coupled with our military ranges, which have priority. In fact we have just melted down around 300 part sets of D/C brake gear. I imagine Adrian kept them intending one day to cast up the missing parts. Life is too short for such shenanigans!
 
Last edited:

AJC

Western Thunderer
I think you are right. I don't have a four plank kit handy but the 3 plank kit has side doors 33mm wide instead of 35 plus a bit (for the splay in the door) to match a 5 foot clear doorway. Easy enough to cut each side into four pieces and remove a millimetre from each end of the sides and add a couple of mm to the centre of the door. OK for one or two wagons but doing more would be no fun.

Unsurprisingly, the ABS white metal kit has the doors the correct width and the body length and height correct. I am pretty sure David Parkins does not have any stock of the dia. O5 four plank but does have a few of the broad gauge version (kit O-249) with the same sides, the ends would need to be cut down for standard gauge and the grease axleboxes swapped for OK oil axleboxes.

The same is true, incidentally, of the 4mm version of the five plank (which is 1mm shy of a scale 5' on the built up version I have knocking around). I'd not have thought to check and now I'll have to do something about it...

Adam
 

NickK

Active Member
The etches were for my own use, but maybe I could be persuaded to get some more made if there is sufficient interest.
The observant will notice a mistake I made with the artwork leaving the W irons separate instead of half fold lines which is now corrected. So if I ran off some more then I would have the photo tool updated.
As far as the remaining components are concerned I produced springs, brakes and axleboxes on the companies 3D resin printer, a facility no longer available to me as I have left that company. However ABS DC3 brake castings are suitable substitutes as well as spring and axlebox mouldings from the Slaters cattle wagon and Peco Buffer/Coupling Set RO-3.

View attachment 179093
I would be interested in three etches if you get round to doing them Tim. I would probably use the brakes, springs and axle boxes from the Coppercraft kit though, just remove the w-irons from the solebars and pare away the springs and axle boxes.

Nick
 

Dog Star

Western Thunderer
My personal choice would be the Coopercraft kit. It is scale size (although I haven't checked the height - 2'7" from bottom of curb rail to top)
Fraser,

Looking at a range of drawings for the 4-plk wagon, dwg. no. 6668 has wood rather than metal for the curb rail and for the end rail. As a result wagons built on osL407 are 2'8 1/2" rather than 2'7" for bottom of curb rail to top of sheeting - those measurements are under the capping strip (which is 3/8" thick).

regards, Graham
 
Last edited:

Overseer

Western Thunderer
Fraser,

Looking at a range of drawings for the 4-plk wagon, dwg. no. 6668 has wood rather than metal for the curb rail and for the end rail. As a result wagons built on osL407 are 2'8 1/2" rather than 2'7" for bottom of curb rail to top oof sheeting - those measurements are under the capping strip (which is 3/8" thick).

regards, Graham
Graham

I quoted the dimensions given on the diagram in A Pictorial Record of Great Western Wagons, 2'4" internal height and 2'7" over curb rail, so 3" thick floor. I don't know enough about variations in these wagons. I presume there were differences as it was an old pre diagram book design which was updated over the years. Would you be able to put together a list of the variations?

I need to buy one of the 4 plank kits to see what needs to be done to it, I bought the 4mm kits when they were first released, I think they were 94p each at the time. Just pulled out the kit instructions for kit 1004 - "About 200 of these 1902 built wagons were produced under various numbers. It was then decided to concentrate on the larger 5 plank O4 Diagram and most general goods open wagons built afterwards were to this latter type. Despite this the O5 is an interesting wagon adding variety to any train, moreover the body parts, in conjunction with the side lever type brake may be used to depict many earlier types."

I do have the 3 plank kit which was used as a fill in wagon on my 1870s Highland layout. It is part way through being converted to grease axleboxes and has been fitted with the original version of Exactoscale sprung w irons, as well as Peco buffers. Not sure why Cooper Craft made the three plank kit as I don't think it matches any real wagon. The number on my one was on a 15'6" long wagon not 16'. This one started out painted red but I repainted it grey so it stood out more against the 'red' Highland Railway wagons on the layout. I think I bought this kit during the W&H Models closing sale in 1994, as I worked nearby.

gw3p2.jpg
gw3p1.jpg

I think the Cooper Craft mouldings look good and worth doing a bit of work to correct the dimensional vagaries.

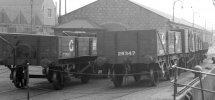
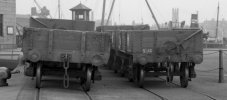
Not sure if you have seen these photos with GW 4 plank wagons at Aberdeen in the 1930s

Aberdeen 1930s gw.jpg
Aberdeen Jamiesons Quay GW.jpg
 

Dog Star

Western Thunderer
I need to buy one of the 4 plank kits to see what needs to be done to it...
Well that is just what Chris Brown (@chrisb) and I are doing at the moment. Today we spent three hours reviewing four GW drawings of the 4-plk open goods wagon, dated 1880s and 1890s, to try to identify variations in the as-built wagons.
"About 200 of these 1902 built wagons were produced under various numbers.
Really? The GWR built more than 25, 000 wagons in the same style of 4-plk wagon from 1880s into 1900s.
Not sure if you have seen these photos with GW 4 plank wagons at Aberdeen in the 1930s.
I have not seen these photos before, thank you. Just the two photos showing low-sided GW open goods wagons? Can these images be added to Chris's photo folder of prototype 4-plks?

regards, Graham
 

Overseer

Western Thunderer
Well that is just what Chris Brown (@chrisb) and I are doing at the moment. Today we spent three hours reviewing four GW drawings of the 4-plk open goods wagon, dated 1880s and 1890s, to try to identify variations in the as-built wagons.

Really? The GWR built more than 25, 000 wagons in the same style of 4-plk wagon from 1880s into 1900s.

I have not seen these photos before, thank you. Just the two photos showing low-sided GW open goods wagons? Can these images be added to Chris's photo folder of prototype 4-plks?

regards, Graham
The photos are crops from photographs in the Aberdeen University Archives Aberdeen Harbour Commissioners Collection - https://abdn.primo.exlibrisgroup.co...INST:44ABE_VU1&collectionId=81151708240005941 . There should be no problem adding them to your files for research purposes, acknowledge Aberdeen University Archives copyright. There are probably more including GW wagons, I haven't specifically looked. The Archives can provide higher resolution copies if you ask them, if needed for publication.
 
Top