You are using an out of date browser. It may not display this or other websites correctly.
You should upgrade or use an alternative browser.
You should upgrade or use an alternative browser.
7mm Scruft's Junction:- Down the Garden path
- Thread starter Dog Star
- Start date
Ressaldar
Western Thunderer
Hi Simon,
I found that Hampshire Models have an Ebay Shop
- Hampshire Models | eBay Stores
and the first item on their 'home page' is Railmatch acrylic paints, I followed the link and checked the colours available, they GWR Light and Dark stone are out of stock. I will contact them to ask for likely restock dates and let the congregation know.
regards
Mike
Ressaldar
Western Thunderer
found the website
hampshiremodels.co.uk
and phone number
01256406604
logged in and there are two options for the Railmatch paints, one is modern and general and the other is Big 4, clicked on that and the GWR light and dark stone are available so ordered some of each, I’ll keep the enamel version in reserve.
cheers
Mike
simond
Western Thunderer
there was/is a series of lists of car paints equivalents to our preferred railway colours.
I wonder if we could create another to link the easily available Warhammer/Games Workshop paints to those we might have use for. My efforts so far have not been conclusive, but my experience with the paints is positive. It would be so handy on occasions to be able to nip into a local shop and pick up what you need, rather than order online. Also Vallejo equivalents.
atb
Simon
Spike
Western Thunderer
Progress over the last few days has been focused on finishing the spraying of the goods shed. I had reached the point of masking the doors for GWR dark stone.
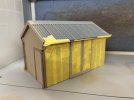
A coating of the dark stone later and the result is rather effective.
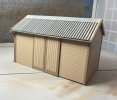
The roof I decided to spray with Citadel air brush paint called Ironbreaker to represent corrugated iron in its fresh form. I will be going on to weather the roof. The paint is perhaps a bit thin and as such does require mutliple coats. Luckily the weather today aided drying. It did not cover very well on the edges, therefore I resorted to normal citadel paint to touch up the patches that were showing the primer.
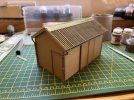
Final job for the moment was painting the gutters by hand, I tried to mask up but gave up and decided by hand was easier. The inside of the gutters has been painted black whilst the outside has been painted in Dark Stone.
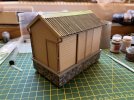
One last step was to put it on the base and step back and look at the finished paint job before weathering.
Regards
Peter

A coating of the dark stone later and the result is rather effective.

The roof I decided to spray with Citadel air brush paint called Ironbreaker to represent corrugated iron in its fresh form. I will be going on to weather the roof. The paint is perhaps a bit thin and as such does require mutliple coats. Luckily the weather today aided drying. It did not cover very well on the edges, therefore I resorted to normal citadel paint to touch up the patches that were showing the primer.

Final job for the moment was painting the gutters by hand, I tried to mask up but gave up and decided by hand was easier. The inside of the gutters has been painted black whilst the outside has been painted in Dark Stone.
One last step was to put it on the base and step back and look at the finished paint job before weathering.

Regards
Peter
Spike
Western Thunderer
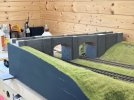
9 Months have passed, whilst updates have not been written, there has been work on the railway. My version of Mierystock bridge is nearing completion. Three boards are setup in the shed currently and have been pain stakingly had their track fixed and then painted, with the sleepers and chairs weathered differently across the three lines to give an impression of track being relayed.
Finally the stone wharf has seen progress and has had its stone work added all round with the flagstones to be added in the coming week once the filler has dried.
Mierystock Bridge
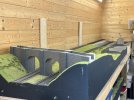
I only have these two photos for the nearly finished bridge, I forgot to document the progress as I went.
The bridge has depron scribed to reflect the stone work, with brick embossed plasticard used to form the underside of the arches. Still to be added are string courses and capping stones along with a paint job.
Trackwork
As mentioned above for the trackwork I have been trying to reflect different ages, the front line past the stone wharf is deemed to be the eldest and the timbers have been weathered using a number of shades of grey and silver. The chairs have also been suitably aged.
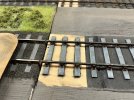
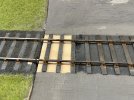
The middle line is not as old and has been drybrushed with a mixture of brown and grey. The chairs are a different GWR style and are weathered to reflect the track has been relied in the past few years. In the photo below I have just started weathering the timbers on the right hand board trying to match them to the left hand section which was weathered about 5+ years ago.
Stone Wharf
My go to material of depron was scribbed to give the stone work effect for the Wharf. A day of madness followed, painting 90% of the stones on the 18 inch by 4 inch piece of Depron, picking out stones one by one. I ended up using about 10 different shades of grey and brown/tan to create the overall effect.
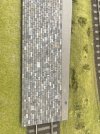
Once happy the Depron was cut to size and fitted to the edges of the stone wharf and trimmed to size.
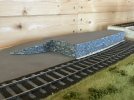
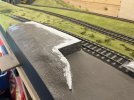
Final step for the weekend was to build up the top surface to match the height of the wharf to give a flat surface for the flagstones to be stuck down.
Regards
Peter
Finally the stone wharf has seen progress and has had its stone work added all round with the flagstones to be added in the coming week once the filler has dried.
Mierystock Bridge
I only have these two photos for the nearly finished bridge, I forgot to document the progress as I went.
The bridge has depron scribed to reflect the stone work, with brick embossed plasticard used to form the underside of the arches. Still to be added are string courses and capping stones along with a paint job.


Trackwork
As mentioned above for the trackwork I have been trying to reflect different ages, the front line past the stone wharf is deemed to be the eldest and the timbers have been weathered using a number of shades of grey and silver. The chairs have also been suitably aged.

The middle line is not as old and has been drybrushed with a mixture of brown and grey. The chairs are a different GWR style and are weathered to reflect the track has been relied in the past few years. In the photo below I have just started weathering the timbers on the right hand board trying to match them to the left hand section which was weathered about 5+ years ago.

Stone Wharf
My go to material of depron was scribbed to give the stone work effect for the Wharf. A day of madness followed, painting 90% of the stones on the 18 inch by 4 inch piece of Depron, picking out stones one by one. I ended up using about 10 different shades of grey and brown/tan to create the overall effect.

Once happy the Depron was cut to size and fitted to the edges of the stone wharf and trimmed to size.

Final step for the weekend was to build up the top surface to match the height of the wharf to give a flat surface for the flagstones to be stuck down.

Regards
Peter
Last edited:
john lewsey
Western Thunderer
Looking good Peter,it's good to see an update on this .
Spike
Western Thunderer
The layout scenics has progressed over the summer:
The Stone Wharf
Caping/edging stones have been added, painted in the same method as the walls.

I have added a mud effect which I experimented with when making the fence test build see post #70.
Re-reading Gordan Gravett's modelling grasslands and landscape detail I decided to have a go at adding static grass to the cracks between the stones. Its still a work in progress but shows promise.

Static Grass and Brambles
Games Workshop sell static grass clumps for use on the minature figure bases, they come in two colours, Straw and green. I wanted to represent a run down siding where the grass is starting to take over.

I have been refreshing the static grass and repair where gaps had appeared. Once complete I moved on to how to represent brambles and overgrowing bushes. I went with Gordon Gravetts method of Postiche for the branches and scatter material. I went with a couple of shades of a light green and a darker green to given a variation in the colours.

Pleased with the results from the first bramble bush I have added more to the first board and below is the result as of this evening. I have added the scatter material to the front bushes, the brown postiche can be seen between the main running lines of track to be finished tomorrow.

To go between the disused track and the station line will be Primo Birch trees to help break up the scene and obsure the view slightly giving the impression of trains running in the forest.
Regards
Peter
The Stone Wharf
Caping/edging stones have been added, painted in the same method as the walls.

I have added a mud effect which I experimented with when making the fence test build see post #70.
Re-reading Gordan Gravett's modelling grasslands and landscape detail I decided to have a go at adding static grass to the cracks between the stones. Its still a work in progress but shows promise.

Static Grass and Brambles
Games Workshop sell static grass clumps for use on the minature figure bases, they come in two colours, Straw and green. I wanted to represent a run down siding where the grass is starting to take over.

I have been refreshing the static grass and repair where gaps had appeared. Once complete I moved on to how to represent brambles and overgrowing bushes. I went with Gordon Gravetts method of Postiche for the branches and scatter material. I went with a couple of shades of a light green and a darker green to given a variation in the colours.

Pleased with the results from the first bramble bush I have added more to the first board and below is the result as of this evening. I have added the scatter material to the front bushes, the brown postiche can be seen between the main running lines of track to be finished tomorrow.

To go between the disused track and the station line will be Primo Birch trees to help break up the scene and obsure the view slightly giving the impression of trains running in the forest.
Regards
Peter
Hi,The layout scenics has progressed over the summer:
The Stone Wharf
Caping/edging stones have been added, painted in the same method as the walls.
View attachment 224445
I have added a mud effect which I experimented with when making the fence test build see post #70.
Re-reading Gordan Gravett's modelling grasslands and landscape detail I decided to have a go at adding static grass to the cracks between the stones. Its still a work in progress but shows promise.
View attachment 224446
Static Grass and Brambles
Games Workshop sell static grass clumps for use on the minature figure bases, they come in two colours, Straw and green. I wanted to represent a run down siding where the grass is starting to take over.
View attachment 224447
I have been refreshing the static grass and repair where gaps had appeared. Once complete I moved on to how to represent brambles and overgrowing bushes. I went with Gordon Gravetts method of Postiche for the branches and scatter material. I went with a couple of shades of a light green and a darker green to given a variation in the colours.
View attachment 224448
Pleased with the results from the first bramble bush I have added more to the first board and below is the result as of this evening. I have added the scatter material to the front bushes, the brown postiche can be seen between the main running lines of track to be finished tomorrow.
View attachment 224449
To go between the disused track and the station line will be Primo Birch trees to help break up the scene and obsure the view slightly giving the impression of trains running in the forest.
Regards
Peter
it's looking very good! One wee comment, if I may. Going by the colours of the grass, the branble bush needs some pinkish white flowers.
Roja
Dog Star
Western Thunderer
I have and much to understand - to start with there are more than 2,000 species of Bramble / Blackberry in this country. Flowers are 5 white or pink petals arranged in a flattish saucer shape: the flowers appear June and July.I need to consult the RHS web site for education on the flowering behaviour of brambles!
Given that our layout is May to early June then if we have flowers then there are not going to be many blooms showing on the tips of the stems.
Time to consult the bible of landscape detailing by Gordon Gravett.
Rgds, Graham
Spike
Western Thunderer
Further progress over the past few weeks has seen the scenics just about finished for boards one and two, still need to "plant" the trees and tidy up some painting under the bridge and by the stone wharf, the black ballast needs toning down as it stands out too much currently.

Fencing
By the bridge I wanted to include a boundry for the railway, using the same method as detailed earlier in this topic post 70, a fence was installed and surrounded by postiche and scatter materials.


Moving on to Board Three
A walking path was required down the side of the centre track to allow workers to get from the station on the fourth board to the goods shed seen below under the bag of static grass. To get to the goods shed the path has to go between the main line and sidings cutting through the grass.

The path was created using gaugemaster gravel or sand, painted using Games Workshop paints, contrast paint which is a mix between a wash and a base paint was used as the base layer in this case a dark grey, followed by drybrushing of different tones of grey, white and brown.

More Games Workshop and Primo clump foliage products have been used at the board edge to give some additional height and interest to what is otherwise a simple mound. The path can just be seen between the grass in the bottom left corner.
Next steps
Is to continue the static grass along the third board and gradually reduce the amount of brambles and weeds as it gets closer to the station. A job I think most people detest is ballasting and unfortunately I need to do some along the incline.
Control Panel
For my 009 layout over the summer I purchased and built Grainge and Hodder Canopy baseboards and was rather impressed with the quality and the fit. When needing to think about control panels for the layout it made sense to see what the company offered and a couple of their split panels were ordered. Changes I have made are to include magnets to hold the right had panel on and a section cut out on the front face to allow for Lenz xpress net panels to be included.

The left hand section will include Scalefour society lever frames that are in the process of being constructed. There is something satisfying with operating the points via a lever frame.

Scruffs Junction is confirmed to be attending the Basingstoke Model Railway show in March, lots to still complete.
Regards
Peter

Fencing
By the bridge I wanted to include a boundry for the railway, using the same method as detailed earlier in this topic post 70, a fence was installed and surrounded by postiche and scatter materials.


Moving on to Board Three
A walking path was required down the side of the centre track to allow workers to get from the station on the fourth board to the goods shed seen below under the bag of static grass. To get to the goods shed the path has to go between the main line and sidings cutting through the grass.

The path was created using gaugemaster gravel or sand, painted using Games Workshop paints, contrast paint which is a mix between a wash and a base paint was used as the base layer in this case a dark grey, followed by drybrushing of different tones of grey, white and brown.

More Games Workshop and Primo clump foliage products have been used at the board edge to give some additional height and interest to what is otherwise a simple mound. The path can just be seen between the grass in the bottom left corner.
Next steps
Is to continue the static grass along the third board and gradually reduce the amount of brambles and weeds as it gets closer to the station. A job I think most people detest is ballasting and unfortunately I need to do some along the incline.
Control Panel
For my 009 layout over the summer I purchased and built Grainge and Hodder Canopy baseboards and was rather impressed with the quality and the fit. When needing to think about control panels for the layout it made sense to see what the company offered and a couple of their split panels were ordered. Changes I have made are to include magnets to hold the right had panel on and a section cut out on the front face to allow for Lenz xpress net panels to be included.

The left hand section will include Scalefour society lever frames that are in the process of being constructed. There is something satisfying with operating the points via a lever frame.

Scruffs Junction is confirmed to be attending the Basingstoke Model Railway show in March, lots to still complete.
Regards
Peter
Spike
Western Thunderer
A month has passed and board 3 is now pretty close to being complete.
Firstly a 4mm greenscenes static grass layer was applied, on the bank at the front a mixture of grass tufts have been applied with tacky glue, the selection used is from Primo and Games Workshop. Static grass is then used to fill in the space around the tufts. The ballasting on the back line has also been completed prior to the static grass being applied.

A bit of a move around in the shed has seen board 1 put away in the racks and board 4 has appeared, this is where the station starts. Static grass has been applied around the tufts in this image and second layer of static grass has started to the left of the goods shed. The base of the shed has been glued to the board using UHU Por. The shed will have magnets added to allow it to be attached when exhibited and stored safely when not running trains.

More postiche and scatter materials again from Greenscenes have been added to the board. I might add more but want to come back to that at a later date once I have the whole layout up for testing and can see the overall impact.

Static grass and tufts have been added around the base of the goods shed to avoid that line where a building meets the ground. Overall rather pleased with this as I was concern it would not hide the line.

The white rectangles sticking up are where I have had to add ballast at the baseboard joints.
I could not resist placing the goods shed on top of the base and seeing how it looked with the added grass.

Up next I have started ballast repair on board 4, couple of holes have appeared over the years and these need fixing. Static grass application has commenced on the front bank, however I ran out of 4mm spring grass, awaiting a delivery next week so after the NEC show on Saturday I will be back in the workshop Sunday to continue and hopefully finish scenic work on this board and the next by the end of November.
Regards
Peter
Firstly a 4mm greenscenes static grass layer was applied, on the bank at the front a mixture of grass tufts have been applied with tacky glue, the selection used is from Primo and Games Workshop. Static grass is then used to fill in the space around the tufts. The ballasting on the back line has also been completed prior to the static grass being applied.

A bit of a move around in the shed has seen board 1 put away in the racks and board 4 has appeared, this is where the station starts. Static grass has been applied around the tufts in this image and second layer of static grass has started to the left of the goods shed. The base of the shed has been glued to the board using UHU Por. The shed will have magnets added to allow it to be attached when exhibited and stored safely when not running trains.

More postiche and scatter materials again from Greenscenes have been added to the board. I might add more but want to come back to that at a later date once I have the whole layout up for testing and can see the overall impact.

Static grass and tufts have been added around the base of the goods shed to avoid that line where a building meets the ground. Overall rather pleased with this as I was concern it would not hide the line.

The white rectangles sticking up are where I have had to add ballast at the baseboard joints.
I could not resist placing the goods shed on top of the base and seeing how it looked with the added grass.

Up next I have started ballast repair on board 4, couple of holes have appeared over the years and these need fixing. Static grass application has commenced on the front bank, however I ran out of 4mm spring grass, awaiting a delivery next week so after the NEC show on Saturday I will be back in the workshop Sunday to continue and hopefully finish scenic work on this board and the next by the end of November.
Regards
Peter
Jordan
Mid-Western Thunderer
Maybe offset the shed to one end so the spouts are over the edge? More drastic answer is to shorten the base a bit?
Maybe Parkend shed could provide some clues.

Maybe Parkend shed could provide some clues.
Now that looks good, and answers a dilemma I've been contemplating - which to glue down first, the static grass via an applicator, or the ready-made tufts.Static grass has been applied around the tufts in this image

Dog Star
Western Thunderer
Jordan,
There is to be no rework before next summer so we are going to live with what we have and shift the shed towards one end. Thereafter we could make another base... or we could take the down pipes over the top edge of the base and into the ground to a mythical soak away.
Our conundrum with this building is that, over time, the number and placement of the down pipes does change - based upon our collection of images courtesy of Ian Pope.
Good that you like our approach to "tufts', there are advantages to this way of working:-
* You can play around with placing the tufts before committing to static grass;
* You can trim the tufts, especially those blades which try to lie flat, before static grass;
* The tufts appear to grow from the ground rather than "sit" on top of the grass.
Rgds, Graham
Last edited:
Jordan
Mid-Western Thunderer
Just looked at Speech Ho. Rd, page 208 & 209 in "F.o.D. Lines Vol 2". Looks like Peter has the shed right, the photos do seem to show a base ledge even from a distance.
Interesting those photos were taken 26th April 1961. In Ben Ashworth's 'Steam in Dean' his photos there (page 30/31) are dated 27th October 1961, & the shed has gone, six months later, and three years before total closure up from Coleford Junction.
Interesting those photos were taken 26th April 1961. In Ben Ashworth's 'Steam in Dean' his photos there (page 30/31) are dated 27th October 1961, & the shed has gone, six months later, and three years before total closure up from Coleford Junction.
