The Chronicles of Canary Sidings - the Tale of an Untidy Workbench

Herb Garden

Western Thunderer
So this has very little to do with anything but I had a day out today to Shildon railway museum and had a chance to see the very recently opened new hall for the first time.

IMG_20240614_122442674_HDR.jpg
Needless to say it's rather swanky.... 6 curated roads which predominantly houses the museums wagon collection, many of which were stored out of sight round the back for the last few years. Appropriately there's a good collection of Shildon built examples.

IMG_20240614_122450784.jpg
This also has allowed some of the items that used to be packed in the centre road in the old hall to be brought out and made more accessible. Like this rather cute sentinel.

IMG_20240614_122826212.jpg
Or even cuter simplex!

IMG_20240614_111727507.jpg
Now there's a bit more space in the main hall you can see this lovely little fireless a bit better

IMG_20240614_110131290_HDR.jpg
And this piece of NER artistry is in the works for a clean up. Maybe in time for the S&D bicentenary next year? Maybe...

IMG_20240614_105215597_HDR.jpg
Couldn't resist!

Normal service will resume shortly with more progress by Great Eastern!
 

Herb Garden

Western Thunderer
A comment on @Dave s scratch building thread prompted me to get a certain old friend to this thread off the shelf.

IMG_20240614_213750262_HDR~2.jpg
It's been some months since we last saw 74 on these pages. And I'm ashamed to say that nothing has changed since the last time.

IMG_20240614_213922709_HDR~2.jpg
The lining still isn't finished. The chimney needs reattaching, the tender needs coupling electrically and mechanically back to the loco and that's before we deal with weathering and DCC fitting
IMG_20240614_214030882~2.jpg
But for those of you who miss all this victoriana from the earlier posts rest assured there is still every intention to continue the 1870s theme and the Mucklemouth layout project. Might just be a bit mixed I with the more modern projects (modern in this case being 1912)

IMG_20240614_213758855_HDR~2.jpg

But I thought you all might like a little reminder of the first character to feature in the chronicles and lets hope I can get her finished soon so she can time travel into the future to run on Skeetsmere
 

Herb Garden

Western Thunderer
So I've been having a bit of a sort out of old photographs and i thought you would all appreciate these images back from 2021

CRW_4457_RJ.JPG
510 back in her 00 gauge days (yes I've only been working in EM for a couple of years). the benefit of these images is they show where I've made modifications to the original Hornby J15 model to convert it to a Y14. i remember a few of you were interested in that conversion.

IMG_2965.JPG

IMG_2968.JPG

as here is 151 before she suffered all those paint experiments. glad she has made it though now

IMG_2969.JPG

IMG_2916.JPG
a few more shots show 510 on Skeetsmere mk2 with its crazy trackwork and steel rails.... why did i think that was a good idea? you can already see the rust starting to take hold.

IMG_2925.JPG
Hanging out with Filby the Muir Hill Tractor, the only loco that could make it down the awful gradient/tight curves to the private siding at the front of the layout. this is probably a good time to tell some of the story behind the Skeetsmere project.

IMG_1098.JPG
the first layout appeared in 2016, Peco code 75 track and a plywood chassis that would survive a bomb blast. it was a revolution in terms of wiring and control for me and the first layout to use MERG C-Bus and DCC. but for East Anglia the track was way to high in terms of the viewed scene. this was to clear the torotoise point motors which were great but huge. operationally it was a bit dull with only a loop and one siding

Skeetsmere and Rushall Concept.jpg
i was persuaded to have a go at building my own track to fit more operational capability into the same space. this plan shows a photo of Skeetsmere mk1 marked up with additions for Mk2

IMG_2828.JPG
and there is is, Skeetmere mk2, on its wall hanging brackets in the small back bedroom, over my WFH desk around the time of the cancelled Christmas 2020. oh how things have moved on and so much for the better! note the steep cruved gradient front left of the viewed scene and the shed which has made its way onto Mk3

IMG_20220112_074756923.jpg
sadly by the end of 2021 the rot, or rather rust was beginning to set in and the track was falling apart. other issues were the fact the layout had two non scenic sections either end so the viewed area was only half the layout length, and the layout chassis weighed a ton. the control system was way too complex as with foolishness I had thought that I would want lights in all the buildings and working animations like opening shed doors. anyway the decision was taken in Jan 22 to scrap Mk2 and move to EM, cos if I could build kits and my own track there was no reason why not.... and the rest is history...
 

Herb Garden

Western Thunderer
and the rest is history...
IMG_20240616_105126099.jpg
And here for comparison is the MK3 layout. Back on its shelf whist I rejig the room. Longer than previous incarnations with a better track plan but still incorporating many of the same design features

IMG_20240615_220156519.jpg
Been cleaning up the blasted track and adding rail spikes over the last day or so. Not exciting but the effect is worth it particularly here on the coal siding at the front of the layout.... Will I go to this effort behind the platform I don't know...
 

Herb Garden

Western Thunderer
Had a family member visit yesterday who has the habit of insisting to inspecting progress then criticising everything in sight....

Her first point was to identify that the base boards were sagging in the middle.... Unfortunately she was right.
IMG_20240616_182206653_HDR.jpg
I pulled the boards apart and added a couple of extra brackets to the wall so each board is supported independently. Incidentally Ive dropped then to the height that the Brockhall and Norwich modules will sit when built just so I can test the eyelines.

IMG_20240616_182319156.jpg
So this allows each board to sit level but when the two boards are pulled together you can see that there is a bigger gap at the top than bottom!

Oh rats!

IMG_20240616_183404008.jpg
When tightened together one board raises off it's mount.... You may have spotted in the previous photo there is a little gap on the corner of the station board where it shouldn't be.

IMG_20240616_185515321.jpg
Turns out the disk supporting the PM dowel was stuck in between boards so the chassis hadn't glued together properly..... Much chiseling of glue later....

IMG_20240617_065429852_HDR.jpg
And we have a pile of railway books pressing the end back in place ... I'm going to wait a while to make sure it's properly cured before I try connecting the two boards again.... Fingers crossed it works
 

Herb Garden

Western Thunderer
After holding my breath for a few days I've got the boards back together

IMG_20240619_210724757.jpg
Although not quite without a dip in the middle it's a lot less obvious so I think it will have to do.
IMG_20240619_210802664.jpg
IMG_20240619_210815812.jpg

Apart from that I've spent most of the week fighting with DHL to get them to deliver a parcel of electrical bits to no avail so work continues on ballasting but not on the electrics where is should be....

IMG_20240619_212438567.jpg
Even so it's a long way before this looks like a scene. But I couldn't help posing 151

IMG_20240619_212425253.jpg
I still can't get over how decent a job I've done on this little beauty... Certainly beyond my expectations of what I thought I would be able to achieve... Very proud of this little loco.

Anyway she needs a home so on with the layout!
 
2024.16 - Skeetsmere - architectural planning

Herb Garden

Western Thunderer
Greetings from Scotland!

IMG_20240627_144834910_HDR.jpg

As is our routine we have packed up and gone on a couple of weeks break exploring the hills, woods and waterways of Argyll.

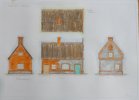
This means that normal modelling has stopped but drawing board in hand I'm able to take some time designing the buildings of skeetsmere.

Now this is just my opinion so feel free to disagree with me, but buildings are a thing you have to scratch build if you want to capture the essence of a place. Railway buildings and some modern ones which are a lot more standard are exempt from this rule but certainly in my home county of Norfolk the vernacular architecture is so specific to a certain part of the county that there is a significant difference between west Norfolk, breckland, broad land, the waveny valley and north Norfolk (not counting other styles in the towns and in-between) that ready to plant buildings or kits ain't going to cut it. Also the trains come and go. But the buildings and scenery is there all the time so even more important to get right. As I said tis my opinion only so ignore me.

All of the non railway structures are taking inspiration from real structures but have been adapted to suit the scene.

IMG_20240628_180625959.jpg
The farmhouse is the first one. Based on the house I grew up in, located in the actual hamlet of Skeetsmere. It has been toned down. The grandeur reduced and later extensions removed. The drawing dates from 2021 and was intended for Skeetsmere MK2. In fact parts have allready been made for the main walls so I'm just resurrecting for MK3

IMG_20240628_180655388.jpg
Next week have the gabled cottages. Based on a booking.com listing of all things but tweaked to suit the waveny valley red brick and knapped flint.

If you travel round Norfolk you will see properties that have been rebuilt in an obviously different material due to damage or expansion and this one typifies that with a LH end very different to the other. To quote the vicar of Dibley series:

"You know what they say: red sky at night, thatched cottage on fire at the other end of the village"

I have minimal draftsmanship training but the pencil and watercolour drawings look lovely and do help me visualise the building and work out the details before I start cutting card.
 

Herb Garden

Western Thunderer
Our annual get away continues the latest adventure being our first visit to the beautiful isle of Gigha.
IMG_20240702_145745567_HDR.jpg
The weather has been so nice that there's been very little time spent indoors at the drawing board but here is the latest building

IMG_20240702_100332054.jpg
The white cottage completes the set of domestic properties on the lane at one end of the layout. Partly inspired by the farm cottages at the real Skeetsmere but mainly based on a series of cottages on railway lane in Starston just up the road. These are unusual as they have Thier backs to the road and are accessed from a private lane on the other side. Also this one had been built atop an existing wall hence the panels of flint construction on either of the two gables. The rest of the building will be whitewashed brick as is vernacular fashion in the waveny valley.

I m now moving on to the mill buildings ..
 

Herb Garden

Western Thunderer
It has been pointed out to me that although Skeetsmere is a Mid Suffolk light railway layout I keep talking about Norfolk. Well the what if premise is that if the MSLR created another of its many proposed branches northwards from Horham in the direction of Harleston on the Waveney Valley line it would pass through the hamlet of Skeetsmere as the last stop before it reached it's destination.

Probably this would be where it would have ranr out of money and didn't get completed as there is a bit of a valley to cross just by Skeetsmere. So hence the awkward terminus at Skeetsmere which was only ever planned to be a wayside station at that. Skeetsmere in in Norfolk (only just... It has an IP post code)

Please note that on MSLR timetables the full station name is Skeetsmere & Rushall. However in a similar vein to Aspall & Thorden and Brockford & Whetheringsett the name board will be reduced to the first of the two destinations....

Anyhoo....

A couple of days of changeable weather have kept us in doors but have allowed for progress on the mill buildings.

Norfolk watermills are a signature feature of the county and anyone interested in the subject I would advise loosing yourself in the Norfolk Mills website..... It's thoroughly interesting.

IMG_20240705_075712042.jpg
The mill for Skeetsmere is based on the mill at Ingworth. Due to the massive size of the thing I've had to draw it as a 3/4 relief building just to get it to fit. I don't like doing this as I now will have to hide the reduced relief end with something but it was that or not fit it in at all.

IMG_20240705_075732948.jpg
The mill is accompanied by a mill cottage for the miller and his family. This one although small has a number interesting features like a Dutch gable so is probably a property's put up and owned by the Rushall estate rather than being privately owned by the miller. We have to assume the ownership of the mill is the same.

Will be back in Newcastle soon so can then bore you senseless with layout wiring .....
 

Herb Garden

Western Thunderer
IMG_20240706_160232882_HDR.jpg
Well I'm finally back home from our Argyll adventures. And on the last day on the way home we spotted the Waverly paddle steamer as it headed down the west Kyle of Bute. Crossing the path of the Bute ferry.... If you zoom in you can see.

IMG_20240708_182307882_HDR~2.jpg
Although getting back into work was hard going a package from the etchers turned up today to be a ray of sunshine ...

Not part of my range of kits but a series of one off scratch aid sheets for mostly 1870s era GER locos.... I say mostly....

So from left to right....

Sheet 1: Parts for Johnson 125 class 2-4-0 and kitson 230 class 0-4-0WT tram loco

Sheet 2: cab for drewery 0-4-0DM, parts for Bromley M12 0-6-0T and parts for Johnson 109 2-4-0.

Sheet 3: chassis for GKN Queen Mary, Chassis for EB Wilson 2-4-0 Jenny Goods, Chassis for Holden D27 2-2-2 and parts for Johnson 0-6-0T 204 class.

Nothing will happen with these as yet but nice to have in stock for a rainy day

IMG_20240708_182333744.jpg
IMG_20240708_182325185.jpg
IMG_20240708_182316118.jpg
The quality of the etching from PPD is as always stunning. These are the first sheets I've done in nickel silver and they are even crisper than brass. Amazing stuff...

I will get on with layout wiring honest.....
 
2024.17 - Skeetsmere - power and control

Herb Garden

Western Thunderer
Ok so the busman's holiday has begun.....

Some of you may be aware that I n my day job as a manufacturing engineer I do a lot of panel wiring and I mean a lot.... So wiring a layout isn't fun it's work! But given that I don't enjoy it as a hobby I can't rush it and have to do it right.... Otherwise I can just hear the tut of disapproval that my colleagues would make if I cut corners....

I find myself bewildered at how we approach electronics in the model railway world.... We buy or make some very delicate equipment then screw it to the underside of the baseboard and hope and pray that it doesn't get damaged.... Also many of us spend time lying under the baseboard wiring above our heads.... If find that hard and I'm 33.... How the matured modeller feels I do not know?

So on Skeetsmere I'm trying an experiment....

IMG_20240614_090422877_HDR.jpg
All electronics including the point actuation will be contained in a single enclosure on each board. These will be linked but a bus cable handling power and coms.

IMG_20240711_063012855.jpg
The enclosure will simply plug in to a few umbilical cables underneath each board so construction can happen off board and the enclosure removed at a later date for servicing.

The servos will be easily charged from the box if failures occur or I could if I so wished build a second box that could be swapped at a show if issues occur.... Maybe that is going too far.... Maybe if I standardised modules on multiple layouts.... Thought for another day

IMG_20240712_185553301.jpg
This is the enclosure for the station board. The servos at the top will link with the wire in tubes under the platform. The section on the right will handle the pulsed 16V AC power distribution (DCC) and frog switching.

The centre section houses the MERG Cbus module and one of the points controllers.

The remaining point controls and level crossing control are housed in the left hand side and are still to be fitted as I need slightly different fixings for these.IMG_20240713_113847896.jpg
So heres progress so far. Most of the 16V AC (orange and blue) is in as is the 12VDC (red and black) supply to the controls. CBus (yellow and purple) is in as is an aux bus (grey and pink). Now it's the control wires to link the CBus module to the servo drivers and relays.

IMG_20240713_113827793.jpgone of the 25 way track power connectors is visible in this view this one is for the +16Vac (or rather the one we think of possitve not that it's says like that for long but you know what I mean). All the connectors are different sizes and types so when installing the box it is impossible to wire it in wrong! Here's to poke one!

Admittedly I'd rather be doing anything but wiring.... But this is at least reasonably satisfying
 

Richard Gawler

Western Thunderer
These enclosures look like a good compromise. They look like one step ahead of how I did my lockdown layout, where I put a couple of relay pcbs onto their own plywood panel.

P1020474.jpeg
The idea behind this "relay mounting panel" was to reduce relay switching noise - I fixed it onto the baseboard with a home-made resilient mounting. Temporary wiring here was to see everything working.

DSCF0982.jpeg
The cable trunking takes wiring for all of the track feeds, including the feeds from the relays ("frogs are green").

DSCF1576.jpeg
Fairly obviously, I wired this layout with the baseboard sitting on its back like this. The idea at the time was, the wiring is so logical and so simple it needs no wiring diagram; the layout itself is the schematic.

Whether this was sensible will come clear when I return to the layout. I overdid the automata and I want to take out all of the Arduinos one day, put the models onto a separate diorama. Still, twenty years ago I wired an N gauge layout using entirely white wires. Every wire carried ident sleeves on each end, and there was a cable runout list on a collosal Excel spreadsheet. It took hours to maintain, so I have gone from one extreme to another.

Good luck with the MERG products, I suspect they will do you better than the COTS stuff I bought into here.
 

Herb Garden

Western Thunderer
Good luck with the MERG products, I suspect they will do you better than the COTS stuff I bought into here.
Well you've done a fine job with the neatness of the underside of that base board. Very impressive.

I've been a MERG member for years and must admit it having a very lovely/hate relationship with the products and literature. In a previous role I was responsible for the design of a fleet of robots and yet I couldn't make head more tail of how to get my PCBs to work together. If I couldn't what hope did someone not electronically literate have.

I am glad to say that things have been changing and the newer generation of products seem a lot better problem is I'm still using up the stash of old boards from earlier incarnations of Skeetsmere
 

Herb Garden

Western Thunderer
More progress on the enclosure
IMG_20240714_171448891.jpg

I'm using 1st gen Cbus and a mix of other products to get the desired functionality. Hopefully on later parts of the Canary Sidings scheme (yes there is a cunning plan) but can use 2nd Gen CBus modules that can handle the servo and relay functions without needing separate PCBs. But in the interests of cost and time better to use existing boards that are constructed and tested. Although the last time they were used was 2021.... Here's hoping they are still ok.

IMG_20240714_220708809.jpg
The switched frog wires are now in (Green). You will also note the use of wire numbers where the circuit or bus cannot be clearly identified by the use of colour alone and the use of ferrules on all non soldered wires. Believe me these are a God send and I would highly recommend using them
 

ovener

Western Thunderer
I do like to see nice neat wiring! Being from an electronics/IT background I have a tendency to over-engineer things and hate to bodge something . Bitter experience shows that it will go wrong later.. I'm retired and for me part of the fun is in designing wiring that is reliable, tidy and servicable. I'm also glad I kept all those old components and parts - it's very satifying to have a lot of what I need to hand. Who knew a 6 position rotary switch from about 1982 would finally be useful! Unfortunately I have very limited space, but the advantage is that my layouts are small enough to easily pick up and work on. Basically shelves and shunting planks with joining sections. I may try and post some pics at some point.
 
Top