You are using an out of date browser. It may not display this or other websites correctly.
You should upgrade or use an alternative browser.
You should upgrade or use an alternative browser.
7mm Pencarrow - Cornish BR(S)
- Thread starter Pencarrow
- Start date
Pencarrow
Western Thunderer
Been a while since my last confession. A reasonable amount of progress on the layout itself despite a loss of mojo in March.
The platform has been formed and the first 3' of platform edging made. The ground has been formed along the front edge of the layout, particularly the sunken section on the 2nd board in from the fiddleyard. I've also started building the old wharf building which will be right at the front edge, right of centre.
A few photos of the area I've been working on together with an early mock up of the wharf building.
7mmMick
Western Thunderer
So, another eagerly awaited installment!
Got bored with the backhead and so moved on. First some destruction, dismantling the parts that made up the fictitious Agenoria cab interior. These will be reused in the correct locations, although some parts will need modifying. I've had to chop the rear axle coil springs in half. Thankfully the casting was way too tall as only one was provided.
View attachment 59450
So that's the pile of bits. Not so obvious (deliberately) are the locating blocks added to the cab floor to help position the cab.
Also now missing are the plates that joined the cab sides at the foot of the entrance. This will allow me to add the flooring and sand box fillers.
Hi Chris,
I know you've been mostly layout building recently but I've just been on holiday to Cornwall and visited the South Devon Railway. I saw this and thought of you.....


Attachments
Pencarrow
Western Thunderer
Hi Mick, my apologies for the tardy response - as you say I've been head down working on the layout, storming along on the track building front.


Next task is a double slip which should be interesting for a novice track builder!
Thank you very much for those photos of the 1366, incredibly useful. Would you mind if I reposted them on my 1366 build thread? They may be very useful to others who tackle a 1366 in the future.
So the order of play going forward is likely to be:
1. Finish laying the track
2. Wire enough of the layout so that it can be used as a test track
3. Finish off my LSWR O2 and the GWR 1366
4. Whatever takes my fancy next!
Unfortunately due to a family event I can't make Telford this year so will miss meeting up with folk.
Many thanks again, much appreciated.
Last edited:
Pencarrow
Western Thunderer
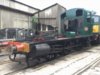
New arrival at Spam Towers:

Sound fitted Minerva 8750. Will be 4666 when plated up.

Along side its smaller brethren.

And the O2.
Sound fitted Minerva 8750. Will be 4666 when plated up.
Along side its smaller brethren.
And the O2.


Pencarrow
Western Thunderer
Looking back through the thread it looks like I didn't record the arrival of yet more GWR RTR back in April 2017, the Lionheart/Dapol B-set:


Seen here with Peter's Ivatt tank.
SR fans shouldn't worry that I've gone over to the dark GWR side though. Other than the Prairie that's on order, all future stock builds should be well and truly SR.
Having stock from the 'other' company does add operational interest and variety to the layout and buying it RTR doesn't steal time from my main area of modelling interest.
Interesting to see how far the track has progressed in 5 months...
Last edited:
Pencarrow
Western Thunderer
Back in the saddle.
It was generally agreed that I had spurious trap point on the clay line, so today it got chopped out.

And replaced it with a rail and a parallel checkrail.

That is the tightest curve on the layout, so a checkrail looks reasonable.
It was generally agreed that I had spurious trap point on the clay line, so today it got chopped out.
And replaced it with a rail and a parallel checkrail.
That is the tightest curve on the layout, so a checkrail looks reasonable.


Pencarrow
Western Thunderer
Further progress last night, probably about 2/3rds done on board 2 now.

Pencarrow
Western Thunderer
A few updates are due I think.
I've been doing a little work alongside the clay siding. Painted and fixed the platform edging:


A trial section of ballasting...


I've been doing a little work alongside the clay siding. Painted and fixed the platform edging:
A trial section of ballasting...
Pencarrow
Western Thunderer
Weathering a couple of vans...


And painting and fitting a Ragstone Models LSWR bufferstop...


And painting and fitting a Ragstone Models LSWR bufferstop...
Pencarrow
Western Thunderer
Question from Dan on another thread about how I did this stonework:

OK, the answer is that it's all a bit trial and error and that I keep going until I get the finish looking about right.
So to start with you have your model wall. I invariably use plasticard and the one above is Wills Coarse Stone which has been abused with files, sandpaper, filler and other sharp objects.
I then give it a coat of Halfords rattle can grey primer. Now, I don't know if this makes a difference but, I generally don't wait for the primer to full dry before overspraying with the base colour coat. For this I have 4 cans (picked up on offer from Hobbycraft about October time):

They are shades of tan (sand), cream (elm), brown (mushroom) and grey (gravel). They were an impulse buy but I like the textured matt finish you can get if breaking every spray rule in the book.
First of all I spray at a distance so that the paint is semi dry when it hits the wall. Then I only give partial patchy coverage to each coat and rotate through using each colour quickly in turn, doing about 3 rotations in total (12 coats in all).
I didn't get a photo of this but here's one of the paper I put down to catch the overspray:

The spraying from a distance means you get a rough textured finish and the use of multiple patchy colours means you get a random colouration. (these are very quick passes with the can, not dumping much paint).
Next I mixed up a thin wash of cream paint and let that run through all the mortar layers. Once that had dried off I turned to using these:

Artists gouache. It's a weird paint as it dries but never really sets and can be reworked by just getting it damp again. I put bits of each colour on a palette and mix up stony colours with the smallest amount of water. Then apply these various colours, almost drybrushed, on to random stones. The aim is to add a bit more colour variation, hints of colour rather than a complete repaint.
Once happy I give it a coat of spray matt varnish so seal the gouache. In this case I gave if another thin wash of the mortar colour. As a final task I treated a few stones to a lick of weathering powder:
I hope that helps. It's not a fixed recipe and I make it up as I go along but using the limited range of colours does mean the results have a family appearance.
OK, the answer is that it's all a bit trial and error and that I keep going until I get the finish looking about right.
So to start with you have your model wall. I invariably use plasticard and the one above is Wills Coarse Stone which has been abused with files, sandpaper, filler and other sharp objects.
I then give it a coat of Halfords rattle can grey primer. Now, I don't know if this makes a difference but, I generally don't wait for the primer to full dry before overspraying with the base colour coat. For this I have 4 cans (picked up on offer from Hobbycraft about October time):
They are shades of tan (sand), cream (elm), brown (mushroom) and grey (gravel). They were an impulse buy but I like the textured matt finish you can get if breaking every spray rule in the book.
First of all I spray at a distance so that the paint is semi dry when it hits the wall. Then I only give partial patchy coverage to each coat and rotate through using each colour quickly in turn, doing about 3 rotations in total (12 coats in all).
I didn't get a photo of this but here's one of the paper I put down to catch the overspray:
The spraying from a distance means you get a rough textured finish and the use of multiple patchy colours means you get a random colouration. (these are very quick passes with the can, not dumping much paint).
Next I mixed up a thin wash of cream paint and let that run through all the mortar layers. Once that had dried off I turned to using these:
Artists gouache. It's a weird paint as it dries but never really sets and can be reworked by just getting it damp again. I put bits of each colour on a palette and mix up stony colours with the smallest amount of water. Then apply these various colours, almost drybrushed, on to random stones. The aim is to add a bit more colour variation, hints of colour rather than a complete repaint.
Once happy I give it a coat of spray matt varnish so seal the gouache. In this case I gave if another thin wash of the mortar colour. As a final task I treated a few stones to a lick of weathering powder:
I hope that helps. It's not a fixed recipe and I make it up as I go along but using the limited range of colours does mean the results have a family appearance.
Pencarrow
Western Thunderer
Looks like I've not yet reported the placement of some more platform edging and the constructikn of the dock.
For the top of the dock I'm working off the small corner of a photo...

Blue brick edgings, stone corners, gully gratings and the tip dished to the centre.

I've gone for using Wills coarse stone sheets again. The surface sanded down to reduced the moulded texture, filler applied over the joints and new blocks carved.


Corners formed from the middle of a sheet, overlapped, filed down and blocks reinstated.


More to follow...
For the top of the dock I'm working off the small corner of a photo...
Blue brick edgings, stone corners, gully gratings and the tip dished to the centre.
I've gone for using Wills coarse stone sheets again. The surface sanded down to reduced the moulded texture, filler applied over the joints and new blocks carved.
Corners formed from the middle of a sheet, overlapped, filed down and blocks reinstated.
More to follow...
Pencarrow
Western Thunderer
In my 'inspired by'version of Bodmin North I've removed one of the four tracks terminating near the grain store. Going from left to right in the photo below, I've got: track 1 the platform and loco release; track 2 siding; and track 4 the loading dock road.

At the end of my loading dock road I'm using a Ragstone Models SR bufferstop. In the siding I'm replicating what I can see attached to the wall in plasticard. At the end of the loco release I'm knocking up the half bufferstop out of scrap rail and plastic based on the Ragstone kit dimensions.

Plates and bolts still to add...
At the end of my loading dock road I'm using a Ragstone Models SR bufferstop. In the siding I'm replicating what I can see attached to the wall in plasticard. At the end of the loco release I'm knocking up the half bufferstop out of scrap rail and plastic based on the Ragstone kit dimensions.
Plates and bolts still to add...
Pencarrow
Western Thunderer
And a bit of a Pencarrow update.
Last weekend I finally tackled one of the tasks that's been avoided for far too long... Getting the turnouts working. Bit of a make or break on having a working layout.
I avoided it by pratting around with bases for the Tortoise point motors:


Further procrastinated by adding external microswitches to the Tortoise point motors (as per MRJ 252):


There was even a trial fit....

Tbc
Last weekend I finally tackled one of the tasks that's been avoided for far too long... Getting the turnouts working. Bit of a make or break on having a working layout.
I avoided it by pratting around with bases for the Tortoise point motors:
Further procrastinated by adding external microswitches to the Tortoise point motors (as per MRJ 252):
There was even a trial fit....
Tbc
Pencarrow
Western Thunderer
I won't bore folk by looking at all the fails but here's what did work:


The switch rails aren't fixed in place yet and look like this:

This shows the arrangement better. You'll have to imagine there's a baseboard between the switch rail and the tortoise...

The stretcher bar mounts are from C&L (blue packets on the right hand side):

The cosmetic stretcher bars are currently just plasticard shoved into grooves in the mounts.
And it does all work too. Over the last week I have tested it well over 1500 times, which probably demonstrates how uncertain I was that I could make it work.
The video was shot before the plastic stretcher bars were added after only a few switches.
The switch rails aren't fixed in place yet and look like this:
This shows the arrangement better. You'll have to imagine there's a baseboard between the switch rail and the tortoise...
The stretcher bar mounts are from C&L (blue packets on the right hand side):
The cosmetic stretcher bars are currently just plasticard shoved into grooves in the mounts.
And it does all work too. Over the last week I have tested it well over 1500 times, which probably demonstrates how uncertain I was that I could make it work.
The video was shot before the plastic stretcher bars were added after only a few switches.
Pencarrow
Western Thunderer
I've been working on trying to finish off the turnouts, including a little bit of extra detailing. In doing this it was pointed out that I'd got the bridge chair and ordinary chair on Timber 14 (B6 turnout) the wrong way around.
Bottom!
I had followed the chair types on the C&L drawing:

Apparently the bridge chairs should be on the diverging road. This was supported by info on Martin Wynne's Templot site.
Oh dear, 7 turnouts all built wrong.
Correction time, with inappropriate tools to chop out the existing chairs.

Process half done...

Nearly there

Done.

The downside of this correction is that I used up the last of my stash of bridge chairs. A big thank you to Daifly for coming to the rescue on this front.
Bottom!
I had followed the chair types on the C&L drawing:
Apparently the bridge chairs should be on the diverging road. This was supported by info on Martin Wynne's Templot site.
Oh dear, 7 turnouts all built wrong.
Correction time, with inappropriate tools to chop out the existing chairs.
Process half done...
Nearly there
Done.
The downside of this correction is that I used up the last of my stash of bridge chairs. A big thank you to Daifly for coming to the rescue on this front.
Pencarrow
Western Thunderer
Managed to spend a bit of solid time on the board 3 wires. All finished this evening, apart from the simple(?) job of adding four point motors...

Also spent a little while doing a spot of tidying of the wires. I did remember to leave the area for the point motors and signal(s) free of wires. Must be something I've forgotten though...

Also spent a little while doing a spot of tidying of the wires. I did remember to leave the area for the point motors and signal(s) free of wires. Must be something I've forgotten though...