Liver & Fry's workbench

Liver & Fry

Western Thunderer
A spare five minutes saw me attach the w-irons to the brake vans this evening, at the respective 9ft and 10ft 6in wheelbases.

20250618_213315.jpg

Wheels have been ordered but I've had a notification to say they will not be dispatched until after 22nd June, so the pull rods for the brake gear will have to wait until them. I may fit the shoes in the meantime.

Still, slow progress is progress nonetheless!

- James
 

Liver & Fry

Western Thunderer
Its been a busy week or so and thus I've not had heaps of time to put towards modelling. When I have, I've been trialling different shades of grey to try and match the phoenix shade (as postage has gone up and a single 14ml tin would cost me £12). None of these trials were successful when sat next to my rendition of 12404 (see the Oxford vans at the start of this workbench thread) but I have managed to get a final few applications out of the tin I have.

As such, here is the current state of the vans:

20250630_213257.jpg

It seemed logical to paint the vans while waiting for axles to be delivered (of which they now have) as I couldn't do the glazing until after the frames were painted and thus I had nothing else I could make progress on.

I'm off to Silverstone this coming weekend for the F1, and so I'm unsure how much progress will be made this week. Still, if I do, I'll post an update!

- James
 

Liver & Fry

Western Thunderer
The recent outage meant that my two previous posts were lost. I've held off for a bit to see if there'd be any potential restoration but by now that seems unlikely so I'm going to recap where things are at currently with these brake vans.

Upon my return from "four seasons in a field" I decided to add glazing whilst waiting on some other components to arrive for the brake gear. This was done using Deluxe Materials 'Glue n Glaze', as per previously on the M&GN brake van.

20250709_210030.jpg

At the same time I also applied a base colour for the veranda floors:

20250709_212922.jpg

The next time I approached the workbench was to fit axles and get the vans rolling. This should be a two second job, I'm sure most of you will agree, but unfortunately this took way longer than it ought to.

Upon fitting the axles, I first noticed that the w-irons splayed notably, as if they are too narrow for a standard wheelset. For the record, I've used Alan Gibson 12mm wheels, as I always do my wagon builds.

20250713_195534.jpg

The second thing I noticed was that on the compensated units, the wheels wouldn't turn at all. Further investigation found that the flanges were making contact with a section of the brass plate:

20250713_195519.jpg

Conversations with another modeller since have led me to conclude that clearance was allowed for P4 and EM, but perhaps not 00.

This was easily rectified by cutting out the offending strip:

20250713_195709.jpg
20250713_195942.jpg

With that, both vans now run smoothly, splayed w-irons and all!

20250713_202040.jpg

Since then I've taken the time to fully grasp the underside arrangement on these vans, given how little information there appears to be on this matter. My thanks go to @Herb Garden for coming to the rescue with an end-on sketch that, alongside the side drawing I had, helped me create my own understanding of what goes where.

I'm still waiting on some final parts to arrive, but I have fitted the v-hangers this afternoon:

20250720_171442.jpg

I'm hoping this week will see some decent progress being made, but time will tell!

- James
 

RichardG

Western Thunderer
James thank you so much for the repost. I have realised this is the brake van most suitable for GER workings on my own railway in 7mm . . . your models are helping me to understand the drawings.


Screenshot 2025-07-04 08.56.15.png
In case you don't have both, the GA and the John Watling drawing align almost perfectly, so we can see where the drawing came from.

Here are both drawings in case they are useful.
 

Attachments

  • GA drawing 9ft WB.png
    GA drawing 9ft WB.png
    340.7 KB · Views: 7
  • dwg 9ft.png
    dwg 9ft.png
    279.4 KB · Views: 7

Liver & Fry

Western Thunderer
James thank you so much for the repost. I have realised this is the brake van most suitable for GER workings on my own railway in 7mm . . . your models are helping me to understand the drawings.


View attachment 244011
In case you don't have both, the GA and the John Watling drawing align almost perfectly, so we can see where the drawing came from.

Here are both drawings in case they are useful.

No worries! I didn't want to leave a gap in the narrative. I'm glad the posts are helping!

Ah, that's handy to know and have! I was going off the John Watling drawing until now. Thank you!

- James
 
The Midland connection at Lynn

Liver & Fry

Western Thunderer
A small tangent from the current thread, and a reminder that there is an eventual L&F layout at the end of all this, once I have the time, space and skills to do so!

Recently I discovered this year's Bachmann Collector Club model of Midland 1P No.1540 in its 1881 guise of Midland green. This was, initially, a club exclusive but it appears it may not have been quite as popular as the previous S&DJR version, for No.1540 has now been made available to non-club members.

Naturally I took the opportunity!

20250722_220518.jpg

It's a tad surreal to me to see a Midland loco in green, but I'm really taken by the look of the thing.

Now, what's the relevance to a would-be L&F layout? Well, by the 1880s, the Midland was operating through-services into Lynn via the Peterborough, Wisbech and Sutton Bridge Railway (PW&SBR). One online source suggests "two Midland 2-4-0 passenger engines of the 1070-1079 class and two or three double-framed goods engines were stationed at Lynn for this traffic". (Source: SteamIndex )

The plan is that the layout will be set in the early 1880s, and so when a loco in an era and company appropriate livery appeared, I had to. There's a slight bending of reality in that it's No.1540 on the passenger turn, but it ticks a box!

The accuracy of the model is limited by the Bachmann tooling, which naturally caters for more "modern" examples of the class, but it is an excellent starting point. Eventually the loco will need converting to EM as well (as that's the plan for the layout) but that's one for the future. The important part was securing the loco.

I guess, by a technicality, that as the wheels turn, this counts as my first operational loco for the layout? Here's hoping for plenty more to follow!

Now, what would be an appropriate set of coaches to go with it...?

- James
 
GER Dia.1 Brake Vans

Liver & Fry

Western Thunderer
I'd meant to update on Thursday, ran out of time and then ended up making more progress Friday evening, so here goes a bumper update!

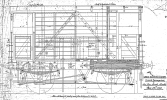
The focus of this latest work has been the brake rigging underneath. This orientated around two focal points: The clasp brakes and the crossbar.

The clasp brakes on these vans operated on the outer ends of each wheel, giving four points of contact for the whole van. A clasp yoke then connected the shoes at each end of the van to the off-centre crossbar by pullrods, with the whole apparatus being operated by an operating arm which fed into a bar on the inside of the van which was operated by handwheels on each veranda (still with me?).

The exact arrangement was concluded by comparing side and end on drawings, and I sketched it out (top down view) for my own benefit:

20250718_091822.jpg

(I dont expect that to make sense to anyone, but bear with me...)

The arms for the brake shoes as supplied are a tad generic, and don't factor the arrangement on these vans whereby the shoe is set 2/3 of the way down, with an extension below to where the clasp yokes attach. My solution for this was to take a whitemetal casting for some dual brake shoes, cut the shoe (and arm) off and fit them upside down, as seen below:

20250724_223653.jpg

I then focused on making up the arrangement for the crossbar on each van:

20250724_225830.jpg

Before adding the clasp yokes and fashioning some pullrods out of brass strip (intended, on their etch, to make guide loops for conventional wagon brakes - they'll look ok once painted!):

20250725_233758.jpg

The eagle-eyed may notice the lack of attachment on the compensated end:

20250725_233910.jpg

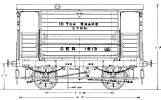
Rinse and repeat and we have two vans!

20250725_233620.jpg

Getting the angles correct and trying to line up both ends before the glue set was... fun(!) but I am pleased with the outcome:

20250725_234412.jpg

I have since prepared and painted the handbrake wheels, as well as drilled the holes in each end of the vans to fit when the paint is dry:

20250726_140055.jpg

I'm awaiting some new 4-leaf springs and drawhooks, and then I shall finish detailing the W-irons and bufferbeams before painting the underside. I also need to fit sandpipes too!

The brake gear was definitely what daunted me the most, so now I feel like I'm on the home stretch, even with a list of tasks still to do! I've definitely found the momentum again though, which is nice. I've already got my next wagon build lined up as well... But we'll save that for another time!

- James
 

Liver & Fry

Western Thunderer
A flurry of deliveries from the postman meant I could push on last night with the next steps.

Both vans now have buffers and drawhooks fitted:

20250731_223405.jpg

And the 9ft wheelbase van has received axlebox covers and springs:

20250731_222617.jpg

The axleboxes used here are actually GN pattern, but they closely resemble the earlier style of GE axlebox, with a more rounded shape. I have a set of the later GE square type and these will be used on the 10ft 6in example. This adds a nice element of variety between the earlier and later vans. Four-leaf van springs have been/will be fitted to both in keeping with the prototypes.

The second van will be caught up and then both will receive footboards, hopefully over the weekend.

- James
 

Liver & Fry

Western Thunderer
A day spent doing work for the C37LG meant a day less of modelling, so I didn't quite get around to doing the footboards. However, the second van has now received its springs and later style axleboxes:

20250803_220040.jpg

It's a step in the right direction (or it will be when I do those footboards... I'll show myself out!)

- James
 

Liver & Fry

Western Thunderer
Has it really been a month? I've certainly been busy over the past few weeks, but it must also confess that once I reached the footboards on these vans, all motivation left my body, and everytime I sat down to try, I achieved nothing.

Thankfully, on Thursday, I feel I finally pulled myself out of this spin and formulated a plan for putting these together. I made good progress Friday and have capped that off today, so, time for a long overdue update I guess!

I started with the 10ft 6in van, using the printed detail on the solebar to locate a pair of hangers, which would hold the L channel, cut to accommodate the axleboxes:

20250828_212614.jpg

This was then fitted, along with the smaller steps and supports:

20250831_201310.jpg

The 9ft van gave me a slight conundrum insofar far as the shoe for the springs would sit right where I want to fit my support brackets. I cheated a little and simply used brass rod all the way down, attaching it as I had the end supports on the previous van. This means they do look slightly different, but I will pass it off as intentional differences in individual vans, if anyone asks!

20250831_200500.jpg

I now need to paint the underframes and touch up the grey on the solebars before moving on to the final jobs - roof, handrails and lettering!

I plan to make a sustained push now that I have found some momentum, especially as I am imminently starting another project, which will have a deadline, and I'd quite like to get these either done or as near to completion as possible prior to that.

Do hold me to that, please...

- James
 

Liver & Fry

Western Thunderer
There's been plenty of progress but I think I may call it here for now until after the other project(s) I have planned. All will become clear...

First of all, the underframes of both vans got painted black, along with the buffer heads and drawhooks:

20250901_200651.jpg

Then I cut and curved some plasticard for a roof or two:

20250901_215321.jpg

I had to replicate a cap on the chimney, so I used a cocktail stick for the flue and found a pair of brass rings on a discarded sprue (I think they were spares from an L&Y etch?). This is what i ended up with:

20250901_215337.jpg

It looks more effective now its been painted:

20250901_233822.jpg

Finally, the 10ft 6in van has received its large G E lettering this evening:

20250902_210320.jpg

Applying these has made me realise something that has been bugging me about these kits, but I hadn't quite put my finger on until now; they look as if they've taken a hard shunt and been squashed, seeming a touch short in length compared to a tall appearance. I've figured out why: The doors are a plank too small, having 4 instead of 5, so the doors aren't as tall as they ought to be, making the verandas seem taller when viewed from the side. I discovered this when counting planks to get the correct position for the lettering.

Now, in terms of what comes next, I had to think about how to achieve the correct font for various lettering such as yard allocation, for which I am at a slight loss. The later van can be passed off easy enough using generic 2mm lettering from Fox Transfers, but this discrepancy will be more noticeable on the earlier van, which was a lot more 'wordy'. I also have handrails to do, but I'd rather fit these after lettering as I'm not keen laying the vans on their side too much once handrails are fitted.

As such, I may well attack the later van tomorrow evening, but the early one will have to wait now, possibly until November. Its a shame, and those of you who've followed for a while know I don't like to leave things open ended, but I feel its a conundrum that I dont have time to answer right now.

- James
 

Liver & Fry

Western Thunderer
I managed to find time this evening for one last push before I switch projects. I've avoided the 9ft van whilst I figure out how to approach the lettering, and the handrails on both will wait until all lettering is done, but I did manage to get the lettering on the 10ft 6in van done!

20250903_210004.jpg

Owners of Tatlow may recognise this as the van featured in his write up on these. Allowing for discrepancies with the kit itself, I'm happy with how it compares!

- James
 

Marc Dobson

Western Thunderer
I'm in the process of finishing my one for the stand I was under the impression that the whole of the ends were red but I noticed that only the buffer beams are red on yours. Not being a GER expert is there a livery shift where one goes to the other?
Marc
 
Top