Beginners OO 1950's Banff

Ian N

Western Thunderer
Yes-ish. Depends on which cutter you have.

I have the Chomas Creations Silhouette Cameo 4 Precision Tip" as I have the Cameo 4, while the item you referenced is reported to be appropriate for "Silhouette, Silhouette SD, Curio, Portrait, Cameo, Cameo 2, Cameo 3, KNK Zing & the Wishblade".

While I've got the "Post reply" window open, here's a more in-focus picture of the final window.

View attachment 176562
Thanks A.
this is a not-so-closeup of what I was getting with a Cameo3 and what I would describe as indifferent, flexible styrene, having to manually cut each pane out. just noticed the middle upper window may be back to front . Apologies for the thread drift.
 

Attachments

  • DC1B0BA1-F336-4844-935C-67EDF819FAF1.jpeg
    DC1B0BA1-F336-4844-935C-67EDF819FAF1.jpeg
    127.2 KB · Views: 18

aardvark

Western Thunderer
Thanks A.
this is a not-so-closeup of what I was getting with a Cameo3 and what I would describe as indifferent, flexible styrene, having to manually cut each pane out. just noticed the middle upper window may be back to front . Apologies for the thread drift.

Don't mention it Ian - I'm happy to have some company here. It may be months before I manage to do something post-worthy, so it doesn't hurt at all that there's some activity on this thread..

For what it's worth, I use 10-thou Javis plasticard for my windows. I disable the Silhouette overcut feature due to the fineness of the frames, so also have to release the corners of the cut-outs by scalpel after the cutter has had it's turn. But then, I only have 2 cutouts per window, not 12 as you have done.
 

Pencarrow

Western Thunderer
Yes-ish. Depends on which cutter you have.

I have the Chomas Creations Silhouette Cameo 4 Precision Tip" as I have the Cameo 4, while the item you referenced is reported to be appropriate for "Silhouette, Silhouette SD, Curio, Portrait, Cameo, Cameo 2, Cameo 3, KNK Zing & the Wishblade".

While I've got the "Post reply" window open, here's a more in-focus picture of the final window.

View attachment 176562

Great work on the windows, always the bane (pane?) of any scratch build.

Is there a UK distributor of the engraving tools?
 

Ian N

Western Thunderer
Thanks.

No idea about a UK distributor.
I did a quick search and found nothing in the UK. The well known auction site had some of the manufacturers tools, but predominantly from sellers in the US. Amazon had a competitors product, but it came in a set with stuff I definitely don’t want, and another two engraving tools that I possibly don’t need, which made it in comparison quite overpriced in my opinion. It did have a picture of the tool in a Cameo3 though.
 

aardvark

Western Thunderer
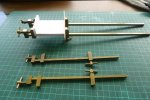
A good woodworking friend has loaned me two pairs of Japanese hatagane brass clamps for trial. These are intended for applying light pressure to fine joinery projects, but might be applied to the assembly of model buildings. They come in various sizes from 120 to 300mm. They can be found on a few modelling websites, but you may find them cheaper on woodworking sites.

P1170238.JPG

Shown here is the 180mm size in the foreground, with the 300mm holding two pieces of 5mm foamboard at the back. The clamps are well constructed and the faces of the heads are square to the bar. The head in the middle is free to slide along the bar. In use, the clamp is fitted loosely using the head at the right, then the pressure adjusted carefully using the screw at the left end, and as such are less likely to damage the material than conventional clamps. Clamping capacity is about 25mm less than their stated length.

I've previously bought the magnetic corner clamps common on modelling supplier websites, but have been disappointed by their operation. The magnetic clamps may hold your work square, but I find it difficult to apply much pressure to the joint when using 3mm card and 5mm foamboard due to the separation of the magnets, and things sometimes move. I doubt I would have such problems with the hatagane clamps

The clamps aren't cheap - a pair of 300mm clamps will set you back A$46 at the time of writing, but they're no lightweights either, each clamp weighing in at ~100g a piece. They're no silver bullet - you still have the task of juggling your work pieces and the clamps while tightening the screws.

I'm going to give serious thought to a pair. Or maybe two. Whether it's worth if for you will depend on how many joints you have to clamp and how much you'd like them to be square and gap-less.
 
Last edited:

aardvark

Western Thunderer
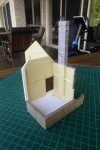
To show that I've not been entirely idle, here's a couple of largely internal walls, a couple of sections of foundations and a chimney assembled. Doesn't look much like the prototype yet.

P1170284.JPGP1170285.JPG

I don't intend on internal detailing, but have chosen to paint the walls and floors. I'm not entirely convinced that these will be visible, but I've done the painting anyway for fear that they might be. Other details such as battens to support the upper floor were added to each wall prior to assembly.

An interesting prototype detail that also may or may not be visible is the little window. At my estimates, it's low on the wall in the upper story, and would afford a view of the comings and goings at the platform below. The Banff station, first built in 1860, was originally the headquarters of the Great North of Scotland Railway (GNoSR), so perhaps this windows was for the use of the chairman to look down upon his minions. I'm guessing, of course.
Originally, the line to Banff was the main line, and with a branch to Portsoy, until the coastal route to Elgin via Portsoy was opened in 1886, whereupon it became the main line, the Banff line became the branch, and the GNoSR headquarters became a quiet albeit grand rural terminus.

Also attached below is a shot of the hatagane clamps in action.
 

Attachments

  • P1170283.JPG
    P1170283.JPG
    116.8 KB · Views: 17

Yorkshire Dave

Western Thunderer
An interesting prototype detail that also may or may not be visible is the little window. At my estimates, it's low on the wall in the upper story, and would afford a view of the comings and goings at the platform below. The Banff station, first built in 1860, was originally the headquarters of the Great North of Scotland Railway (GNoSR), so perhaps this windows was for the use of the chairman to look down upon his minions. I'm guessing, of course.
Judging by the location in relation to the door the small window may have been on a small landing halfway up the stairs.
 

David Waite

Western Thunderer
Hi aardvark
The windows with the stonework look amazing and I like the curved fascia board you have made for your base
board it gives it a Art Deco look.
David.
 

aardvark

Western Thunderer
I've been working on the next external wall.

P1170297.JPG

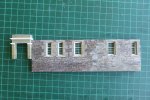
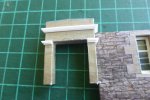
As with the others, I think it's probably easier to detail it before joining it onto the rest, so I tackled the twiddly-bits that embellish the main station entrance - there's probably a proper architectural word. You'll note that the stonework changes along the wall, an artifact of one of several extensions performed on the prototype.

P1170298.JPG

The next step will be painting them to "match" the texture paper used for the portico. Since colours are my Achilles's heel, I may be gone some time, and most likely will procrastinate by doing something else instead.

I do believe that I should start by spraying them with undercoat, but wonder how to do this without blowing them into the next universe.
 

aardvark

Western Thunderer
Progress.

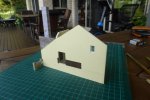
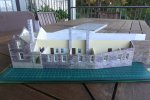
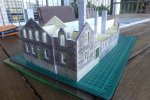
I’ve made and attached all but one wall to the station building. There’s been plenty of mistakes along the way, but nothing too glaring remains (I hope).

P1170705.JPG.833ae746c39354b79dd80b6b235c5927.jpg

P1170706.JPG.5226a0d72cbcb9156c2e1cd71fe3adaf.jpg

I do doubt my sanity – the back wall which faces into the platform has glazed windows and 4-panel doors, none of which will be visible once the roof goes on. I might have saved myself a lot of trouble by drawing them on in crayon.

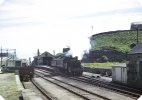
The wall that is left is the much photographed western wall, as seen here in a photo from Wikipedia.

Banff_station.jpg.04a7cd6e657ab87cd8fc739bc2004979.jpg
[From https://en.wikipedia.org/wiki/Banff_railway_station_(Scotland)].

Tricky, but I’ve made a start by cutting out the upper section of the wall from a sheet of Evergreen clapboard.

P1170708.JPG.7445536922a65f188116482b90b83bf3.jpg

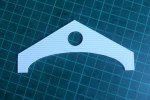
I was puzzled for a while as how to accurately cut the circular hole for the vent, until my wife suggested I make enquiries at the local trophy shop which has a laser. They were extremely helpful, and the end result is probably better, cheaper and quicker than I might have achieved if I'd bought a circle cutter off the web.

There are plenty more puzzles to solve yet, not the least of which is the vent itself. York Model Rail do louvres, but I find £4.74 plus £11 postage a tad expensive for a single window, although I don’t doubt the quality. I’m going to see what I can do myself first. Suggestions would be most welcome.

After the wall, there will be rooves, with all those tiles to affix, along with trusses to hold it up and skylights to see through it.
 
Last edited:
Top