Blacker Lane Disposal Point NCBOE (4mm/OO)

Dave

Western Thunderer
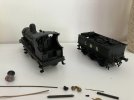
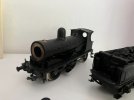
I have been rebuilding the second hand unfinished project L&Y Class 27.

This is how it looked when I acquired it.
Cl27-1.jpg

cl27-2.jpg

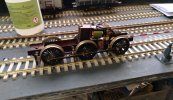
The chassis was in a poor state. The soldering wasn't as good as that on the bodywork, which makes me wonder if this is the abandoned project of more than one previous owner.
1693237031555.jpeg
The motor didn't work, but I would have binned it in any case. Running a 30:1 gearset, it would have gone like a rocket! The wheels were terrible old things, too. It had been regauged to EM by fitting extended axles and lots of fibre washers. The brake gear was a mess, the hangers and blocks were fitted facing inward and the tags from the frets hadn't even been filed off before assembly.

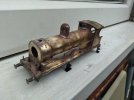
I stripped the paint from the body and also chopped off the handrails and pillars, which were all oversize. The vac brake pipes were horrible things, made from brass wire and springs. They have gone in the bin and will be replaced with something nicer.
20230825_105426.jpg.6ceed0cd954953a3895eca8ad7f3dfc8.jpg

I rebuilt the chassis using Gibson wheels and a High Level gearbox and coreless motor. It needs the rods to be permanently fitted and the brake gear adding.
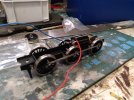
20230828_155849.jpg

I have stripped the paint from the tender, so that the coal rails can be fitted as these were still in the box and the prototype I intend to model (BR 52244) had coal rails . That's the next job.

I will be fitting DCC sound and a Stay Alive. I want to try and get it all in the loco itself and not have wires running to and fro the tender.
 

Dave

Western Thunderer
Progress with the viaduct. Two arches done, five to go.

I'm not altogether happy with it, but I suppose it looks alright from a distance. It's made from artists mounting card that has been laser etched and so, unlike plasticard, I can't simply paint it the main colour and then run a wash of the mortar colour in to the courses as it simply soaks in, leaving virtually nothing in the way of a mortar course showing. I've had to use polyfilla type stuff to fill the courses. Getting the excess off is a pain and getting a consistent finish on the different panels is not easy. The top surfaces of bricks at the outside edges of the panels delaminate at the slightest knock and filling in the white spots seems to be a never ending game whilst the thing is being worked on.
20230830_174852.jpg
There is also the fact that my friend, who drew the CAD, made the sections join at the tops of the arches, which makes it very difficult to disguise the joints. If they had been on the pillars then it would have been as simple as an overlay to hide them.
 

Paul Tomlinson

Western Thunderer
A couple of coats of shellac turns card into something much more durable.

(Put "shellac" in the WT search box and you'll find a number of matches. HTH)
 
Last edited:

Dave

Western Thunderer
Back to the Class 27.

It ran silky smooth with power applied to the motor but then I tried it on the track. It has no pickups yet, so I slackened off the grub screw in the gearbox and pushed it. It wouldn't go around the curve at the viaduct end of the layout so I removed the wheels, took out the fibre washers on the leading and centre axles in an attempt to give more lateral movement to those axles. It would then go around without being forced off the rails but as soon as the rods were put on it came off again. The rods are one-piece items and wouldn't allow the lateral movement of the centre axle, so they are to be replaced with jointed rods.

20230901_131734.jpg

20230901_155624.jpg
The added bonus will be that the new rods look nicer. They're still as strong as the old ones, being made of single thickness 30 thou. nickel silver that is filed down and overlapped at the joint.
 

Dave

Western Thunderer
That was all a complete waste of time. I cannot get the thing to run at all now. I don't understand at all how the likes of Bachmann get their locos to run. As soon as I introduce the same amount of slop into everything to attempt to get it to go around the sort of curves that RTR stuff is designed for, it ceases to run.

I put it back in the box, before I did the chassis some harm with a hammer.

Back to the viaduct...
 

Dave

Western Thunderer
The viaduct, almost completed in this photo. At 6ft. 4in long and 8in. tall, it is the largest model structure I have ever built. It was a task to fit the insides of the final two arches once the rest was joined together as it is so large it cannot be turned or stood on end inside the shed.
Viaduct4.jpg
 

Dave

Western Thunderer
Another of the locos to have worked at British Oak was the former LSWR No.92. I did this one a few years ago in anticipation of building this layout. It now has somewhere to run. It is the Dapol RTR model.

It worked at British Oak when it was being run by Wm. Pepper and carried the company name in large yellow letters on the tanks.
DSCF0199.JPG
Photos show that it had lost its fancy cylinder end covers by this time, so I cut the ends off and made new ones from plasticard and plastic rod to represent the studs and nuts.

I replaced the original motor to make space inside for DCC sound and Stay Alive.
DSCF0200.JPG
 

Dave

Western Thunderer
That last photo says that the "waste material" heap needs a "how to" post.
The "how to" is very simple. The form of the tip at the edge of the baseboard was made from 9mm ply as this needs to be strong enough for layout operators to lean on. The rest of the shape is corrugated cardboard in a sort or irregular honeycomb. This was covered with plaster bandage and newspaper papier mache, with PVA glue.

The materials for the tip are shale, broken brick, foundry slag, coal dust, sand and model ballast. All but the last two being obtained from the trackbed and waste tip of the real British Oak site. I have an old granite pestle and mortar, in which I crushed it all up and then sieved it. It's the same mix, less the shale, that I used for ballast, only I put it through a finer sieve for ballasting.

The papier mache surface was painted black and then a coat of PVA brushed on before scattering the mix onto it. When that was dry it was sprayed with water that had a tiny amount of washing up liquid in it and then diluted PVA was dripped on and the whole left to set hard.

Back in February I was out with the whippets on a site visit to collect materials.
20230218_111545.jpg
On the right is the trackbed of the line that went to the exchange sidings. The other went to the staithe on the Navigation.
 

LarryG

Western Thunderer
Is the body the Craftsman kit? Do you have any posts on here about what modifications you had to make to the chassis to get it to fit?
I suspect it was a Craftsman body; I bought it ready built, but the chassis wasn't too good, hence fitting it with a bachmann C Class chassis. I wonder if the GER J15 chassis is worth looking at?

Below is a comparison of boiler heights before I strarted the conversion...

WEB L&Y A Class 6.jpgWEB L&Y A Class 7.jpg

The C Class chassis with some pieces sawn off to make it fit inside the firebox and rear section of boiler...
WEB L&Y A Class 2.jpg

Saw mark showing where Front of chassis had to be removed...
WEB L&Y A Class 4.jpg

Backhead removed along with some of the underside of the boiler...
WEB L&Y A Class 3.jpg

Motor and bits just fitted inside the L&Y firebox....
WEB L&Y A Class 5.jpg

Checking ride height with Tender prior to repainting loco....
WEB L&Y A Class 8.jpg

New backhead fitted......
WEB L&Y A Class 9.jpg

The diminutive L&Y 0-6-0 follolwing a respray. Seen with an LMS 4F....
WEB L&Y A Class 10.jpg

The following link might also give further assistance...
 
Last edited:

Dave

Western Thunderer
I got bored by doing all the greenery and had to do something else, so I have been working on a few road vehicles.


The plan for the cottage has always been for it to belong to a hoarder/seller of parts for old vehicles and so they will be scattered along the track between the road and the cottage. It is also another excuse for another grounded van body.
DSCF0210.JPG
The Thames van is a second hand Classix model. When taking it apart to give a coat of matt varnish I discovered that the bonnet is in fact a separate part and so with a little effort, inner wings made from card, a rough representation of a radiator and a side valve engine, inserted, I glued the bonnet in the open position.

I had been given an army Bedford truck and an army Humber snipe tourer a while ago and so have now made use of them. The Bedford is has been weathered and is now dumped next to the track whilst the Snipe is undergoing demilitarisation.
DSCF0209.JPG

An AEC Matador is being converted to a tanker for fuelling plant machinery.
20230908_113633.jpg
The problem with these Oxford diecasts is that the axles don't have enough articulation for parking them on any but the smoothest of surfaces and there's always a wheel off the ground. I took a slitting disc to the casting to allow for more articulation. In the same way as making 3-point compensation on a model loco, the front axle rocks on a knife edge.
DSCF0211.JPG

The tank under construction.
DSCF0212.JPG
 

Dave

Western Thunderer
Today, I decided that the yard didn't look scruffy enough and that the owner had nowhere under cover to work on the motors, so I made use of some of the left over scraps of plastruct that I've been hoarding for years.
375754611_687073136253755_1560366133462111663_n.jpg

DSCF0217.JPG

It still needs to be planted and have weeds and grass growing up around it but that's for another day now.
DSCF0220.JPG
 
Top