You are using an out of date browser. It may not display this or other websites correctly.
You should upgrade or use an alternative browser.
You should upgrade or use an alternative browser.
7mm Craxton SP
- Thread starter Ressaldar
- Start date
Ressaldar
Western Thunderer
Today I have been able to put in the concrete slab in front of the service shed and also continue the slab along from the re-fuelling area towards the old platform
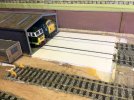

with a break between doing the two areas to check running clearances etc any excuse to play trains! Tomorrow will see the 'installation' of the off loading pipes onto foundation slabs which should be a fairly quick and straight forward job as I need to be finished by lunchtime as I am getting my broadband connection updated in the afternoon which I definitely hope will be a quick and easy operation.
On Saturday, I plan to remove the red sand area which runs down the middle of the last photo and prepare the surface for a more suitable covering. No work on Sunday as it is the Wirral OGG Open Day - details elsewhere, hope that some of you might be able to attend.
regards
Mike
Joe's Garage
Western Thunderer
Hi Mike
This looks very effective with some green diesels? May I ask what date this sort of facility would have been from?
Three tracks and a couple of locos, then the odd wagon....nearly an Inglenook idea, glad I still have my Brassworks 1/32 03!
Cheers
Julian
This looks very effective with some green diesels? May I ask what date this sort of facility would have been from?
Three tracks and a couple of locos, then the odd wagon....nearly an Inglenook idea, glad I still have my Brassworks 1/32 03!
Cheers
Julian
Ressaldar
Western Thunderer
Hi Julian,
the green diesels are there, so as far as I am concerned, the period is mid - late 60s, but having seen a clip on YouTube taken at Crewe within the last month, there was nearly every livery that has even been on British metals. So many of the older generation of diesels are now being restored for Mail line use, anything goes seems to be the order of the day!
I fancy following the numbering/livery history of Brush D1643 as the latest Heljan version would allow that which would produce four models up to the late 90s, even more now that it has been restored.
I think that all green livery would become a tad boring and at the end of the day RULE 1 always applies!
Just applied the first coat of concrete onto the slabs and will let that go off until Monday - it is our Open Day tomorrow, thankfully we shall not be directly in the sun for too long.
regards
Mike
Joe's Garage
Western Thunderer
I totally agree with Rule No 1 and really like the scenario Mike. I just wondered when this sort of building may have been started to be built. Guess 1969/70 would be a suitable timeframe?
I will keep watching this thread.
Cheers
Julian
I will keep watching this thread.
Cheers
Julian
Ressaldar
Western Thunderer
Hi Julian,
sorry for the late response, many things happening and all at once! The 'style' is not much different to that of the 50s all that has changed are the materials that were used and therefore you can go ahead and using any post war cladding and roofing, with the exception of asbestos cement panels. As you say, Rule 1 always applies.
regards
Mike
Ressaldar
Western Thunderer
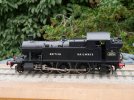
Yet another twist in the ongoing saga that is my layout is that the Preservationists have moved in with a Lionheart Small Prairie which was ordered when they were first announced and now that they have arrived, resistance was futile!!!

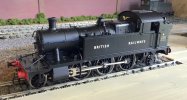


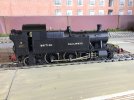

I am not a rivet counter and I doubt that there (m)any missing/out of place etc on this model. The most noticeable as far as I am concerned is that the Gil Sana font used is totally wrong for 4571 it should have been Egyptian GWR style but I am not worried as I am re-numbering mine to 4570 an 83E St. Blazey engine for much of its life and it will appear on a diorama that I am aiming to produce of Helston engine shed in the fullness of time.
I have installed a Zimo MS440C with a YouChoos soundfile, so the installation is literally take out the Lionheart DC pcb and substitute the Zimo - a speaker is already installed and according to Richard Webster on the Guild website, stayalives are not required as some new electrickery ahs been used for the first time which makes them obsolete.
The only 'bolt on bits' that the purchaser has to fit are the two sandboxes and associated pipes and the handbrake crank connection below the cab, A crew will be fitted once the re-numbering is complete (using Railtec 3D printed numbers) and then some light weathering, bearing in mind that this loco belongs to a Preservation Society who are very proud of their loco - who knows, other locos could yet appear!
regards
Mike
Ressaldar
Western Thunderer
The re-numbering went well, the cabside plates came off without a fight, a scalpel blade under a corned was sufficient to break the bond, such that the plates have been put aside for possible future use. The smokebox number and shedplate are printed flat so nothing needed to be done in the way of preparation and the two numbers slid into position without any problems and the cabside plates fitted over the space just as easy.
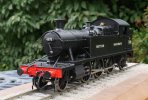

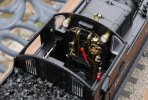
The cab interior detail is excellent and deserved another photo
just got to choose which Modelu crew members to order to carry out the necessary duties.
Taking it to the Club this evening to give it a good blow.
regards
Mike


The cab interior detail is excellent and deserved another photo

just got to choose which Modelu crew members to order to carry out the necessary duties.
Taking it to the Club this evening to give it a good blow.
regards
Mike
Ressaldar
Western Thunderer
WARNING
Be extra careful when removing the cab roof - do not hold the roof on the sides as the top runner for the cabside shutters is immediately beneath the roof lip and it is very fragile - don't ask me how I know!!!! always remove the roof by holding the front and rear edges in the area where the magnets are located.
Re-fixing the runner will be an interesting task later which might end up with the shutter being permanently fixed in the open position.
regards
Mike
