We have a few technologies new since Iain wrote his book on loco construction, but not many. I am having my first go with some 100 degree solder to put the copings onto my Y14 tender.
Yesterday I built myself a variable mains power unit for my soldering iron, using a dimmer switch and a 13A socket. The 100 degree solder reminds my of the T1000 in Terminator 2. I think Mr Spock would say, its solder Jim, but not as we know it. It is very soft, and very easy to clean up, and goes onto bare brass without tinning first.
This post probably ought to be on my workbench topic but it follows on better here.

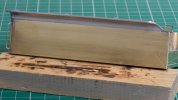
This is the worse side of the side of the job, photographed rather carefully from a suitably flattering angle.

This is the same work, with the lighting altered to show how I am really getting on.
My own feeling is, I cannot expect to model a scale 1/4 inch overhang at the bottom of the coping (because of my present abilities in 7mm scale) but I might create a horizontal line on the model to imply the overhang is there. Even draw one! And I am wondering what to do next. I have already had two goes at adding more solder and then cleaning it away again. I wonder if there is a filler I could use, to wipe into the gap nearest the camera? Perhaps a fine surface filler used by car body shops?
At the end of the day, I will be happy if I have a model good enough to take a satin paint dinish not a full gloss, Though there is a nagging perfectionist inside, and usually not far from the surface.


