4mm From an unpromising start - shop around

Neil

Western Thunderer
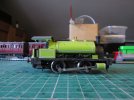
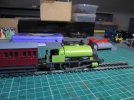
Since the last photos were taken one of the pair of pugs has come on a bit. Most of the work has been with rattle can (Halfords - Rover applejack) and brush but before painting I had cut out and fixed the scalloped roof edges.
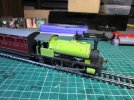
light 036.jpg

light 037.jpg

There's still some detailing and painting left to do. One disappointment was that I tried a mock up of a single 1mm square slide bar, there's room in the top of the slot in the cylinder for this, but the crankpin on the front wheel clonked it on every revolution. There seem to be two possible ways to a better chassis, the Branchlines kit seen here under a very nice build at the other place or the Dapol B4 mechanism which looks as though it could fit. However as my aim is to pursue a simpler more basic approach I'm happy to go with what I have.
 

Simon

Flying Squad
That looks really very good Neil, quite a transformation.

At the risk of being shot, I think the silver springs would look better if they weren't silver or at least made less "showy".

Of course this might be the photograph making them more "visible" than in reality.

Soz

Simon
 

geoff_nicholls

Western Thunderer
I like your decision to stick with the original mechanism. Could you compromise a bit by covering part of the motion, as on the L and Y Pug, or the Aberdeen Gas Board Andrew Barclay?
 

Neil

Western Thunderer
That looks really very good Neil, quite a transformation.

At the risk of being shot, I think the silver springs would look better if they weren't silver or at least made less "showy".

Of course this might be the photograph making them more "visible" than in reality.

Soz

Simon

Thanks Simon, don't worry my blunderbuss is still gathering dust. The springs are in grey as a base coat for some of the same shade green (Humbrol 38 - a spot on match for Rover Applejack) as the body. A bit of grease and grime should knock them back a bit but if they still look a bit pants then they'll go back to black.

I like your decision to stick with the original mechanism. Could you compromise a bit by covering part of the motion, as on the L and Y Pug, or the Aberdeen Gas Board Andrew Barclay?

Thanks Geoff, I did wonder about that. Once it's finished it'll be easy to fabricate and paint a panel to test the idea out; a bit of blu-tack to hold it in place and it'll be easy to reverse the process.
 

Neil

Western Thunderer
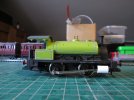
I've now finished painting and weathering the springs. The idea is that the darkened green will give the impression of them being deep in the shadow cast by the tank and so fool the eye into thinking that they're sat back further than they actually are.

light 038.jpg

I think it's worked, here's the body on another underframe in black as it comes from Hornby.

light 039.jpg
 
Points start

Neil

Western Thunderer
Work on pair of pugs is paused while I wait for a delivery of handrail knobs. I had hoped to use split pins (as on my SNCB 0-8-0) as they're an old skool sort of thing, but my ability to close them up around the handrail wire seems to have gone missing so I'm taking the easy way out.

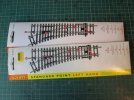
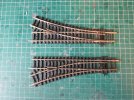
However my workbench, like nature, abhors a vacuum so keeping to the theme of unpromising starting points I got out a pair of points thet I'd bought earlier on e-bay.

light 044.jpg

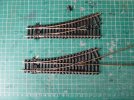
.... and at the top one I did some time ago with one of the new pair for comparison.

light 045.jpg

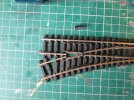
First task, out with the piercing saw and cut away the mouded plastic frog and the metal connecting strips encapsulated in it.

light 046.jpg

More to follow.
 

Neil

Western Thunderer
With the frog and the linking strips cut away the rails of the vee are easily pulled through the few chairs holding them in place.

light 047.jpg

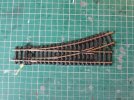
Longer replacement rails were filled up from spare lengths of rail. It's much easier to do this if they're over length at this stage. A splodge of Fluxite on the top of the joint and a quick join made with solder and a hot iron finishes the join. The little burst of heat seems to help the new vee settle into the surrounding plastic in the base of the frog even though there's no apparent sign of melting having taken place. The last stage, for the moment, was to cut the over length rails back with the piercing saw.

light 048.jpg

When the time comes for the points to be laid I'll attend to the the ugly sections joining the last sleepers to the rest of the point but for the moment I'll keep them as they give an extra fixing to the rails.
 
Structures - start

Neil

Western Thunderer
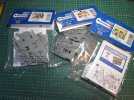
With the pugs being all over bar the shouting I thought I'd take a look at some of the structures I plan to make for the layout. My staring point are these three kits and the contents of my bits and bobs boxes.

light 050.jpg

In these days of ready to plonk resin structures and hi fidelity laser cut kits I feel that the ex-Airfix range is seen as a bit outdated and perhaps a bit too familiar. I rather like them as a starting point, they take me back to my childhood (accusation of outdated makes sense) and they're a lot of fun to cut, shut, bodge and alter. It's the modification that allows us to step away from the over familiar and create something that's hopefully fresh.
 
Last edited:

Neil

Western Thunderer
Have I missed a track plan for the layout on which this stock will run?

steve

Hello Steve, don't worry, you haven't missed a plan for the layout. At the moment it only exists in the void between my ears and while I have an idea of how it should fit together I need to finish the structures in order to firm up the concept. I also need to identify where exactly in my playroom it will fit.
 

geoff_nicholls

Western Thunderer
This project is very infectious. As the Club Librarian, I usually harrumph a lot at the bits and bobs the Second Hand Stall people keeping leaving in my Library. But now I've started rooting through it all and daydreaming about what I could make with it.
 

Neil

Western Thunderer
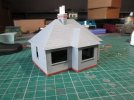
I've been a bit distracted the past week by some truly appalling replacement double glazing work done to Casa Rushby. @r$e$ have been kicked and I'm hoping for an improved Mk.2 jobbie. All this has meant that I've had less motivation to play than usual, however I have managed to get the first structure under way. Inspired by this Colin Peake chop of the Dapol detached house into a bungalow I've had a go at my own copy. Not as sharp as Colin's but few manage as clean a build as Colin, in my opinion. Here's where I'm up to with it.

light 051.jpg

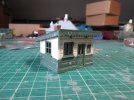
Not all structures will have to be new builds, here's one I did earlier which has been waiting for a suitable home for some time.

light 052.jpg

It fits the sow's ear principle originating from the Hornby halt building.
 
Last edited:

ColPeake

Member
I've been a bit distracted the past week by some truly appalling replacement double glazing work done to Casa Rushby. @r$e$ have been kicked and I'm hoping for an improved Mk.2 jobbie. All this has meant that I've had less motivation to play than usual, however I have managed to get the first structure under way. Inspired by this Colin Peake chop of the Dapol detached house into a bungalow I've had a go at my own copy. Not as sharp as Colin's but few manage as clean a build as Colin, in my opinion. Here's where I'm up to with it.
You are far too kind Mr Rushby!

Your build is looking good, I had tried a brick base initially but had set them too far back, your attempt looks much closer to reality. I really ought to know, living in a half brick/half render house :D

Colin
 

Neil

Western Thunderer
You are far too kind Mr Rushby!

Your build is looking good, I had tried a brick base initially but had set them too far back, your attempt looks much closer to reality. I really ought to know, living in a half brick/half render house :D

Colin

I too live in a pebbledash pad and I worried that I hadn't set the brick base back far enough. Maybe neither of us has hit the Goldilocks spot.

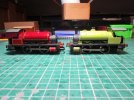
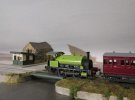
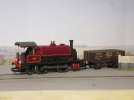
In other news the red pug has gained handrails, stanchions and plates. It was due to be e-bayed but I'm rather minded to keep it.

light 053.jpg
 
Top