4mm From an unpromising start - shop around

1645551032034.png
1645551061392.png

*

Neil

I am delighted to have today found this thread. Thank you for the reference to it on NGRMonLine.

The work shown here is very much to my liking and I will continue to follow the account with interest.

That said may I make one comment on the posting from 7 January 2022 (partly quoted above)?

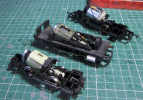
Over the years (beginning almost three decades ago) I have done a lot of work using "Smokey Joe" chassis for larger scale NG locos. I have also used the bodies a couple of times. From that experience I do wonder if the age of the various motors used is correctly attributed. I may be wrong, but I would have thought that of the three motors shown, the oldest is that in the middle - the open frame motor.

[1] I cannot say that it would be unassailable proof of that assertion, but I have to hand a loco that has the open frame motor in the chassis under what is certainly and early body (one of the originals fitted with handrails). Having aquired this second hand I concede that it may be an original body mated with a later chassis, but my feeling is that the open frame motor was used before the MABUCHI cans.

[2] Indeed, as you say the motors in your photograph at the top and the bottom are somewhat similar.

[3] There is also the spacer at the rear of the Mabichi cans. This would suggest that the original design of chassis was for the open frame motor, and that when the shorter length cans were introduced the spacing piece was inserted.

As I say I could be wrong, and if I am would be happy to stand corrected.


Christopher Payne
 
Last edited:

Neil

Western Thunderer
That's very interesting Christopher. I've done some checking, the near one I bought from new (Dunraven NCB) and was produced in 1984 and 1985. The middle one came with what looks to have been an overpainted Desmond body (it's red and the no.7 is visible but not the name) produced in 1981, 1982 and 1983. The rear as I mentioned is a current Chinese built job. I think that your assessment of the order of ages has to be correct. I've also done some extra cleaning and tweaking and all three now run pretty well; all are keepers. It reminds me that when the Hornby saddle tank came out a mate of mine from the York Model Railway Society built a light railway layout based around these locos and at the time it was considered to run well.
 
*
Over the years these chassis have had a bad press that has not been entirely justified.

[1] They were the natural successor to the old plate framed chassis used by Tri-ang for "Nellie" etc.

[I draw a discrete veil over the curious beast Hornby briefly offered. It looked like the love child of a Baldwin and something that might have run on the Deutsche Bundesbahn. As I recall it had the open frame motor and - believe it or not - square axles.]

[2] Of all the varieties of loco body that have been offered on the current chassis the best are "Smokey Joe" (AKA "Desmond") and the 06 diesel. This is because these two have a cast metal footplate section that adds quite a lot of weight.

In my not inconsiderable experience of using these chassis for 1:34 and 1:25 NG the crucial matter is the addition of extra weight and the use of a feedback controller. The result can be very good, smooth. and slow speed running.

I recall one occasion when I was operating one of my 1:34 scale layouts at an exhibition. I was conducting a shunting manoeuvre with a skirted tramway style locomotive running on an basic "Smokey Joe" chassis (with added weight). There were a few interested viewers when they were joined by a gentleman in (shall we say) traditional attire of tweed coat, collar, and tie.

"I say, that runs very well".

"Thank you".

"Scratchbuilt chassis with a Portescap motor?"

"Er, no - a Hornby 'Smokey Joe'".

"Really?"

A pause during which I continued to operate.

"No, no. You are pulling my leg."

"I assure you it is a standard 'Smokey Joe" plastic chassis with the original motor".

Another pause during which I continue with my shunting and the audience to what is becoming a cabaret turn is growing.

"No, I am sorry. You are not telling the truth. It MUST be a Portescap motor."

At this point I lifted the locomotive off the track and held it upside down before the nose of my challenger.

"Eauuuu!"

In a flash he was gone much to the amusement to the crowd he had generated.


Christopher Payne
 

Neil

Western Thunderer
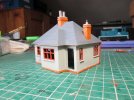
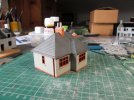
Paint has now been applied to the bungalow. I've tried to keep to those colours that would be seen in Edwardian Britain; I like to think that if you don't look too closely there a slight arts and crafts air about it.

light 054.jpg

There's still some way to go; doors, glazing, weathering and detailing need to be done before I can call it finished and move onto something else.
 

Neil

Western Thunderer
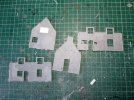
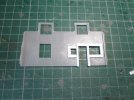
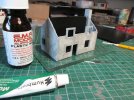
With the bungalow on the home straight I turned to my next victim, the thatched cottage. Now a half timbered thatched cottage is wholly inappropriate for the intended Lake District location of the layout. Never mind, these things are easily altered. The first stage is best done in the flat. The framing round the dormer windows was cut back to the line of the half timbered surround as it's otherwise too wide. Next the messy and destructive bit, sanding drum in the pendant drill and grind away the half timbering, in many ways the rougher, the better.

light 056.jpg

All the burred over edges are cleaned back with a craft knife and then the rear of the openings framed with 40thou strips so that the windows and doors are inset.

light 057.jpg

I stuck the walls together with the chimney on the inside and glued in a spine from floor to ridge level down the middle of the cottage. Unfortunately I forgot that thatched roofs have a steeper pitch than slate so I had to trim back both ends and the spine to reduce the angle. The outer surface of the walls had blobs of filler brushed over to give the uneven look of crudely rendered stone. An old brush and lots solvent does the trick.

light 058.jpg
 

Jordan

Mid-Western Thunderer
I recall one occasion when I was operating one of my 1:34 scale layouts at an exhibition. I was conducting a shunting manoeuvre with a skirted tramway style locomotive running on an basic "Smokey Joe" chassis (with added weight). There were a few interested viewers when they were joined by a gentleman in (shall we say) traditional attire of tweed coat, collar, and tie.

"I say, that runs very well".

"Thank you".

"Scratchbuilt chassis with a Portescap motor?"

"Er, no - a Hornby 'Smokey Joe'".

"Really?"

A pause during which I continued to operate.

"No, no. You are pulling my leg."

"I assure you it is a standard 'Smokey Joe" plastic chassis with the original motor".

Another pause during which I continue with my shunting and the audience to what is becoming a cabaret turn is growing.

"No, I am sorry. You are not telling the truth. It MUST be a Portescap motor."

At this point I lifted the locomotive off the track and held it upside down before the nose of my challenger.

"Eauuuu!"

In a flash he was gone much to the amusement to the crowd he had generated.
Don't you just love 'Experts', of the self-appointed variety... :D

On the other hand, I was watching a small industrial/shunting layout once at a show, and what looked like a Hornby Pug was crawling around very smoothly indeed. "That's not a standard Hornby chassis under that, is it?" I enquired.

...and indeed, it wasn't. ;)

Interesting the comment on added extra weight aiding running. The same was said about old Lima diesels, and it did seem to work.
 

Rob R

Western Thunderer
Interesting the comment on added extra weight aiding running. The same was said about old Lima diesels, and it did seem to work.
Extra weight (and lots of it) is also very helpful with Tenshodo motor bogies.
 

Neil

Western Thunderer
A week and a bit on and I have a little more to show. The bungalow inches closer to completion.

light 060.jpg

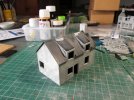
The no longer half timbered cottage has had the basic roof structure added along with the dormers.

light 059.jpg

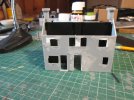
Finally I've started work on the village store which is to become a shop and a pub.

light 061.jpg

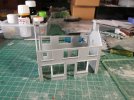
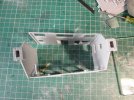
The very bendy state of the Dapol mouldings is apparent here with three of the corners stuck together.

light 062.jpg

No problem, the plastic is pretty flexible and some internal bracing will soon sort out the Dali like tendencies.
 

Captain Kernow

Western Thunderer
Interesting, thanks Neil.

I must confess that that one had completely passed me by. I have built some of the others in years gone by, but not that one.
 

Joe's Garage

Western Thunderer
Colin....hope you do not mind me asking but are you the same Colin Peake who had a box file layout featured on the late Carl Arendt's website many years ago? A scrapyard in Sheffield?
Cheers
Julian
 

steve1

Western Thunderer
A week and a bit on and I have a little more to show. The bungalow inches closer to completion.

View attachment 158385

The no longer half timbered cottage has had the basic roof structure added along with the dormers.

View attachment 158384

Finally I've started work on the village store which is to become a shop and a pub.

View attachment 158386

The very bendy state of the Dapol mouldings is apparent here with three of the corners stuck together.

View attachment 158387

No problem, the plastic is pretty flexible and some internal bracing will soon sort out the Dali like tendencies.
Neil, I have found Lego bricks make good corner braces, both solid and a genuine 90deg square.

steve
 

Neil

Western Thunderer
Thanks Steve, because of the ledges on the corners of the kit the Lego technique wouldn't work, but it's one that's gone into my bank of clever stuff to be deployed when appropriate in the future. The build has progressed some since the last photo and additional braces have gone in and pulled it a bit squarer but as I'm after a bit of picturesque haphazardness a bit of skew-whifishness plays into my hand.
 

Neil

Western Thunderer
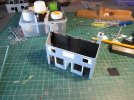
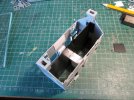
More from the plastic surgeon. The droopiness shown above has been partly tamed by the addition of a passageway using what was intended to be the centre shop entrance and a matching incision in the rear wall. Further structural enhancements comprise a centre strengthening rib and attention to the window openings, blocking and resizing as appropriate.

light 063.jpg


light 064.jpg

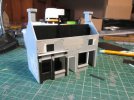
The real facelift comes from an altered and backdated shop front to the left of the building, the right will be a pub.

light 065.jpg

It will however be the rear face that faces the front of the layout and here I'm looking to differentiate each half of the building; further enhancements to follow.

light 066.jpg
 
Top