B462076 - PALBRICK B
  • Lyndhurstman

    Western Thunderer
    Reconstruction Time Again
    71D5E25D-8689-4C01-8B31-C2F1630A9AC3.jpeg

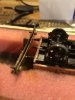
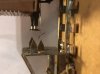
    Open-ended basic boxes need support, and - whilst waiting for the order from Eileen’s (here’s hoping it hasn’t done a Midnight Runner) we have spent some time in reworking What Lies Beneath. The Stores has MJT RTR units aplenty, having bought a joblot from a concern in Ireland who couldn’t get on with them. The usual rules apply; both are rocking units, but one has been stymied bu the insertion of 20 thou plasticard packing pieces superglued in place. Gibson 3-hole discs are the circumferential conveyance choice, having their pinpoint protrusions flattened with a file, as they are surplus to requirements in this arrangement.

    We have also taken the opportunity to remove the brakegear. This will be replaced with something that can be aligned with the wheels, rather than the 9” offset that would have resulted if we’d kept them. One good thing about these boxes is that the floor is nice and flat, so no major surgery of the area is needed for this work.

    Cheers

    Jan
     
    B462076 - PALBRICK B
  • Lyndhurstman

    Western Thunderer
    The Jig Is Up....
    side down (cue Diana Ross).
    3B3FD84B-D110-4F9C-ABF2-13A523F414D4.jpeg
    Some wheelbase setting work, via a(nother) home made jig. This one is a direct cadge from the one in the Underframes chapter of John Hayes’ ‘4mm Wagon’. Every wagon buff should have a copy, I think. Just to marvel at the artistry on display. And the attention to detail is second to none (second to monks, too). I love that book. I love that level of skill. I love that level of commitment and passion, writ large in tiny boxes.

    Anyway... here’s the Watkins Wharf wheelbase setting jig - two bits of 20 thou joined in a box. Slotted fir 2.0mm axles. The most difficult part was making the initial holes; I tend to start at 0.5mm and go up in 0.5mm increments. This stops the drill catching, I find. And there’s something very soothing about drilling Plasticard... no? Just me then... I put the stretchers in after, pushing them tight against the axles before glueing.

    It’s all progress. Not leaps and bounds. More of a determined limp into the headwind. But we’re used to that. As long as the thing we’re getting is somewhere.

    Cheers

    Jan
     
    Last edited:
    B462076 - PALBRICK B
  • Lyndhurstman

    Western Thunderer
    Too Thick, Or Not Too Thick; That Is The Question
    509689A9-98ED-4529-9E73-16E85052E4E4.jpeg

    There’s an opening, opening.
    The adjuster end of the PalBrick needs some serious modification (read total replacement). So we’ve set to on some stock 40 thou sheet. The intention is to match the opposite end of the wagon. However, Volume 1 of Kent (Wild Swan) has a more realistic rendering beautifully constructed using 5 thou. So now we’re in Enhanced Quandary Mode. There may be some Time & Motion consternation whilst we contemplate our next move...

    Cheers

    Jan
     
    B462076 - PALBRICK B
  • Lyndhurstman

    Western Thunderer
    All Ends Up
    The weekend overtime has - for once - paid dividends to the Works.
    62CBB481-9E09-4EDD-BE8D-9AEF7778E02B.jpeg
    The picture above (another example of the Crewe L Enlargement technique) shows a more fixated finale to the Palbrick. In order to make firm the end, we’ve drilled and pinned all four corners (0.3mm) before dropping some Henkel (Loctite to you and me, but the pun is all, here. Even if it is weak) on it. We’ve also started to fill the offending gaps twixt the uneven whitemetal end platform and the strengtheners with some Squadron White. This will be sanded, I’m sure. But that’s a job for another day. This one is done, for us.

    Here’s a shot of the days doings from a more tolerable distance:
    8E75E31B-42C8-407E-962C-21414B525750.jpeg

    Cheers

    Jan
     
    B462076 - PALBRICK B
  • Lyndhurstman

    Western Thunderer
    Slow Ahead Both
    Not much to show today. Nothing momentous. Just some work on one bufferbeam.
    6A472F2E-74D3-40CE-B498-15293822C752.jpeg
    The buffers are LMS B006 (1’6” 2 rib, 13” head). The coupling hook is LMS CH04 (rectangular mounting plate). I’ve just twigged that we’ve got ahead of ourselves, and fitted the hook without opening the hole for the link. The bufferbeam itself is Plastruct 90534 - 5/32” channel with one side cut off and filed down to bring it down to the 9” depth required.
    I would note that the shadow between the baseplate and the bufferbeam suggests that there’s a deal of overhang where there shouldn’t be. You’ll have to believe us when we say it looks worse than it is.

    We’ve also moved the inner strengthening plates on the adjuster end closer together. Looking down on the top of the assembly highlighted that the initial construction was too disparate.

    Cheers

    Jan
     
    B462076 - PALBRICK B
  • Lyndhurstman

    Western Thunderer
    Braking News
    The Palbrick gets some help to halt.
    The undergear is FourMost Models (ABS) D121 whitemetal Morton from Stores. I’ve taken the piercing saw to the brake loops and replaced them with reconfigured staples (the old tricks are the best: they make you feel like a ‘real’ modeller, and connect you with the past masters of the hobby). The V hangers are from Bill Bedford’s RCH 10ft fret (CES901). There will be a vacuum cylinder and actuator - all part of the FourMost consignment. And a cross-shaft from sub-1mm brass. We shall use the kit brake levers, as well; there’s been so much compromise in this construction, it seems silly to go mad and add closer to scale thickness components.
    0764C6A7-7BC4-40AE-8857-958FC17A8B68.jpeg

    Cheers

    Jan
     
    B462076 - PALBRICK B
  • Lyndhurstman

    Western Thunderer
    Coupling
    Here’s the Rumney Models screw link fitted to the Palbrick.
    CBED5016-D52A-48FD-8D8A-FDEF6D07D240.jpeg
    Nickel silver, and the fret comes with 8 potential lengths of loop to suit individual requirements - just right for this neck of the woods.

    There are 3 layers to the boss, and the holes are 0.5mm. We’ve erred on the long side with the loops here, as the curve on the outside slip is a bit tight. We’ve also used 0.3mm NS in the pins - rather than 0.5 as per instructions, to give a bit of flexibility.

    A good compromise:
    1. a bit of a fiddle to construct - you really need two 0.5mm drills for the assembly of the boss
    2. cheap, and
    3. quickly delivered.

    The first also applies to the Exactoscale version. But the second definitely not!
    And the third.... ah.... if only Masokits were easy to access...

    Bottom line: they look the part, and can be moved. Fundamentally, A Good Thing.

    One down; one to go...

    Cheers

    Jan
     
    B462076 - PALBRICK B
  • Lyndhurstman

    Western Thunderer
    Worked Out
    F5D5A80A-7842-48EA-BD61-3CADACC320F7.jpeg

    The Palbrick is done. We’ve finished off the build by adding the tiebars (1mm NS strip).
    We’ve added a scribed floor of 10 thou plasticard, and 5 thou representation of the central retaining pillar.

    We tried to fit the rope cleats - there should be 3 per side - but gave upon them, as they were found to be beyond the most extreme values of Faff. Ditto with the inside framing for the forklift holes in the side. We’re not anywhere near the levels of Mr Kent’s skill - and patience.

    In the queue for the Paint Shop Boys it goes.

    Our best to you all

    Jan
     
    B462076 - PALBRICK B
  • Lyndhurstman

    Western Thunderer
    Stages
    The PSB have done their best with this heavily pierced sows ear.
    77636219-18B0-44B6-B2E6-0B84D327BECF.jpeg
    The externals are Railmatch Freight Bauxite (235) and Weathered Black (412). Both need a bit of thinning; for which we’ve used Humbrol Enamel Thinners. We weren’t sure of the internal colour of the plywood sides, so we’ve decided to use 235 in there, too.

    The floor is our freestyle jazz interpretation (we’re pretty hep cats, here) of almost-new wood. Based around Humbrol Matt 63 (Sand) with a bit of Matt 147 (Light Grey). Individual planks are picked out in HR103 (GWR Lining Cream). The whole floor was then dusted with Carr’s C1100 Weathering Powders - Rust & Coal. With more of the former than the latter.

    Interestingly - in a response to a query regarding the loading of these glorified hods in MR - Paul Bartlett identifies that the traffic for these wagons (refractory bricks - like those used in loco fireboxes - rather than the normal building brick) diminished to a third of its size between 1958 and 1962, and so in their latter years are probably best represented empty.

    Anyway. Numbering next. And then The Inspector Calls.

    All the best

    Jan
     
    B462076 - PALBRICK B
  • Lyndhurstman

    Western Thunderer
    No Country For Old Men
    D1F3C489-B737-463F-A41B-F413E744F92F.jpeg

    Finished. The PSB’s last throw of the dice - the numbering - left them a gibbering heap of humanity; nerves shredded, and all energies spent. I’ve sent them off to The Volunteer on Mill Place to imbibe their way back to normalcy. Please don’t look at the cant of this stuff: their mahlsticks have been put in places, and at odd angles that would render Houdini speechless. And don’t look to closely, or you’ll see where they Kleared an area on the left hand panel for the number, forgetting it was a Palbrick B, and not an A...

    Suffice it to say, it was a battle to the last. The placement of the delicate artistry of CCT’s BL56D was almost a bridge too far; we almost ran out of Kidwelly XP sets - using 3 of the 4 just on one corner. Placement on the triangles is a complete Pfaff. Or a right sew and sew. One side of this wagon almost ended up in Worksop as a result! How they would have worked getting the two halves back to their respective depots we thankfully don’t have to consider!

    Anyway, the paint’s drying now. It will be drifted with Testors tomorrow.

    Thanks for sticking with us. I’m off for a lie down!

    Our best to you all.

    Jan

    obo Watkins Wharf Wagon Works


    Point Mechanism
  • Lyndhurstman

    Western Thunderer
    Over-seasoned
    Dark, cold, wet. Logs crackling in the burner. Quiet on the hill outside the house. Hibernation - practiced for all year - comes to the Tamar valley.
    It is the time of year when thoughts turn inward, and the quickening of evening brings time for the out of mind.

    I see my last post on this thread was in June. Shameful, but there it is. I've not been absent, but neither have I been extremely present. My head receives my head. This odd - seemingly endless - period of the 'new normal' (working from home, washing cardboard boxes, scouring the neighbourhood for eggs, turning the garage over to food storage) has made the road less travelled extremely slippery. And my grip upon it has been weak, at times.

    Anyway, I've parked the VANWIDEs on the Shelf Of Doom. They were compounding my mental miasma; like a sewer inspector, I was very much going through the motions with them. Doing them because I was doing them. A beginning with no end. They're still there, lurking. But they'll have to wait. No more than a lot of things have had to do in this year.

    So, in all this, and probably something I should have written three paragraphs up; I've gone back to the layout.It's still bare boards. But the trackwork is now complete.
    50369841672_34ec1b96fe_k.jpg
    Barring the fiddle yard, but I think I have enough left over from the reconfiguration to allocate there.

    I have turned my attention (I've probably lost yours...) over to thoughts of point control. It will be manual. I have added droppers to the ends of the blades, in order to put the mechanism below the baseboard:
    50416295248_4676158054_k.jpg
    but now (typically, I'm useless at making decisions) I'm toying with the idea of making the wire in tube runs above the surface rather than below (they're all going to be buried in DAS (or similar) at some stage, anyway).

    Nothing new here, of course. Instantly recognisable to aged millinery purveyors. But in order to take up the difference in throw between the point blade against the stock rail (1.0 mm) and the travel of the DPDT slide switch (3.5 mm) some 2.5 mm of accomodation has to be found. Omega Loops (I'm sure they should be on The Wall Of Crisps, alongside the Chutney Windmills) are the obvious answer, but I've never liked the mechanics of them. And then, wiffling about the internet last week, I came across a post by Paul Gittins Over There on the system he's used on Braynerts Sidings. So I contacted Paul. and he very kindly sent me chapter and verse on How He Did It.

    So, having the DPDT switches already, and a suitable selection of Albion Alloys non-ferrous stcok to hand, the only thing I needed (here, I'm assuming my mojo has returned, rather than got stuck here due to not being allowed anywhere else..) was compression springs. I couldn't find any (and here, a previous life as a teleprinter mechanic sent me into daydreams about endless grey shelves filled with every small spring you could possibley imagine..) of a suitable size, so set about trying t make my own. And this is where I am now. I'll spare you more words, and let the pictures plot progress:
    Take 1: Upper: 0.4 mm PB wire around a plastic tube: proof of concept, mostly. Lower: A longer pitch, using a slotted screw:
    50452130091_a2c560b2d3_k.jpg
    Take 29a) A (sort of) jig:
    50472077576_d3438d12c8_k.jpg
    Take 2 (b): It's a wind-up:
    50472077606_7234f27304_k.jpg
    Take 3: The completed prototype
    50472233302_0ebed2e787_k.jpg

    Not bad, even if I do say so myself. Plenty of accomodation for switch throw, here.
    The plan now is to make end plates to compress the spring, and interal support sleeves, to ensure that the action of the mechanism stays aligned. 2 of these each for each spring. And then there's the two bits of wire to add to them - one end goes back to the switch tab, the other to the point. I'll try to make a drawing (it's far easier to explain that way - suffice it to say that there will be a disconnect (~3.0 mm) in the middle of the spring.

    Anyway, thanks for listening. I'm happy to be here. That's a good thing (for me, anyway... :) ).

    Peace

    Jan
     
    Y4 No. 33 - Adventures in CAD
  • Lyndhurstman

    Western Thunderer
    Tinkering towards a Y4 Art Thou?
    CAD (in our case Computer Aided Doodling) comes - knuckles dragging, picking at sticks, fascinated by its own reflection - to the Wharf.
    A4D8A2C2-B49C-4B99-BF82-B9F16AD3C202.jpeg
    This is - in theory - a Y4 (in old money, a B74).
    She will be No. 33 (ex-Departmental at Stratford, formerly 68129). Scrapped in 1963, she was the last of steam at Stratford. Along with J15 65445 - she would also be the last of steam on the Blackwall line, being scrapped by A. King & Co., Norwich, who had taken over the yard old GNR warehouse at Blackwall for breaking purposes.

    The basis of the loco is the wonderful set of drawings published by the GERS. I’m using TinkerCAD, because it seemed promising at the beginning. It’s not so bad, really - trying to remember which workplane I did what in, and scooping up all the pieces in order to move them about, is a bit fiddly. As is trying to get centred on the bit I want to work on (I daresay there’s some enlightenment online, but staring at PCs all day makes me loathe to stare at them on my day off...). But it’s coming along; this is the first time I’ve been back to it in 18 months, and I obviously didn’t forget everything. I’m not looking forward to the front windows, though. Or the square topped firebox ...

    Cheers

    Jan
     
    VANWIDE
  • Lyndhurstman

    Western Thunderer
    Vans: der graft generator

    A few hours doing tiny trains this Saturday afternoon. The Parkside Dundas sextet have had their coupling hooks fitted (courtesy of Dave Franks at LMS) and rooves courtesy of the bits box. As noted in an earlier post, I was going to make my own packing boxes for the couplings, but wobbling back and forth through the LMS website, I noted that their versions come in packs of 12. It sounded to synchronous to slide past....
    DE5B24A4-AEF7-4A0C-8D2E-FF6CDFEDFB37.jpeg
    They're coming on. Progress is glacial. The mojo is definitely on the down low. Still buffers and couplings, and painting and lettering.

    Cheers

    Jan
     
    VANWIDE
  • Lyndhurstman

    Western Thunderer
    A Parallel Universe
    More of it, in short order. So that’s good. Back to baby steps, one hour at a time.

    The Wharf’s R&D Dept are working up our particular (bordering on peculiar...) response to the Oleo pneumatic/hydraulic buffers required by the Diagram. Here are the component parts:
    214CC042-CCF4-404F-8DB0-C57104BD7142.jpeg
    On the left, is the sleeve to be inserted in the buffer moulding. The middle is the the buffer head and the tinned oversleeve that fits in the buffer sleeve. On the right is the completed sleeve/buffer assembly. Below is the unit fitted.
    6FE9DD77-E4D0-4BF7-8B0A-9804042A0287.jpeg
    The downside of this is that the tinning of their oversleeve means that it’s a press fit in the buffer sleeve, so working buffers are out. But the resistance of all parts does allow the reasonably accurate setting of the overall length (2’ 1/2”).

    Cheers

    Jan
     
    Last edited:
    VANWIDE
  • Lyndhurstman

    Western Thunderer
    One Of Six
    Progress on the half a dozen VANWIDE currently occupying the workforce has been sporadic, to say the least. But the underpinnings are done, and a few hours hiding from the Sun this afternoon has completed the insertion of the modified buffers mentioned earlier. Now all we have to do is fit couplings and apply paint. So maybe another eight months, then.
    65599EC4-F8FB-4DC3-98AF-4DACC17A705D.jpeg

    This one is the ugly duckling; you’ll see that the left hand buffer housing is askew. It snapped off, and wouldn’t reseat properly. The other 23 were fine.

    Cheers

    Jan
     
    Last edited:
    VANWIDE
  • Lyndhurstman

    Western Thunderer
    Watkins vs Jackson
    Hardly Kramer vs Kramer, but a pictorial panoramic view of fitting the AJs to the VANWIDEs.

    Disclaimer: We don’t know if what we’ve done is right, but it gives something that looks - and acts - like the thing it’s supposed to look like. So that’s good enough for our QC. But your judgement may differ.


    The supplied underframe provides the restrictive environment; the arrangement of transverse and longitudinal beams give a nice zone to fill:
    F87B4BFC-194B-44B6-AF76-3BA81556FD09.jpeg
    The first step was to make the locator. Some scrap 60 thou plasticard was cut to fit (4 mm high by 3.9 mm wide). This was drilled with two 0.3 mm holes, and glued in place under the brake lever cross-shaft.
    1C1FEC0A-E19F-447B-87D6-B25755DB2B79.jpeg

    412B311F-6DC6-401D-B35D-8ECE2378EF91.jpeg
    The two holes take the individual tails of each coupling - one of the AJs criteria is that they’re supposed to be aligned to the axis longitudinal axis of the vehicle:
    026C14B1-FF98-4719-AB01-44F262463A76.jpeg
    This was the test fit; the long tail was trimmed afterwards.

    The coupling was inserted under the axle. Before insertion, the settings of the bends are checked:
    1DD2EBCC-6440-41DF-885F-49C297659199.jpeg
    he coupling head is held in place by the Graham Turner designed jig:
    F68A0843-4E93-468C-84B6-8B39D71E56AF.jpeg
    The tail is then glued in place.
    This wonderful jig gives an identical unit at each end of the vehicle.

    The next step of the process is to set the height. Again, a jig gives us accuracy:
    CAABA286-348B-448F-BA98-D54086EDEE60.jpeg
    ...and the measurement is transferred to a piece (or pieces) of plasticard that is glued inboard of the buffer beam:
    31AC4DAE-CDE2-400B-9DF6-C5033C23A68D.jpeg

    Which provides the correct height setting:
    F69373A3-72B8-4E4E-8ED9-85F1F616E5F2.jpeg
    This useful little jig comes from Stenson Models: Alex Jackson Coupling Alignment Jig P4 Gauge – SM30D

    All that, gives this:
    5F18E590-4544-45C8-ACC9-1AD6156CC4D4.jpeg

    Around 60 minutes each. Not including the fettling of the hook. Fiddly, but fun. Only another 40+ wagons left to do...

    Cheers

    Jan
     

    Attachments

    • 0C587E88-2410-42FF-B5D2-A44506DE8638.jpeg
      0C587E88-2410-42FF-B5D2-A44506DE8638.jpeg
      79.1 KB · Views: 10
    • 741E8779-B75B-4F16-B461-C77DF1DE2E6C.jpeg
      741E8779-B75B-4F16-B461-C77DF1DE2E6C.jpeg
      207.6 KB · Views: 9
    Last edited:
    VANWIDE
  • Lyndhurstman

    Western Thunderer
    The Missing Link(s)

    Having polished off the fitting of the AJs to the sextuplet, attention has turned to the droppers. As mentioned previously, these are a natty fold up arrangement sourced from Lanarkshire Models & Supplies. The VANWIDEs are Instanter-fitted, but the 3-link version is also available.

    The etches are very wonderful. Fitting them is tricky, but possible. After doing the first freehand, we resorted to refitting the AJ bufferbeam jig; this holds the wire steady, and enables the closure around the 11 thou wire.
    EB171499-6D28-4554-8B12-FD30328796E6.jpeg
    The link can then be slid to its position beneath the hook, before a final crimp with some snipe nose pliers. A touch of Loctite secures the assembly to the guitar wire.
    436D7AC4-7BC2-4F39-B66A-A3E6066C0631.jpeg
    After that, it’s the turn of the iron link. These need opening out a tad in order to slip through the Instanter, by the usual method of twisting slightly.
    C7B89E76-24D2-4055-B696-6EF7D34A48C5.jpeg
    They can then be ‘closed’ with more Loctite. I’ve also run the Loctite on to the Instanter, thereby making the assembly rigid. This should make life in the stockbox easier.

    One aspect I did find In fitting the iron loop is that my pliers are all slightly magnetised. I therefore intend to make a set of brass crimpers; nothing flash - just something I can use to align the two ends of the loop flush with each other. You’ll note in the lose up that this hasn’t been done. Mind you, it’s only at these horrible zooms that such things are apparent. I can only hope that the eyesight of any visitors to the Wharf is as bad as mine!

    Cheers

    Jan
     
    VANWIDE
  • Lyndhurstman

    Western Thunderer
    Nether Ending
    The Works is flowing now. Beryl’s baps are powering us through the last fettling and fixing before this strained sextet head for the Paint Shop, and - hopefully - are accepted for their final destination somewhere on the Big Railway outside.

    Some hours have been spent trying to determine a happy ending. We’ve managed to construct some lamp irons (although they’re actually brass) from a few frets of Bill Bedford’s BUW001, and affixed the bony, bony vacuum pipes of Lanarkshire in the same neighbourhood. 57BC6806-6A67-41A3-BE45-31EFE506B95D.jpeg
    As you can see from the photograph; the end is in sight. We’ve decided that the pipe dummies will not be fitted - I know we made them for the MEDFIT, but Accounts have convinced us that the Cost:Benefit number of turning out another 12 is definitely of a negative value.
    We may have to blacken the AJs - preferably with something that has a rust inhibitor, as well.

    Cheers

    Jan
     
    VANWIDE
  • Lyndhurstman

    Western Thunderer
    Fine Fettle*
    (*Your mileage may vary)

    A productive hour or two, this Bank Holiday evening. We’ve managed (successfully, we think) in righting the wrong previously reported:
    C6D7E296-1F51-4D1F-9F78-E08EAE8A885E.jpeg
    Sinister is the original, shorn of its incorrectly-oriented cam. On the right is what we’ve worked up.

    The original was sweated on to some 10 thou brass sheet using 60/40, and cut closely with a piercing saw on the bench peg. Needle and diamond files gave us the shape, following the lines of the original. The boss was built up using the washer supplied on the fret, and the representation of the pivot pin a piece of brass wire soldered into place. Not as finessed as the original, but good enough.

    Cheers

    Jan
     
    VANWIDE
  • Lyndhurstman

    Western Thunderer
    Leverage
    The kerfuffle on the ratchet side has become a distant - low-level - grumble. We’ve moved on to clearer, stiller, uncluttered, waters. Where freehand fettling can be forgotten.
    7E572ECF-AC71-4A3E-900B-A1BF31A17A35.jpeg
    The levers on both sides are non-acting. Something akin to Victor Mature, you may say. They are used to bring some stability - and solidity - to the dangerous delinquent dangle of the brake lever guard.

    The cast clump of the semi-exposed vacuum cylinder comes courtesy of ABS by way of Stores, with its actuator arms snipped from the Rice-drawn Mainly Trains MT230 fret
    MT230: Wagon Brake Details - Wizard Models Limited - again, courtesy of Stores.

    Cheers

    Jan
     
    Top