Apologies in advance - a long, rambly post coming up! But potentially interesting to some

It's been a while since my last post on here - I've been busy doing test builds for the Manning Wardle Old class I project which is now nearing completion. I'm on my 3rd and final test build, with just the wheels and inside motion to finalise. Also been sidetracked by a foray into radio control, and a making a start on a display diorama so I've got somewhere nice to photograph my builds.
Previously in this thread, I have shown how I 3D printed the castings for the loco in a castable resin, and then had them cast in brass by a company. Since then, I took on board the advice of Graham and Andy above, plus that of others and redesigned the sprues a couple of times. Problem was, this was getting expensive, as a full set of castings was costing upwards of £50+ each time. I'd been following a few YouTube channels of people who do their own castings (jewellery rather than modelling, but the principal is the same), and wondered if I could vacuum cast my own models. Professional casting equipment can cost many thousands of pounds, but there are hobbyist machines that would do for my purposes, although my budget was pitifully small, so some compromises had to be made as can be seen below.
The basics needed were:
- 3D printer (which I already had)
- A kiln for burning out the 3D printed waxes
- A small, electric metal melting furnace
- A vacuum casting machine + vacuum pump (a cheap 2.5cfm single stage from eBay several years ago when I first floated this idea in my head!)
The latter 2 were combined in one machine, purchased from Facebook market place and advertised as not working. For £50, I thought it was worth a punt - the furnace part of the machine was working fine, but the vacuum half didn't pull a vacuum when attached to a pump. A quick bit of tinkering found the problem to be a simple fix, so a bit of a bargain given these machines cost £500-600 new! It has an integral metal melting furnace, a vacuum investment table for degassing investment plaster before & after pouring, and a vacuum chamber to draw the molten metal into the tiny nooks and crannies of the models.

Next up was the kiln - again from Facebook market place and not working as the controller wasn't working. No problem, as I had bought a programmable controller as I needed to set specific burnout schedule, so as long as the elements were fine - which thankfully they were - this would be perfect. It must be a good 30 years old so looks a bit brow beaten, but it's doing the job!

So onto the castings themselves. I've experimented with various resins, burnout schedules, temperatures of metal and flask, and finally think I'm getting close - not fully perfect yet, but much better than when I started. There are so many factors that are at play that affect the quality of the castings, one has to take quite a scientific approach to changing the variables each time in search of improvement.
Previously,
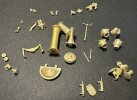
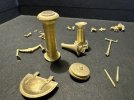
@GrahamMc has written about the need for different temperatures depending on the size of the pieces being cast, and he's spot on - the castings pictured below are from 2 different trees - the tree with the larger pieces on is pictured below (the design of which isn't ideal, but it seemed to work OK), with a metal temperature of 960 C, and a flask temp of 500 C. The smaller pieces were attached to a separate tree in a different flask (forgot to photograph these), and cast with a metal temperature of 1080 C and a flask temperature of 630 C.
Apologies for the really poor photos, taken on my phone in pretty poor light. Cruel close-ups etc etc...... they look pretty decent in the flesh. Some of these parts are only a couple of mm, so are magnified quite a bit! Also, they are either snipped or cut straight off the tree, with no clean-up, so they are still raw where removed from the sprue. All in all, they're not too bad for a home-brew attempt!


You can see some ash deposits on the buffer head at the bottom, which I think indicates I need to get a better airflow into the kiln.


Including the spigot on the back, these blowdown valves are only 2.5mm long, so it shows that if you can print the required level of detail, you can cast it.

Next steps:
- refine casting temperatures further - I'm led to believe that a difference of just 10-15 C can affect the surface finish.
- Redesign the buffer bodies - The wall thickness is really thin around the 'neck', leaving small holes where the metal either hasn't filled fully, or has been drawn into thicker parts as they cool.
- Change where I place certain parts on the main sprue to aid surface finish
- Print the parts at a layer height of 0.02mm (rather than 0.05mm as these were) to reduce build layer lines in some parts.
I'll post on here again once I've got a reliable, repeatable system!
John


