Manning Wardle 1814 16-inch 0-6-0ST scratchbuild. 4mm scale.

Dave

Western Thunderer
Evening all,

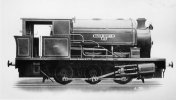
I have wanted a model of this hefty saddletank since I first saw a photo of it in the Industrial Railway Society Lincolnshire & Rutland handbook and so decided to scratchbuild it.

1814 was built in 1913 for Walter Scott Ltd. who operated a steel works in Hunslet and ironstone quarries in Lincolnshire. It started off as Walter Scott No. 2 and later became Crosby Ironstone No.4 before becoming No.2 in the fleet of United Steels Ore Mining Branch. It was scrapped in 1962.
WS2small.jpg

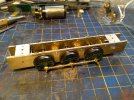
Frames, made from 40 thou. engraving brass, layered with 18 thou. hard brass. Hornby Peckett wheels and axles, bought as spares.
20240503_141645.jpg
 

Dave

Western Thunderer
I make these parts on a pantograph engraver by producing a styrene sheet pattern to four times the size of the finished part. I make a drawing first and stick it to the styrene. Holes are highlighted with red paint so that I don't miss any out. I don't own a proper drawing board and I can't drive a computer to draw with CAD, so I use a cheap plastic A3-sized drawing board and ball point pen. I would guess it's not the way you're supposed to do it but it works for me.
20240507_145529.jpg
I like to make loco frames from 40 thou. thick brass for strength and weight. Some bodywork is also done in this material, especially where the thickness doesn't show. The cab, below, has sides of 18 thou. hard brass with a front and floor of 40 thou. engraving brass.
20240508_194925.jpg.8cc748a754f33ee619fd80db02e540d1.jpg
 

40057

Western Thunderer
Evening all,

I have wanted a model of this hefty saddletank since I first saw a photo of it in the Industrial Railway Society Lincolnshire & Rutland handbook and so decided to scratchbuild it.

1814 was built in 1913 for Walter Scott Ltd. who operated a steel works in Hunslet and ironstone quarries in Lincolnshire. It started off as Walter Scott No. 2 and later became Crosby Ironstone No.4 before becoming No.2 in the fleet of United Steels Ore Mining Branch. It was scrapped in 1962.
View attachment 215361

Frames, made from 40 thou. engraving brass, layered with 18 thou. hard brass. Hornby Peckett wheels and axles, bought as spares.
View attachment 215362
That is a very handsome looking loco. It looks a great prototype for a clockwork model with those small wheels and tall saddle-tank. Plenty of room for a really large mainspring in a small engine. Can I ask, if you have drawings, where are these published?

Thank you.
 

Dave

Western Thunderer
That is a very handsome looking loco. It looks a great prototype for a clockwork model with those small wheels and tall saddle-tank. Plenty of room for a really large mainspring in a small engine. Can I ask, if you have drawings, where are these published?

Thank you.
There was never a General Arrangement made of it but I suppose there's a possibility that the working drawings exist somewhere in Statfold's uncatalogued MW drawings. Apart from the cylinder size I only know the wheel diameter and wheelbase. There is another Manning Wardle of which more is known that shares these dimensions so I scanned a side view and superimposed it on the works photo of 1814 and then resized 1814's image until the wheel centres matched. I estimated everything from there and from the known dimensions on the other loco. It's not precise but it's as near as I'm going to get.
 

40057

Western Thunderer
There was never a General Arrangement made of it but I suppose there's a possibility that the working drawings exist somewhere in Statfold's uncatalogued MW drawings. Apart from the cylinder size I only know the wheel diameter and wheelbase. There is another Manning Wardle of which more is known that shares these dimensions so I scanned a side view and superimposed it on the works photo of 1814 and then resized 1814's image until the wheel centres matched. I estimated everything from there and from the known dimensions on the other loco. It's not precise but it's as near as I'm going to get.

Thank you.
 

Dave

Western Thunderer
I had to make the smokebox again as I wasn't happy with the profile. The transition from straight to curved wasn't as clearly defined as it ought to be. I also took the opportunity to add rivets to the wrapper this time.
20240515_163555.jpg
I don't own a rivet press, so I planned to make a simple rectangular Plastikard pattern, mark the position of the rivets on it, and use a point cutter to mark them on the brass piece before punching them out with a pin and hammer. I didn't do that in the end. I discovered that the cutter can be made to act in the same way as a drill in a pin vice can, where a dome forms just before it breaks through the metal, so I used this to form the rivet heads. There are no graduations or settings on the pantograph, so it's done by judgement and experience. Or trial and error if you don't get it right first time but, fortunately, I did.

Old and new smokeboxes.
20240515_172004.jpg

The smokebox door was made by soldering a brass disc onto a copper tube and spinning it in a drill. The dome effect was formed by holding file against the disc. The saddle tank bracket is made in two parts, with the rivet heads being put in using the same method as on the smokebox wrapper.
20240516_160355.jpg
 

Dave

Western Thunderer
I need some help with this part.

I am attempting to make the chimney. I don't know much at all about making chimneys but I am aware that when starting with a brass bar it needs to have the curve of the smokebox put in using a fly cutter in a lathe. I have a very small Unimat lathe but not only am I not very experienced in using it, I don't have a fly cutter or a holder for the work. I came up with a bit of hillbilly engineering to hopefully get around this.
20240522_154559.jpg
A simple pattern was made and the parts above were cut on the pantograph.

Then soldered together to produce this lump:
20240522_161436.jpg

Which was then turned to make this:
20240523_113128.jpg
It fits the curve of the smokebox perfectly but I'm unsure where to go from here. I can't see how the base can transition into the chimney itself by simply turning it in the lathe. I take it that it's more complicated than that?
 

Herb Garden

Western Thunderer
Turn the profile on the lathe as if you were just turning the profile that meets the top of the smokebox in the lathe. Then file by hand the sides that come down the smoke box....

There's a good video by the 2mmfs society on YouTube of how to turn a dome which might help.... Sorry can find it at the mo as I'm at work
 

Ian@StEnochs

Western Thunderer
See my thread from post #11. Describes turning a simple chimney
Ian.


Dave

Western Thunderer
Thanks, chaps. I see now how it's done. Not having the jig to do the flare, I thought I'd turn the rest of it and maybe have a go at filing the flare by hand. I didn't part the chimney off completely and left something to hold on to whilst filing. I put it in a hand vice to hold it and that's when it all went wrong.
20240523_170713.jpg
I put in in the vice against the grain, so to speak and the pressure caused two of the laminations to come apart, so that's the end of that. I'll probably see if anyone sells a chimney that fits and looks near enough what I want. Failing that, there's probably someone who can 3D print one.
 

Herb Garden

Western Thunderer
Thanks, chaps. I see now how it's done. Not having the jig to do the flare, I thought I'd turn the rest of it and maybe have a go at filing the flare by hand. I didn't part the chimney off completely and left something to hold on to whilst filing. I put it in a hand vice to hold it and that's when it all went wrong.
View attachment 216063
I put in in the vice against the grain, so to speak and the pressure caused two of the laminations to come apart, so that's the end of that. I'll probably see if anyone sells a chimney that fits and looks near enough what I want. Failing that, there's probably someone who can 3D print one.
Oh no!

You could try araldite to put it back together and some rod to line it up?
 

Overseer

Western Thunderer
Thanks, chaps. I see now how it's done. Not having the jig to do the flare, I thought I'd turn the rest of it and maybe have a go at filing the flare by hand. I didn't part the chimney off completely and left something to hold on to whilst filing. I put it in a hand vice to hold it and that's when it all went wrong.
View attachment 216063
I put in in the vice against the grain, so to speak and the pressure caused two of the laminations to come apart, so that's the end of that. I'll probably see if anyone sells a chimney that fits and looks near enough what I want. Failing that, there's probably someone who can 3D print one.
I thought you were asking a lot of the solder. Better start with some round brass bar. If you don’t have a fly cutter the bottom can be filed to shape quickly using half round and round files followed by wet and dry abrasive wrapped around a rod of the same diameter as the smokebox. It is not difficult making chimneys and domes on a Unimat and a skill well worth learning.

I could do a tutorial on how I do it but not until next week. Not sure if you can wait that long.
 
Top