Way back yonder someone asked how I fix 3D to brass, today I was doing just that and thought it'd be a good idea to take some photos to hopefully clear any confusion.
First up we'll start with the chimney, in this case we're going the other way, brass to 3D.
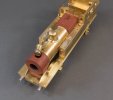
I measured the bore of the brass chimney and found some suitable thin bore tube that equals that internally or is wider, the top edge was profiled to match the underside of the chimney flange and soldered on; now it's a case of simply adding your adhesive of choice and plonking it on.
Some detail, without the additional tube we effectively only have a single surface bonding area, aka flat to flat. In this case the curved surface is not a true flat to flat and the curve will give additional bonding strength...but probably not enough. By adding the tube we have changed it to a dual surface bonding area, the closer those faces are to 90° the better as they reduce/eliminate the shearing failure that occurs with dissimilar materials.
Shearing failure, what does than mean? Well it's when two surfaces move at different rates, when that happens the bond will fail along that line, a good example is sand or tool boxes glued flat to flat on a brass plate; over time the expansion/retraction of the brass (greater than plastic) will cause the bond to fail. A good adhesive to counter this is Loctite 480, it has a rubber component and is designed to bond dissimilar surfaces, it's also bleedin expensive and has a short shelf life.
Back to the chimney, if it were 3D on brass then I'd still use the brass tube, but, I'd design in a rebate in the base of the 3D chimney to take the brass tube.
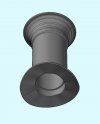
You'll have to excuse the wavy underside, I tend not to care about this face when lofting, it doesn't get seen and so long as the surface is higher than the smoke box wrapper, has no impact on fitment.
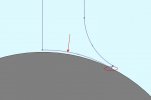
I suspect most people try to make the arrowed edge (below) match the smoke box radius perfectly, don't, you really don't need to; you'll probably end up with a wobbly chimney or gaps around the flange. The only critical point is where the flange meets the smoke box (circled), if you focus on that you'll design in some leeway or tolerance.
The cavity will allow you to put some wet n dry on the smokebox and gently rub the flange down to get a perfect fit.
Moving on to boxy objects, in this case cab interior tank extensions.
First a disclaimer, there are none in the 2P kit so these are nice to have additions, not replacement parts. The only nod to authenticity is the small stub extension at the rear, this covers the gap in the footplate where it does not meet the cab side. That's a fault with the kit, but when you consider that the sides fold down to give the little walls at the entrance, as well as jacking the footplate up to the right height, it's a forgivable sin and quite normal back in the day of kit design.
In hind sight I should have pushed the plug down into the cavity (though that would have created additional issues with orientation and support on the 3D part) and made the top flush with the footplate, or better yet just filled the cavity and stood the tank on top. The tanks are not fitted yet so I'll ponder that as I write the rest of this.
The cab tank has been designed with as small a surface area touching the metal work, why, well it makes it a whole lot easier to flatten and match the brass work. As we saw with the chimney, the only critical part is visual the bit that actually touches the metal work, the rest is best left as clear as possible.
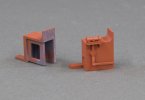
On the left is the secret Skunk works photo, it shows the magic internal plate, the plate is there for a couple of reasons, it'll allow the adhesive to wrap around the beams and cavities to 'grab' the 3D part. The internal plate is purposely set back from the edge for the reason noted above, it's much easier to trim back that thin edge of resin to get a perfectly joint. The internal plate also has a 3D print component, it acts as a strengthener and critically, keeps the top surface warp free. It's not there by accident, nor is it's shape or placement.
By the same token, it'll not work for every application, you need to work out internal supports, baffles and plates to get the end result on virtually every component, it'll also change if you have a different orientation as the peel and compression forces will be coming from a different angle and push the part in a different direction.
Anyway, enough mumbo jumbo voodoo, lets look at the more practical application, fixing it to the cab.
Now the cab interior already has a multi face bonding area, in fact it has four if you count the small stub rear face on the inside of the door turn in.
Here's the drivers side just placed in to give y'all an idea of how it all goes together.
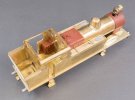
You could probably just add adhesive to the surfaces and it'll stick fine but I'm loathe to do that for a few good reasons, it's quite hard to get just the right amount of adhesive on and usually it squirts out of the edges and needs cleaning up....wasting more time. The tank is also a tight fit and and adhesive will almost smear on the cab front or wall as the tank gets pushed into place. Second, the adhesive layer has a thickness (certainly Devcon) which can push the part away from the wall and if it shrinks or retracts will leave a trough.
We can do better than this, it's a little more effort but the end result is much neater and cleaner, we're going to hide the glue on the inside and now the concept of hidden grabs handles should becomes clear.
We've already made our 'grab' handle in the design of the tank internals, now we need a 'grab' handle on the brass so that the two in unison provide a lasting secure bond. If this were a smaller part like a sand box then I'd not have a 3D grab and rely on the internal walls to give the required purchase.
The simplest grab handle in brass is what I call a staple or pig tail, it can be any shape you like so long as it has more than two faces/edges/angles component to it.
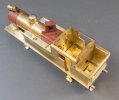
On the fireman's side you can see the small R shaped staple soldered to the inside of the cab wall, this fits inside the hole of the tank internal plate.
To fix in place the inside of the tank is filled with glue, doesn't need to be totally full, then very quickly and deftly, flip it over and place it on the cab interior. In this instance I'll be holding the body with the left hand side facing down and push the tank in and upward, it'll slow down the glue falling out.
Once in place I'll flip the whole body over to lie flat on the right hand side, the adhesive will then gloop down around the staple and bond the two together.
That folks, is how I fix 3D prints to brass models.


