Mike G's Workspace.

Mike Garwood

Western Thunderer
Just to rub salt into an open wound, I have contracted the new Covid variant. After we had a significant family birthday party, everyone from my side contracted this, my son, daughter, respective partners and children! I avoided it, until my dear wife decided to share! I'm especially peeved as I was due a visit to Barrow Road today. To put the County through some much needed intensive running and also to make sure that the completed A44 coach now gets round the curves.
I have actually done something about those awful Comet side frames. I've bought a hand full of the MJT 9ft side frames and then designed the steps in CAD to fit them - MJT do, do a step to for these but with only one supporting leg, they had two. It means a bit of fiddly work (when doesn't it?) but the result will be 100% better than the current frames. The reason I've bought so many MJT bits is because I'll have to retro fit these to my existing stock of coaches.

So for 3/4 days I've felt like doing nothing, I had planned to deal with the 52xx short comings on the slide bars and crossheads. But, as the 51xx is still not completed - testing and analysis is STILL ongoing - I thought I'd build a wagon or 2.

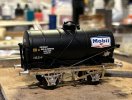
Another Rumney models production, the same kit as in post 467. Having made a fair bit of an in road on this today, I have to admit being even more impressed with the design. This is probably the easiest and quickest of Justins' designs to put together or is it that I'm familiar with the chassis already?

This is where I'm at:
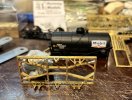
14t Oil tank chassis2.jpg

I love how this looks. Just like welded truss work.
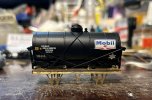
14t Oil tank chassis.jpg

The donor body is Bachmann and as usual there's a fair bit of underframe carving that will be needed to get it to fit. As you can see. But isn't it great when you pull a kit out of storage and all the fiddly bits fit without a struggle. This is the second oil tanker destined for Hengoed.

Stay safe - it's still out there and doing very nicely!

Mike
 

Dave Holt

Western Thunderer
Mike.

Sorry to hear about your new Covid infection and the consequent inability to visit Barrow Road for running in purposes. Most frustrating I'm sure.
Looks like good progress with the new tank wagon, though, so some compensation.
Dave.
 

Mike Garwood

Western Thunderer
Thank you for the suggestions, liquid lead no glue...like that.

My reasoning behind this was two fold;

1. Heavier than water.
2. Dense/ thick (a bit like me :) ), won't slosh around once the tank has gained some momentum.

A few hours work and another Rumney Models chassis rolls off the production line. For the first time I had to add spacer rings to the waisted bearings to make the wheels sit correctly in the bearings. First time I've ever had to do that. Not exactly a problem as these 'space rings' are included on the etch. As always these chassis, unless checked, will roll off your bench.

Just need the wife to go out so I can get it painted, acrylic paints, so minimum smell.

14t Mobile tank.jpg


Instanter couplings have been added and the build is complete. It's been cleaned up already. I think I'm going to do some more wagons. I have a pair of Gun Powder vans that I've had for ages now. Going to have to get some spoke wheels for those.

21 days till my daughter gets married, at some stage I'm going to have to think about my speech, either that or nick one off the web :(

Stay safe

Mike
 

Attachments

  • 14t Mobile tank.jpg
    14t Mobile tank.jpg
    147 KB · Views: 2

Mike Garwood

Western Thunderer
In the background of the attached photo, there's the Mobil tank lurking. The tank now has 49 gms of weight from 1mm liquid lead and sealed in with Tamiya putty. I wish I had a printer, I'd have loved to have stuck the 'Fairy' liquid emblem over the Mobil one, that really appeals to my sense of humour :) .
In the forefront are the 2 Gunpowder vans, now under construction. Another Rumney models design. The vans themselves are 3D printed with an etched brass roof and chassis. Justin has covered all the regional variants, including fitted and unfitted vans.

Removing the supports was a matter of moments as was filling off the remainders. I've just started the chassis build and as usual, a lot of the chassis is jigged.

Gunpowder vans 1.jpg

The printed pieces were super glued together. All fitted without problem.

More to follow in due course.

Stay safe

Mike
 

Mike Garwood

Western Thunderer
Firstly I'd like to thank Hayfield1 for his help, thank you John.

This really has been a new voyage for me, I have never built such a multi media kit. Lots of drilling 0.3mm holes, which has really tested my eyesight.
The solebars are 3D printed and come bent, or a little turned up at the edges is a fairer description. In his instructions Justin gives a solution and it works...as you can see from the picture. They also require a bit of cleaning up, again nothing stressful.
I have also managed to form the roof, using a 19mm diameter piece of dowel, took seconds to roll it on my thigh and a good fit for the roof profile. The brakes are also a 3D print but the brake guards are very fine etched brass. If your going to build the fitted version you'll need all 4, fortunately I'm not. Fiddly...very fiddly.

Gunpowder vans 2.jpg

Really enjoying this new approach to model building. Having the brakes as a print is a real godsend, although the arrangement of building the brakes from the 14t tank is also very good. On the 12t chassis the brakes are a real challenge.

A week today my little girl (now 30) gets married, finished the speech, suit fits well as does the shirt and my shoes are gleaming. I may have to hand out sunglasses :) .

Tomorrow sees a visit to Glewstone to use the painting facilities and get the A44 into a top coat. Looking forward to finishing this unusual coach. The 14t tank wagon chassis is in primer awaiting an opportunity for SWMBO to disappear for an hour or so. There are rumours that she's off to Amroth on bank holiday weekend...and I've a lot of weathering to complete, just saying :cool: .

Stay safe

Mike
 

Mike Garwood

Western Thunderer
Had a great time at Glewstone. Finished the top coat of the A44, but not without drama. Took my own airgun (Asturo 0.3mm tip), forgot to take the adapter for the compressor. Justin kindly offered me the use of his Iwata...never driven this model before, I don't think it was HVLP, but it would save a wasted trip. Set the Iwata compressor to 18 psi (which happens to be the same model as mine). Couple of minutes later a very grateful Mike G had a smile on his face.
So, thanks J for the lend and I'm still really sorry about spilling the paint all over your workroom floor. (More like drops - not a flood).

While I was there I was privileged to see some of Justins completed work. I sincerely hope that his models get to meet the public, because they are stunning pieces of work. And yes, I still hate talented people. :) :)

GWR A44 top coat.jpg

Nice gloss finish. Bought some gloss black for the chassis...just need dry day to be able to use it.

More work on the Gunpowder vans...I've added the weight to the bodies, each body now comes in at 55gms. Mr Newitt has added a recess on the bottom of the body to allow 2mm thick lead sheet to be added. I used liquid lead for the rest of the weight.

Gunpowder vans 3.jpg

The 4 holes in the body align with the building holes in the chassis. After the weights, the roof went on. Held on by rubber bands until the glue had dried. Other little bits have been bent up and soldered and wait their turn to be put in place.

Gunpowder vans 4.jpg

The edges of the roof need a little bendification to put them straight.

Next job is to glue in the sole bars. So the work continues...updates will be a bit sparse for the next couple weeks...wedding & holidays etc...

Stay safe

Mike
 

Mike Garwood

Western Thunderer
It's been a while...daughter married, had a few days away and now it's back to reality.

The wedding was fabulous, went like a charm. This is my daughter and if I say so myself, the make up artist did her proud :)

Sarah wedding.jpg

Simply stunning! One very proud Daddy.

Back to more mundane things...

I'm beginning to have a few reservations over 3D printed parts. Detailed they certainly are, robust they are not. I say this knowing full well that I have sausage fingers. That and the fact that it didn't help that I dropped the van on the floor from about 5 ft up. So there's been a fair bit of bodgery gone on to try and resolve the problems this caused. Apart from a few minor details the van is finished, the first one of two. I have to admit in rushing the end - simply because I was so pissed off with myself.

Gunpowder vans 5.jpg

It looks like the prototype and I've ordered paint from Precision Paints - I could not find the acrylic equivalents from Vallejo. BR freight grey and a slate grey for the roof. But if you look closely at the solebar you can see where parts have broken off.
So, I've changed my mind on mixed media kits or perhaps to fairer, I'd like to see the solebars back as etched, the oil boxes and springs are superb and are easier to fit than soldering whitemetal castings. I think I'm so used to fully soldered construction that using superglue is a bit of a 'dark art' - where have I heard that before?

Gunpowder vans 6.jpg

The second van will be a fitted van and looks to be a challenge where the vacuum cylinder is concerned. This does present a problem in splitting the train when it pulls into the marshaling sidings, but I dare say that can be overcome (somehow?).

To make matters worse, SWMBO, is indeed away for the bank holiday weekend. This news has lightened my mood considerably. So the dinning room will once more be paint city central.

To my new son-in-law and his wife, live long, love and laugh hard.

Stay safe

Mike
 

Mike Garwood

Western Thunderer
The second van was to be a fitted version of the first van, then my sausage fingers got to work and I fractured one of the brakes. I managed to successfully glue the leg back to the brake, but when I came to fit it all to the chassis...yup, I broke it in the same place. By then I'd fitted the brake gear safety loops. So I abandoned the idea of a fitted van and settled for another unfitted van (like I had a choice!).

I have to say batch building does have it's upside, in as much that you recall the parts you found difficult first time and are more patient in getting thru the fitting of those pieces. I still think the sole bars should be etched (my own personal preference), but the brakes and body being 3D printed are really grand ideas. So much so that the next project to cross my bench will be a model built in a similar vein.

Gunpowder vans 7.jpg

The eagle eyed of readers will note the lack of buffer shanks on both models...that's because I don't have any. MJT are currently out of stock, as are Comet and I cannot access Dave Franks site as he's got his own peculiar problems and I completely sympathize with Dave as his problems aren't of his own making.
If anyone knows where else buffer heads can be had from I'd be grateful if you'd let me know, the alternative is to force the buffer housing off and put some cast whitemetal 4 rib buffers in situ.

Gunpowder vans 8.jpg

As usual once the wheels were added to these models they both made a dash for the far side of my desk! The quality of Justin's designs continues to amaze me.
Highly recommended kit of an unusual prototype.

Preparations are well in hand for the weekend, paint supplies have arrived for these vans, transfers are on the way. The GWR A44 coach has been masked up ready for the roof to be painted and I've retrieved my gloss black celly to do the chassis. All other paints are already and waiting for use. Hopefully SWMBO will be on her hols by 10:00 hrs Friday and after a quick hour in the gym I'll be at it for the rest of the weekend.

Stay safe

Mike
 

cctransuk

Active Member
I've got a few motors from CCTrans but, these are to big (diagonally) to fit my engine.

How do you fit the motor to the gearbox?

If installed as per the supplied diagram - drilling new screw holes - the Mitsumi motor usually fits most medium prototypes on the boiler centreline. Some users simply spot-solder the motor case to the gearbox.

John Isherwood,
Cambridge Custom Transfers.
 

Mike Garwood

Western Thunderer
How do you fit the motor to the gearbox?

If installed as per the supplied diagram - drilling new screw holes - the Mitsumi motor usually fits most medium prototypes on the boiler centreline. Some users simply spot-solder the motor case to the gearbox.

John Isherwood,
Cambridge Custom Transfers.
John

Pictured on post 145.

Mike
 

Mick LNER

Western Thunderer
Re Buffer Heads they are non working but good qulaity. No one else seems to have anything for quite a while .


AJC

Western Thunderer
Re Buffer Heads they are non working but good qulaity. No one else seems to have anything for quite a while .


Do you happen to know what the diameter of those is, Mick?

Adam
 
Top