Nick Dunhill
Western Thunderer
I am quite excited about this build. I like Standards and haven't had the opportunity to make one recently. Only Scorpio do a kit for the model, and it has its origins with Jim Harris's Acorn, later Transport Age range. Scorpio acquired the range some time ago and did what they could to improve the product and Jeff had a built up model on his stall at Kettering and said it was buildable. So armed with an elastic budget and some determination it's on with the soldering iron.


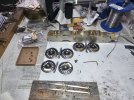
The client has supplied me with a set of detailed drawings for the loco, so the uncertainty lies with the tender. I decided to tackle that first. The first job was the inner chassis. Firstly I cut U shaped holes in the chassis side to accept Slater's square brass bearings on the front and middle tender axles. The bearing location was measured and the bearing located using 1.5 x 1.5 mm L section brass. I added height adjusters.

The rear axle used the top hat bearings supplied in the kit.
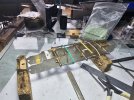
The chassis sides have a big fold that needs making along the top of the panel. I folded the first side and it came out a bit distorted, so rather than mucking around trying to straighten it I cut the top off, straightened the parts and soldered them together. I did the same with the second side, and noticed that the fold line wasn't drawn completely straight, and hence the curvature on making the initial fold. The kit is hand drawn, and the edges and fold lines are a bit wobbly. It is easily filed straight though, checking for squareness as I go.
Anyway the inner chassis came out well. I used the simplified castings for the tender brake rigging and water scoop, deciding it would be better to spend the budget on the visible parts of the model later.

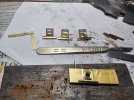
Next I made the tender front and the sections behind it. The panels for the lockers behind the front panel were not quite the correct size, so I had to make a couple of new parts. Also the curvature of the top sections of the tender front didn't match, so I decided to stop building that area until I had got a little further with the body and could find some point of reference for everything. There's no point in making a big sub assembly and having to take it apart later to make it fit. At this stage I went back to the outer frames and buffer/drag beams. The footplate was fine and the front drag beam folded down nicely. The fold line for the buffer beam was too close to half etched sections on the buffer beam front, and I would have just distorted it....badly. I cut off the buffer beam along the fold line and soldered it on instead. The outer chassis sides were about 4 mm too short, so I extended them by butt soldering a bit of scrap etch to the rear (the join is hidden by the rear steps). The locating hole for the rear axlebox is around 1.5 mm to far to the rear, so that was moved too. I fitted up the steps provided and added buffers to the drag beam and bumpers to the drag box. A fixing screw for the loco to tender coupling was improvised, and the tender floor had to modified a little so that the fixing nuts could be located sensibly.

The axlebox and spring castings were replaced by some Ragstone items provided by the client. I bought some Ragstone buffers from Andy at Kettering and will convert them to be self contained next week before fitting them to the beam.
This is the state of play as I type.

The client has supplied me with a set of detailed drawings for the loco, so the uncertainty lies with the tender. I decided to tackle that first. The first job was the inner chassis. Firstly I cut U shaped holes in the chassis side to accept Slater's square brass bearings on the front and middle tender axles. The bearing location was measured and the bearing located using 1.5 x 1.5 mm L section brass. I added height adjusters.
The rear axle used the top hat bearings supplied in the kit.
The chassis sides have a big fold that needs making along the top of the panel. I folded the first side and it came out a bit distorted, so rather than mucking around trying to straighten it I cut the top off, straightened the parts and soldered them together. I did the same with the second side, and noticed that the fold line wasn't drawn completely straight, and hence the curvature on making the initial fold. The kit is hand drawn, and the edges and fold lines are a bit wobbly. It is easily filed straight though, checking for squareness as I go.
Anyway the inner chassis came out well. I used the simplified castings for the tender brake rigging and water scoop, deciding it would be better to spend the budget on the visible parts of the model later.
Next I made the tender front and the sections behind it. The panels for the lockers behind the front panel were not quite the correct size, so I had to make a couple of new parts. Also the curvature of the top sections of the tender front didn't match, so I decided to stop building that area until I had got a little further with the body and could find some point of reference for everything. There's no point in making a big sub assembly and having to take it apart later to make it fit. At this stage I went back to the outer frames and buffer/drag beams. The footplate was fine and the front drag beam folded down nicely. The fold line for the buffer beam was too close to half etched sections on the buffer beam front, and I would have just distorted it....badly. I cut off the buffer beam along the fold line and soldered it on instead. The outer chassis sides were about 4 mm too short, so I extended them by butt soldering a bit of scrap etch to the rear (the join is hidden by the rear steps). The locating hole for the rear axlebox is around 1.5 mm to far to the rear, so that was moved too. I fitted up the steps provided and added buffers to the drag beam and bumpers to the drag box. A fixing screw for the loco to tender coupling was improvised, and the tender floor had to modified a little so that the fixing nuts could be located sensibly.
The axlebox and spring castings were replaced by some Ragstone items provided by the client. I bought some Ragstone buffers from Andy at Kettering and will convert them to be self contained next week before fitting them to the beam.
This is the state of play as I type.
")