Templot Plug Track Developments

Hayfield1

Western Thunderer
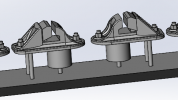
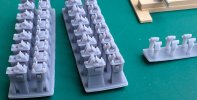
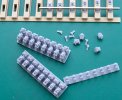
And about another hour last evening, printed a few overnight. Not perfect, but certainly a promising start. They fit the rail well, I have not used Templot plug dimensions here but that would be easy to do - mine have a 3mm stub centred on the gauge face - I’ll laser cut a few timbers at some point.

I don’t yet have a cost per chair, but I’d estimate well under a fiver for a whole build plate full - that would be about 240 chairs I think

View attachment 214287

View attachment 214291

I reckon it’s perfectly feasible, it’s certainly cheaper and more convenient than buying chairs.

simond

An excellent bit of both design and modelling, as you say printing at home is far cheaper than buying commercial products,

Its a great pity you are not developing the 2 bolt chair/chairs further. I wish I could get my head around 3D designs

Thank you

John
 

Hayfield1

Western Thunderer
Only if you have the gear to draw it, and the printer to print them.

ATB

OzzyO.

Whilst design is one thing, the cost of 3D printers is tumbling and laser services can now be outsourced if required

Many seem to think the cost of the hardware is a barrier, but with the ever rising costs of RTR track or even parts to build track, anyone considering building even a modest layout face an outlay which would fund both the hardware and materials to print the trackwork

One example is a resin printer, James Walters recommends one that costs £90, a 500 pack of C&L chairs cost £46.80 + p&p. The printer is soon paid for after 3 bags of chairs, then you are paying appx a tenth of the retail price for further prints

Likewise with FDM printers a turnout base is about 30p a base in 4mm, 7mm turnout bases are likely to be around £1

But perhaps a group with in either a club or society can join together and share the costs, this way the capitol cost decrease rapidly ply sharing technical abilities

At the last Scaleforum I was taken aback at the number of folk who already had these machines, perhaps find a friend ?

John
 

Dog Star

Western Thunderer
Many seem to think the cost of the hardware is a barrier, but with the ever rising costs of RTR track or even parts to build track, anyone considering building even a modest layout face an outlay which would fund both the hardware and materials to print the trackwork
This statement is probably true.... This past week I needed to buy more chairs and in establishing my current needs I worked out how many plain line chairs I have used on our BLT with added coal (colliery). My crude calculations suggest that Scruft's Jcn has / will consume in the region of 6, 000 plain line chairs and at roughly 10p per chair (C&L, price per bag of 500) then the spend is a surprising £600!

Would I have expected that cost when I started?

OK, costs have risen and my calculation is a first approximation which I shall not bother to refine.

rgds, G
 

adrian

Flying Squad
And about another hour last evening, printed a few overnight. Not perfect, but certainly a promising start. They fit the rail well, I have not used Templot plug dimensions here but that would be easy to do - mine have a 3mm stub centred on the gauge face - I’ll laser cut a few timbers at some point.

I don’t yet have a cost per chair, but I’d estimate well under a fiver for a whole build plate full - that would be about 240 chairs I think
Looks interesting - I'll certainly be giving it a try - just ppondering whether to order some different resin for the 3D printer. The detail stuff I have is quite brittle when finished.

Something a little more flexible or with a bit of give might be better.
 

simond

Western Thunderer
Water washable is recommended on the Templot forum, but I have not tried it.

I find FNG is brittle but you can push "surprisingly hard" before you find the limit. I apologise for the use of highly technical terms :)

What I did find was that my sprue was not quite good enough, and to my surprise, some of the chairs had "collapsed" a bit - the jaws had closed. Of the good ones, I have only played with half a dozen, and one broke when fitting it to the rail, the others were fine, fitted snugly - I guess that's not a an unqualified success. The rail I have is almost certainly C&L.

1714632319336.png

I won't do any more with the 3mm stud, I will follow @martin_wynne advice, and use the templot plug, or do them with a flat base without any kind of plug, but with holes where the fangbolt ends would be, so they can be pinned down. I might sprue them at an angle from horizontal.

1714632386988.png

one sprue like this fits across the short axis of my Saturn build plate.

Currently working on a "95R" ordinary chair

cheers
Simon
 

Hayfield1

Western Thunderer
Simon

I am glad you are enjoying experimenting printing 3D resin chairs and it would be interesting seeing photos of the printed items
 

martin_wynne

Western Thunderer
Looks interesting - I'll certainly be giving it a try - just ppondering whether to order some different resin for the 3D printer. The detail stuff I have is quite brittle when finished.

Something a little more flexible or with a bit of give might be better.
@adrian

Hi Adrian,

I'm using ABS-Like resin, water-washable (Anycubic).

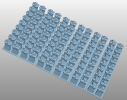
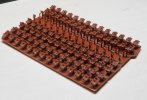
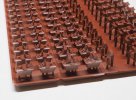
From Templot in 7mm I can get 6 rafts of 18 REA S1 chairs on the build plate of the Mars 2P and Alkaid printers.

That's 108 chairs. Chitubox says the resin cost is £1.24, so that's just over 1p per chair. Some resin could be saved by shortening the support pyramids, but then it's tricky to get between them with normal-size side cutters. The small blue snips are not really strong enough, especially on the larger chairs. Templot is free to use and an Alkaid printer which prints these very well costs £90 delivered in the UK. So the costs compare well with buying injection moulded chairs if you need lots of them.

These are for C&L code 131 BH rail section. Any BH rail section can be set up in Templot. These are all solid-jaw clip-fit plug chairs. For the loose-jaw chairs it takes a bit more space for the separate loose jaws.


rafts_s1_clip_fit_131-png.png

s1_clip_fit_131-png.png
Martin.
 

Dog Star

Western Thunderer
... just pondering whether to order some different resin for the 3D printer. The detail stuff I have is quite brittle when finished.

Something a little more flexible or with a bit of give might be better.
We are printing 7mm GW S&C fittings using FNG on Anycubic; good, usable, results with chair base printed parallel to build plate and with short, small, supports (about eight or ten per chair). Using the information from the Lychee settings the average cost per chair is between 1.5p and 2p per chair (remember that we are printing S&C chairs in 7mm scale).

Some of the chairs are more likely to break than others and the chairs which break are those where the shape of the wing rail... the angle between switch and stock rail... are not quite 100% accurate. The 1C and 1S / 2S often break the jaw with the key. Reducing the rate of breakage by improving the accuracy of laying timbers and by achieving more accurate rail bends has an acceptable bonus of better looking track.

From Templot in 7mm I can get 6 rafts of 18 REA S1 chairs on the build plate of the Mars 2P and Alkaid printers. That's 108 chairs. Chitubox says the resin cost is £1.24, so that's just over 1p per chair.
That seems to align with our experience.


Worth saying that the chairs that we print do not have keys and that makes turnout assembly easy provided that the timbers are laid at correct spacing and the rails are shaped well. 3DP keys are inserted to hold the rail tight to the printed chair.

Our chief problem with using 3DP chairs is choice of adhesive for fixing chairs to ply timbers. Solvents like Butanone or Methelyne Chloride do not affect the resin so are of no use. Currently we use thin superglue although that is not 100% guaranteed. I intend to try UHU Pur as a contact adhesive with the pending turnouts.

regards, Graham
 

martin_wynne

Western Thunderer
Worth saying that the chairs that we print do not have keys and that makes turnout assembly easy provided that the timbers are laid at correct spacing and the rails are shaped well. 3DP keys are inserted to hold the rail tight to the printed chair.

@Dog Star

Hi Graham,

Templot sets the correct timber positions, and sockets for the clip-fit chairs -- no adhesive or gauges needed. The tangs on the plugs work equally well in laser-cut ply sockets. The entire outer jaw is loose, rather than just the key. This clips the rail into the chair as the pin is inserted down into the slot:


cheers,

Martin.
 

ICH60

Western Thunderer
Our chief problem with using 3DP chairs is choice of adhesive for fixing chairs to ply timbers. Solvents like Butanone or Methelyne Chloride do not affect the resin so are of no use. Currently we use thin superglue although that is not 100% guaranteed. I intend to try UHU Pur as a contact adhesive with the pending turnouts.

regards, Graham
Graham I used Loctite 2097695 60 Seconds Universal Glue and occasionally Loctite 406 on my printed chairs on Shipston, They have been laid for a year now and still seemed to be OK.
 

adrian

Flying Squad
Hi Adrian,

I'm using ABS-Like resin, water-washable (Anycubic).

From Templot in 7mm I can get 6 rafts of 18 REA S1 chairs on the build plate of the Mars 2P and Alkaid printers.

That's 108 chairs. Chitubox says the resin cost is £1.24, so that's just over 1p per chair. Some resin could be saved by shortening the support pyramids, but then it's tricky to get between them with normal-size side cutters. The small blue snips are not really strong enough, especially on the larger chairs. Templot is free to use and an Alkaid printer which prints these very well costs £90 delivered in the UK. So the costs compare well with buying injection moulded chairs if you need lots of them.

These are for C&L code 131 BH rail section. Any BH rail section can be set up in Templot. These are all solid-jaw clip-fit plug chairs. For the loose-jaw chairs it takes a bit more space for the separate loose jaws.
Thanks for that - I've started having an experiment with the system.

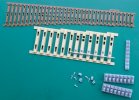
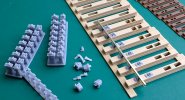
I'm laser cutting a plain track base from 3mm ply so I've been experimenting with the shorter plug depth and whether to use clip or push fit. I've just been taking a bit of time reading the guides and exploring the different options - so I'm not too worried about maximising the number of chairs per print run just yet. I found the pyramid supports from Templot a little too beefy to easily cut them away without damaging the clip part so I have resorted to the finger supports generated by Lychee slicer.

I'm struggling at the minute with the rail dimensions, I'm using C&L code 125 BH but the I haven't been able to get a good set of dimensions for the custom rail settings to get it seating nicely. Do you have any recommendations for Code 125 BH I can try?

mrj - 1.jpeg

mrj - 2.jpeg
 
Last edited:

martin_wynne

Western Thunderer
I'm laser cutting a plain track base from 3mm ply so I've been experimenting with the shorter plug depth and whether to use clip or push fit. I've just been taking a bit of time reading the guides and exploring the different options - so I'm not too worried about maximising the number of chairs per print run just yet. I found the pyramid supports from Templot a little too beefy to easily cut them away without damaging the clip part so I have resorted to the finger supports generated by Lychee slicer.

I'm struggling at the minute with the rail dimensions, I'm using C&L code 125 BH but the I haven't been able to get a good set of dimensions for the custom rail settings to get it seating nicely. Do you have any recommendations for Code 125 BH I can try?
@adrian @Hayfield1

Hi Adrian,

Looking good.

Most of the plug track experimenting to date has been done at 4mm/ft scale, and is currently working well.

I'm now tinkering about in 7mm/ft scale. In theory everything should upscale to 7mm nicely and work fine. Which it does mostly, but I can see a few areas where further tweaking might be worthwhile.

For use with the loose outer jaws option in 7mm you need a minimum plug depth of around 5mm and a minimum timber thickness of 5.5mm (or say 6mm ply) to clear the plug. With a shorter plug I don't think the loose jaws are feasible -- you would need to get the key past the rail head and locate the shorter pin in the slot both at the same time. No fun at all. The long-pin design works because the pin is already inserted in the slot before the jaw is pressed all the way down, clipping the key under the rail head in the process.

For use with 3mm timbering I suggest raising the track on 3mm battens in the old-fashioned way:
battens_plug_clear.png

Otherwise for 3mm timbering I think you would be restricted to using the solid jaws option only (slide-on chairs).

The C&L code 125 rail represents the lightweight 85lb/yard bullhead rail sometimes found in yards and sidings, goods loops, and on lightly-used branch lines -- but not usually in pointwork. It needs the smaller S2 and L2 chairs, not currently available in Templot. If used in the standard 95lb chairs (S1, etc.) it would look a bit over-chaired. I suggest using the C&L code 131 rail which is a good representation of the common BS-95R 95lb/yd bullhead rail.

I haven't yet included pre-set dimensions for the code 125 rail because I don't have any of that to hand. I will see about getting some. If you leave the setting on the default EMGS code 75 rail, it may fit the code 125 rail ok (Templot will scale it up to 7mm/ft).

For the code 131 rail I have now added some pre-set dimensions, which will be in the next program update soon.

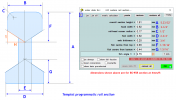
This is the simplified bullhead section dimensioning used in Templot:
custom_rail_section_dims-png.png

(mm dims above are for 4mm/ft scale)

In entering your own dimensions you first need to determine the fish angle. The prototype is 1:2.75, but model rail seldom gets close to this, about 1:2 or 1:1.5 is typical of model rail. You can then set the fish centre dimensions to achieve the required head and foot depths.

These are the figures I'm using for the code 131 rail. You could enter these as custom settings if you don't want to wait for the next program update:

overall section height: 3.36 mm
head width: 1.56 mm
foot width: 1.58 mm
web thickness: 0.44 mm
fish centre from top: 1.35 mm
fish centre from bottom: 0.98 mm
fish angle: 2.0

(Make sure you have set your model scale to 7mm/ft first, because Templot stores these dimensions as full-size equivalents.)

The default pyramid supports work well in 4mm/ft scale, but I agree that they are a bit chunky when scaled up to 7mm/ft. But they do work ok and chairs can be cut from the raft with side cutters or a razor saw. If using auto-generated supports instead, check that they don't block the underside of the pin slots -- which would make it difficult to wash through the slots thoroughly. Residue resin in the slots is the main cause of the loose jaw pins not fitting. Using water-washable resin means it can be vigorously plunge washed in a bucket of water -- a bucketful of IPA is hardly practical. This is the resin I'm using:

https://www.amazon.co.uk/gp/product/B0C7BFQZ2C/

cheers,

Martin.
 

Attachments

  • battens_plug_clear.png
    battens_plug_clear.png
    34.1 KB · Views: 4
Last edited:

adrian

Flying Squad
Thanks for the prompt and comprehensive reply.
For use with the loose outer jaws option in 7mm you need a minimum plug depth of around 5mm and a minimum timber thickness of 5.5mm (say 6mm ply) to clear the plug. With a shorter plug I don't think the loose jaws are feasible -- you would need to get the key past the rail head and locate the shorter pin in the slot both at the same time. No fun at all. The long-pin design works because the pin is already inserted in the slot before the jaw is pressed all the way down, clipping the key under the rail head in the process.
...
For use with 3mm timbering I suggest raising the track on 3mm battens in the old-fashioned way:

Yes thanks for that I understand the problems and issues so I will be experimenting with a few ideas. For the current project it's for a test track and so would like to persevere with the 3mm timbering but avoid the battens - if only for weight considerations. I really like the idea of the loose jaws as it will make fitting the rail with electrical droppers so much easier.

The options seem to be in order of increasing hassle!
  • build as panels on the workbench and clip the longer loose key from underneath after fitting
  • cut the foam underlay in strips so there is a gap for the extended pin on the loose key
  • laser cut the foam underlay from the Templot export with pockets for the extended pin
  • devise a fitting jig/system for fitting the loose jaws with a shorter pin

The C&L code 125 rail represents the lightweight 85lb/yard bullhead rail sometimes found in yards and sidings, and on lightly-used branch lines -- but not usually in pointwork. It needs the smaller S2 and L2 chairs, not currently available in Templot.
As mentioned it's just a test track project and I have the 125 rail in stock so will use that for most of it, I should try the code 131 at some point but it only appears to be available in nickel, my preference is for steel rail where possible.
If you leave the setting on the default EMGS code 75 rail, it may fit the code 125 rail ok (Templot will scale it up to 7mm/ft).
Just trying that - print run going at the minute - will post results when finished.
The default pyramid supports work well in 4mm/ft scale, but I agree that they are a bit chunky when scaled up to 7mm/ft. But they do work ok and chairs can be cut from the raft with side cutters or a razor saw. If using auto-generated supports instead, check that they don't block the underside of the pin slots -- which would make it difficult to wash through the slots thoroughly. Residue resin in the slots is the main cause of the loose jaw pins not fitting.

The magic supports in Lychee work very well, none are blocking the pin slots. The one issue is that it puts a stablising finger joint on the side of the base plate. Whilst experimenting it's not a problem but I will move it slightly if running off a batch, currently a quick cut with the cutters leaves a slight bump on the bottom of the base plate which might cause problems with it seating nicely on the timber, easily trimmed with the scalpel but not something I'd want to be doing on thousands of chairs!
 

simond

Western Thunderer
laser cut the foam underlay from the Templot export with pockets for the extended pin

This sounds like an attractive solution. Might work well with generating the cess etc.

I’ve not used foam under the track on PD loco but it’s all slow running so not important. If I get my planning permission appeal, and my extension, and my layout room, a bit of noise deadening will be on the list.
 

martin_wynne

Western Thunderer
Yes thanks for that I understand the problems and issues so I will be experimenting with a few ideas. For the current project it's for a test track and so would like to persevere with the 3mm timbering but avoid the battens - if only for weight considerations. I really like the idea of the loose jaws as it will make fitting the rail with electrical droppers so much easier.

The options seem to be in order of increasing hassle!
  • build as panels on the workbench and clip the longer loose key from underneath after fitting
@adrian

Hi Adrian,

Templot update 244d is now available and includes this new option:

3D plug track - version 244c and beyond

which reduces the 7mm/ft plug depth to just under 3mm, matching the 4mm/ft plugs:

mod_depths1_7mm_chair-png.png

modify_depths-png.png

Ignoring the note in blue, I'm wondering if the track is built on a slab of expanded polystyrene, would the long loose jaw pins would push down into it without needing any preparation? Then turn it over after assembly and snip them off flush from below.

So much stuff still to try. :)

cheers,

Martin.
 

adrian

Flying Squad
Ignoring the note in blue, I'm wondering if the track is built on a slab of expanded polystyrene, would the long loose jaw pins would push down into it without needing any preparation? Then turn it over after assembly and snip them off flush from below.

So much stuff still to try. :)
Thanks for that - I will be trying those options soon.
 

adrian

Flying Squad
Templot update 244d is now available and includes this new option:

3D plug track - version 244c and beyond

which reduces the 7mm/ft plug depth to just under 3mm, matching the 4mm/ft plugs:
Thanks for that, I'm trying it now. The first print run looks very encouraging, I've no results to post yet as a number issues means another iteration. Points of note so far

  • The C&L 125 rail section seem to fit pretty well with the C&L 131 settings - slide fit solid chairs fit well.
  • Somehow messed up the loose key settings and appear to have printed out the 4mm versions! Tried again and seem to have ticked the correct boxes the 2nd time so until that print run is complete nothing available to test with the split chairs
  • With 244d the length of the plug seems to have increased slightly as I found out with 3mm plugs printed from 244d not fitting in the laser cut timbers cut from 244c. So still need to get the timber base exported and cut from 244d.
Plenty to keep me busy. :)
 

martin_wynne

Western Thunderer
Somehow messed up the loose key settings and appear to have printed out the 4mm versions! Tried again and seem to have ticked the correct boxes the 2nd time so until that print run is complete nothing available to test with the split chairs
@adrian

Hi Adrian,

Oh sorry! That's a bug in the works. The loose jaws are 7mm scale on width and 4mm scale on height! I forgot to test the option of printing chairs and loose jaws at the same time. Usually the loose jaws are printed on a separate raft to save space, for which the new option should be unticked.

I will get this fixed and release 244e as soon as possible.

Martin.
 

adrian

Flying Squad
Oh sorry! That's a bug in the works. The loose jaws are 7mm scale on width and 4mm scale on height! I forgot to test the option of printing chairs and loose jaws at the same time. Usually the loose jaws are printed on a separate raft to save space, for which the new option should be unticked.
Thanks for the prompt response - now that you mention it the width did appear to be correct on the loose jaws and it was the height that was deficient which did make them look rather unusual in shape.
 
Top