Well I passed my exam, so that's me for another two years.
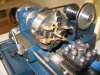
Steph in post #61 planted a thought which I have now followed up, my last post recognised the problem, how to fix it though. I realised a rotary table was needed if I didn't want to completely dismantle the assembled frames. I most certainly didn't, and whilst I had planned to get one in due course, circumstances accelerated the purchase which arrived on Friday. Machine tool bling.

I can be quite as shallow as anyone else and therefore seduced by shiny things, absolutely gorgeous.
I also had to determine the size of the existing cutout in the frames and workout how to mount it to enlarge the arc. Initially I struggled and then had a brainwave so I took the dimensions of the cutout, plotted them in CAD which told me the radius of the arc. It came out at 11.91mm, which is a ludicrous size to choose and undoubtedly down to my measuring, I think 12mm was the likely figure.
Mounting the table on the mill required a centre, the hole in the middle above is 24mm dia, and then I had another brainwave, that's the quota for the year used, if I made the table centre over length it could also be used as a fence to mount the frames which would automatically locate the centres in all the right places. Quite good huh.

A 1" bit of brass being reduced to 24mm. This is pretty much the limit for the Cowells lathe, the chucks wide open and the top speed is rather two slow at 880rpm, 1200 would be better, however it and I managed, and with the addition of a 10mm spigot screwed into one end can be fitted into both a chuck and a collet as needed.
The table was located on the mill bed and the frames positioned for the first cut.


The methodology should hopefully be obvious, and with a holding of breath, no going back.

The first cut was made. It seemed to work so I took the cutout to 2mm from the top edge which I had previously worked out should clear the wheel flange by 1mm. I was right pleased, so I quickly put enough of it together to see how it looked, this is the result.

the front wheel with clearance the remainder to do on Sunday. Well earned curry followed.
Having established how to do it the rest was an exercise in mounting the frames with the holding clamps out of the way of the cutter, which was by far the most time consuming part.


Having enlarged all the frame cutouts the front sections were a little bit lacking meat so I soldered two bits of angle inside the top edge to provide some support.

So there we are, pretty much a full weekends work to solve a problem which I shouldn't have had to. That'll teach me, maybe.
Regards
Martin