7mm The Derby Line - Rolling Stock Gladiator Crab

dibateg

Western Thunderer
I wasn't fully happy with the tumblehomes, I don't think I'll do the workmate method again as it did leave some creases. I had to dress those out as best I could with a coarse emery block. I only have 3 other kits in the cupboard in any case.

Which reminds me - I believe Malcolm is going to retire next year, so if you want anything from the Sidelines range, get in quick as I think the last batch is going to the etchers now...

Working on the ends is pain, I find the easiest way is clamp a block of hardwood in the vice.
IMG_3910.JPG

Sockets for the 'lectric cables are cut from 3x1.5mm rectangular brass tube.
 

dibateg

Western Thunderer
I try and turn a negative into a positive, so after 80 hours or so work we have a train. I've not felt/ been able to go out much, so its good to complete the building part of a project I've had in mind for a few years. They will be painted in the spring - probably unlined maroon, although it seemed that after the start of the '60s most of the ex LMS non corridor stock got lined out very quickly by 1962. The other omission is the door ventilators, the majority of those seemed to have been removed by 1960... so that's saved me a job! Preparing the aluminium roofs was a workout and cutting up the seating strip created an unholy mess of detritus, the vacuum cleaner was very quickly brought in to play following that task.
IMG_3914.JPG
 

dibateg

Western Thunderer
With the creativity in full flow, I've chosen my next project, and one I've been looking forward to. Originally purchased to run on Nafferton, this loco will still be useful on Basford North on the through trains to Burton.
IMG_3915.JPG

Looking sexy and appealing in the reflection of the blue Xmas lights...:-
IMG_3917.JPG

I picked up this kit second hand on the Guild site a while back. I thought it was an original Barnfield, but the instructions are credited to Gladiator.
 

Rob Pulham

Western Thunderer
Good morning Tony,

A couple of things to be aware of, (if you are not already). The back to back frame spacing is quite tight, which probably won't be too much of an issue if you are using hornblocks but still worth mentioning. Plus the frames are marginally too long, so they will need trimming to fit between the buffer planks. Otherwise a really enjoyable kit to build. - my build thread is here, albeit it was partially built when I took it on.

I also amassed quite a few photos when I built it so if they are of any assistance, let me know and I will send them to you.

I have another one of these in my to do pile for my own collection, which I am looking forward to.
 

dibateg

Western Thunderer
Thanks Rob -
that's really useful, yes - I would like the pictures if thats ok, do you have my E-mail address?

Cheers
Tony
 

dibateg

Western Thunderer
Thanks for the files @Rob Pulham ! They downloaded fine!

So, on with the frames, I cut out for the Slaters hornblocks. I also marked the outlines of the wheels, so that I could drill out for the plunger pick ups.
IMG_3918.JPG

I made up the coupling rods so that I could set up the Hobby Holidays chassis jig. I remembered to clean and oil the jury axles this time after soldering as they get splashed with flux.
IMG_3919.JPG

I wasn't happy with the etched springs in the kit, and I found in the running gear drawer a set of Ragstone GE 0-6-0T springs. With a bit of modification, they would do nicely. They were missing the retaining shackles and nuts. , fortunately I had some left over MOK castings that would do the job, so I drilled the spring castings at an angle so that they could be securely soldered in to place.
IMG_3920.JPG
 
Last edited:

dibateg

Western Thunderer
Making up the cylinders - was always going to be interesting. I discarded the half etch n/s covers in the kit and cut some new brass ones ones from some 10thou scrap etch. They would be much easier to form, and the first task was to put a fold in them in the folding bars to represent the flat upper part of the cover. The rest was formed to shape with some round nosed pliers.
IMG_3929.JPG

Being made oversize, there was plenty of overlap that could be trimmed afterwards..
IMG_3931.JPG

The cylinder covers both end presented a problem, they are somewhat undersize by a mill or so. I found some spare front ones in the cylinder parts drawer. They had a large boss on the back which allowed me to mount them in the lathe and turn them down to just under 13mm. A hole was drilled in the center, so that I could cut off the oval mountings for the piston rod tails off the old covers and remount them on the replacements. Some B16/1s were like this other seemed to have them removed completely and have a plain cover.
IMG_3935.JPG

For the rear covers I wanted to retain the rather nice slide bars, so I curved some 0.5mm thick brass strip to form a ring around the outside of the cover to beef it up. They have yet to be soldered on and tidied up.
IMG_3936.JPG

All in all the cylinders look a lot better and chunkier!
 

mickoo

Western Thunderer
Hi Rob

search for ‘bail making pliers set’ on eBay. I bought a set of 3. I’m having trouble copying the url on my tablet..

Bail Making Pliers Set Jewelry Wire Looping Tools for Craft & Jewellery Making | eBay UK
These are good but there is a caveat, they're designed to form wire, not sheet, if you form sheet then the surface closest to the hinge will form a tighter radius than that at the tip, simply because the jaws are not parallel. Ideally one needs parallel action bailing pliers but most of those have very short tips of a set radius (below) and are also not ideal for forming sheet materials.

The other caveat of course is tool quality, few will close the gap between the jaws fully, it may be that there is a 10-20 thou gap from production, in which case when using that thickness material the jaws will effectively be parallel ;) Or one can grind a gap in the jaws to get a uniform gap to suite the chosen sheet material thickness.

Of course we're only talking a marginal difference in radius, you'd have to factor whether that keeps you awake at night or not but cylinder wrappers close to a straight valance edge show the slightest variation in radius or straightness.

If you could find three sets of these, each with constant (13.5, 16.5, 20 mm) radius for the full length then you'd be onto a winner.

 
Last edited:

dibateg

Western Thunderer
Ya - good point Mick, yes I didn't get a consistent curve at both ends in one go in any case. So it did take a bit of manipulation from each end to get the shape just right. It just takes a bit of diligence in forming the metal, but it does work well enough for me!

Regards
 

mickoo

Western Thunderer
Ya - good point Mick, yes I didn't get a consistent curve at both ends in one go in any case. So it did take a bit of manipulation from each end to get the shape just right. It just takes a bit of diligence in forming the metal, but it does work well enough for me!

Regards
I think that's the salient point mentioned there, 'takes care and manipulation'. They're not the golden bullet but they're certainly a very good start and I've ordered a set :thumbs: 
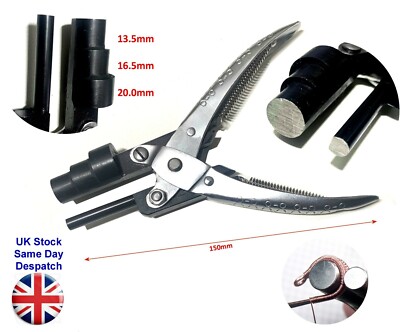
but will modify to give a constant material gap when closed.

I get the same with rolled boilers, it's not the gap as that can be adjusted, it's roller strength. The middle diameter is often larger than the ends (rugby ball profile) because the rollers are flexing in the middle. I had some bespoke ones made up with rollers twice as thick and they still exhibit a bit of rugby ball profile though, again care and manipulation are the order of the day.
 

dibateg

Western Thunderer
Simon posted these on RMweb -
Q7_901_HeadofSteam_Darlington_e.jpg

Q7_901_HeadofSteam_Darlington_c.jpg


Has anyone ever seen these NER style lubricators available in 7mm?

Happy New Year!
Tony
 

Genghis

Western Thunderer
I wonder if these lubricators were used on other NER locos? If so, I'll definitely look into getting some printed.

Happy New Year!
Dave
 

dibateg

Western Thunderer
Thanks Dave - Happy New Year

Maybe I'll drop Mick a line!


So the cylinders are now attached to the motion bracket, some cleaning up to do yet, but that all fits and works.
IMG_3956.JPG


I couldn't get on with the front platform, trying to put a tight curve in the 20thou nickel-silver to form the upturn was just not going to be easy. I didn't like the large half etches for the lamp irons either. So I made a replacement from 10thou brass and that was a lot easier to manipulate. The rear platform has 'wings' which were easy to anneal and form..
IMG_3957.JPG
 
Last edited:

AJC

Western Thunderer
40 thou’ nickel?! 1mm thick? That’s beyond my comprehension in the smaller scale, and even at this size surely significantly over scale thickness?

Adam
 
Top