The Heybridge Railway, 1889 to 1913

Richard Gawler

Western Thunderer
Just thinking about the tarnishing question; tarnishing occurs as a reaction to oxygen, but other things can produce similar results - acid, oil and so forth, so I'd be inclined to agree that contamination may be causing some of it. And certainly, in a situation where you have several vehicles in the same environment but only one shows tarnish, that must surely indicate contamination of those particular buffers.
To be honest with you, I was more troubled by the rust (on the two buffers) than the tarnishing on brass. Rust implies damp but it was probably set off by some unknown contamination on the buffer heads, not something in the atmosphere.

I think a lot of the tarnishing I see is set off by the solder flux. I am making a new roof for my brake van, this was a pristine piece of brass sheet until the first application of heat reached the flux. The flux splattered and the tarnishing began. I could try using less flux and applying it more carefully. This is 9% phosphoric acid, applied by a small paint brush.
 

Richard Gawler

Western Thunderer
Hi Richard
What type of lathe do you have?
I just noticed dose the 3 jaw chuck on the lathe work like a drill chuck with a key?
David.
The lathe is a Cowells ME-90, I guess 30+ years old though I don't think they've changed the design much since then.

The chuck has a spiral inside and it works like a drill chuck. You put the chuck key into any of the three holes and all three jaws move together. Because of the spiral and the manufacturing tolerances, the three jaws tighten onto the work in a slightly different place every time. So if you are turning something, you really need to finish the job before you take it out of the chuck, because it will probably go back in ever so slightly eccentric the next time. Unlike the four-jaw chuck where you set up the jaws one at a time. I think the repeatability and precision of the Cowells chuck is much better than on the Boxford lathes I used at school in the 1970s, but memory plays tricks and maybe I am remembering things how I want to remember them.
 

Chas Levin

Western Thunderer
To be honest with you, I was more troubled by the rust (on the two buffers) than the tarnishing on brass. Rust implies damp but it was probably set off by some unknown contamination on the buffer heads, not something in the atmosphere.

I think a lot of the tarnishing I see is set off by the solder flux. I am making a new roof for my brake van, this was a pristine piece of brass sheet until the first application of heat reached the flux. The flux splattered and the tarnishing began. I could try using less flux and applying it more carefully. This is 9% phosphoric acid, applied by a small paint brush.
Yes, flux also produces a form of tarnishing, but you should be able either to prevent almost all of that by prompt and thorough washing in plenty of flowing water, or - and this is what I generally do - using a gently abrasive cleaner after each soldering session. I use an old, soft toothbrush and 'Bar Keepers Friend' Power Cream (no asterisk, as shown!), which is a white cream cleaner and which brings up brass like brand new, removing almost all flux marks either compeltely, or certainly enough to stabilise them and stop any further reaction. It can be a little harsh on white metal and on solder it removes the shine, but both can be re-buffed if needed.

I think we're also often looking at quite different compositions of metal, without realising it. Steel buffers are a good example of this: I too have had buffers on both kit and RTR stock show corrosion, apparently at variance with other similar age stock from suppoedly similar sources, all stored int he same place. This makes me think that while the eight buffer heads on a pair of wagons may look identical to the naked eye and the wagons may be from the same kit or maker, those buffers may ahve come from different lots or even different factories and be of quite different metallic composition, leading to differing reactions to the presence of air and moisture.

On some kits I've built with steel buffers, I've given the heads a couple of coats of Klear while I was doing so with other areas, in hopes of preventing corrosion. That seems to ahve worked so far...
 

Richard Gawler

Western Thunderer
Richard,
I always hot blacken buffers to prevent them rusting.
Heat to red, drop in a jar of cooking oil and leave overnight. You can use mineral oil, but cooking oil does the same job and the smell doesn't upset domestic harmony. I have a jar with a lid which also helps with the smell.

I remember what I did now :)
I have built 12 wagons from kits . . .
- five have dumb buffers
- two have cast whitemetal buffers
- two have bright steel buffers and in my early enthusiasm I Loctited the nuts onto the shanks
- two have steel buffers blackened by quenching in oil just as you suggested to me many months ago
- one has steel buffers which I had overlooked and I have treated this evening
total 12.
I have also dealt with the steel axles for my next coach project.

I have used olive oil for these, this produces very little smell. I keep this in an old food can on the window sill, where I can see it and reach it but I cannot drop things into it by accident. I have found, if you quench the item in the oil until the gassing stops, you can remove it and wipe away the surplus and the finish still looks okay. It's a shame the wheels have plastic centres(!), the oil method is far quicker than faffing around with gun blue on a cotton bud.
 

Chas Levin

Western Thunderer
Very interesting, gents: I'd not heard of this oil-quenching blackening method before. Is it reacting chemically with the metal as the blueing stuff does, or is it coating it?
 
Last edited:

simond

Western Thunderer
It’s not really oil-quenching - it’s not like the steel is red hot.

I’m guessing there‘s some kind of surface carburisation but it’ll be very thin. And of course, the steel is oiled by the process, so, unless degreased, will retain a thin coating that will resist rusting.
 

Richard Gawler

Western Thunderer
It’s not really oil-quenching - it’s not like the steel is red hot.

I’m guessing there‘s some kind of surface carburisation but it’ll be very thin. And of course, the steel is oiled by the process, so, unless degreased, will retain a thin coating that will resist rusting.

DSC_2697.jpeg
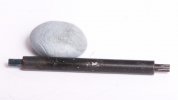
This is one of my coach axles, it is a Slater's axle. Held with forceps at one end, heated to cherry red, and dunked into olive oil taken from the kitchen.
  • The finish is tough enough to resist scratching off with a finger nail but succumbs to a knife blade as at the right hand end
  • The treatment hasn't worked where there is a spot of contamination on the metal near the middle
  • The axle is blue not black where the forceps were acting like a heat shunt and it wasn't hot enough
This is very easy to do and it doesn't create terrible smells using olive oil.
 

Chas Levin

Western Thunderer
Very interesting, I shall have to try this. The question that interests me is whether the finish is tougher - more resistant to scratching - than the blueing stuff, which is what I usually use... I shall test...
 

Richard Gawler

Western Thunderer
It's the sort of subject which suits a short video (and re-reading this to myself, makes a tongue-twister) so something to try next winter when it's too cold and damp and dark to be outdoors.
 
Last edited:

Richard Gawler

Western Thunderer

The original roof on my break van was from card and although it looked okay from a viewing distance the edges were too wavy for convincing photographs.

DSC_2700.jpeg
The new roof is a sheet of 0.3 mm brass which I rolled using the same technique as my coach sides i.e. a thick dowel rod used like a rolling pin on a backing of dense packaging foam. This is remarkably easy to do with thin brass but obviously won't work for something circular like a boiler.

I added edges from strips of brass so the visible edge looks about the right thickness, and the recess created hides the worst of the gaps above the body.

DSC_2701.jpeg
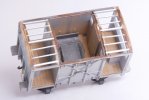
This is a final view of the inside. The two prongs under the roof are fairly precise in their placement and are sprung against the insides of the doors, and now with epoxy glue holding them forever.

DSC_2704.jpeg
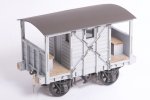
So the result looks like this.

I got the cuvature of the roof to be a good match for the ends but it isn't perfect. There are some variations in the curvature which run from end to end and they show up under harsh lighting like direct sunlight. Even with a matt finish.

IMG_20211220_212218.jpg
I have only this photo of the prototype but I imagine the bracing under the roof would show through after a while.
 
Last edited:
Charlie (a sort of 0-B-B-0)

Richard Gawler

Western Thunderer
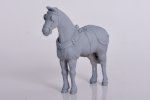
After all of the problems I had with the stationary boiler from Duncan Models I have assembled a light delivery horse from the same source.

DSC_2733.jpeg
This is two whitemetal castings plus detail parts, and the parts fitted together with only a little filler. There was hardly any cleaning up to do either, much better.

Painting is another matter for me, this is going to get subcontracted out.
 
Last edited:

Richard Gawler

Western Thunderer
A fine looking animal Sir! May I ask, is it glued or soldered?

Yes he is!

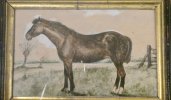
After all the corrections to the stationary boiler I took "Charlie" to the Munnings Museum at Dedham (many Munnings horse paintings on show) to ask some experts and make sure.

P1050082.jpegP1050083.jpeg
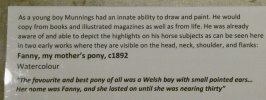
They suggested, Charlie looks a bit like 'Fanny'. Munnings was about 13 years old when he painted this.

I used solder for the assembly. I was about to mix up some epoxy and then thought, epoxy won't come apart, 145 degree solder won't come apart, solder is quicker. The nice thing about this solder is it doesn't foul the bit like the 70 and 100 degree versions. The solder is straightforward to use when the castings are a reasonable size like this. I aimed for a good alignment between the two halves of the body at the collar, and filled in the gaps left at the rear with extra solder and then some Squadron putty. I used Evo-Stik for the blinkers and CA glue for the eyelets.

The detail on the castings is excellent even if they didn't quite line up. I wasted a lot of time looking for model farm animals before I found the kit, a scale model here really is much better than a child's toy.

I am intending to get a second iron to keep for low temperature solder, but unfortunately this has been a mere intention for a wee while now.
 
Stationary boiler . . completion (or controlled abandonement)

Richard Gawler

Western Thunderer
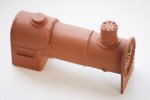
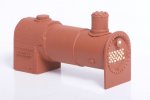
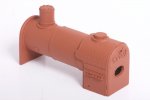
I have called time on the stationary boiler. This is a personal first for me, a model which looks better in photographs than in real life :confused:

DSC_2737.jpeg
Natural daylight shows up plenty of flaws. I could file off all of the rivet detail and say "less is more" but despite my efforts the boiler is too far away from being cylindrical, it looks awful.

DSC_2754.jpeg
Diffused light helps. I now have a pile of wooden cocktail sticks without ends.

DSC_2752.jpeg
The backhead looks fair-ish but I forgot to thin the metal around the firing hole (see post no.701), I can hide this with a board to keep the rain out.

My big lesson learned here is, a scenic model has got to be just as good as a loco. In retrospect, if this kit had been for a loco I would have posted it back and asked for a refund - the details are wrong, the instructions are wrong, the boiler parts were heavily distorted and the firebox parts were too small to reach each other. The only parts I am proud of are the filler, the main steam pipe (which I made myself from brass) and the paint job.

This is the first time I have tried U-Pol #8 primer on whitemetal. I left it overnight and it seems to have stuck and not reacted with the top coats. I suspect Halfords grey primer would have worked just as well. The "red oxide" is Humbrol enamels no.70 brick red with a large dollop of no.100 red-brown, two coats sprayed 30 minutes apart to try to let them merge together.

So - a model to include as a wagon load in a carefully-composed photo but not to enjoy very much let alone glue down onto a layout. Unless, as Tony (@Osgood) suggested, I cover the whole thing in a large tarpaulin :thumbs:
 
Last edited:

Chas Levin

Western Thunderer
Well Richard, it looks absolutely fine - excellent in fact - from here so I guess you must be right in saying it looks better in photos, as I can;t see the faults you mention.
I do find with my own work though that I have difficulty seeing anything other than the faults, which others then don't see at all!
 

Richard Gawler

Western Thunderer
The larger piece of boiler has a sort of shoulder running front to back at about 30 degrees from the top, where the diameter is about 0.5 mm larger than everywhere else. It shows up in strong sunshine, but right now the sky has clouded over and I can't see it either!

The firebox is pretty good, and the rivet/stay detail is better than I could make myself. One day I could cut off everything forward of this and make new parts for the boiler and tube plate, but right now I want to try something different.
 
Top