You are using an out of date browser. It may not display this or other websites correctly.
You should upgrade or use an alternative browser.
You should upgrade or use an alternative browser.
Threadmarks
View all 124 threadmarks
Reader mode
Reader mode
Recent threadmarks
LT&SR horse box (1878) . . part 1 unboxing LT&SR horse box (1878) . . part 2 solebars ends and sides ( Diversion : sixteen wagons at NEEGOG ) GER C53 (1903 onwards) The Beast of Heybridge ( Diversion : 'Lady Marion' with train, SM32 garden railway ) New LT&SR horse box (1878) . . part 3 using solder paste and a RSU New LT&SR horse box (1878) . . part 4 RSU probe rebuild NewRichardG
Western Thunderer
RichardG
Western Thunderer
Yes, the HF3 is discontinued. Mine was new old stock, still in its blister pack.The HF3 is apparently discontinued, but the principle works with DCC of course. But the volts, amps and colours will all be different! The HF3 (and the other HF track cleaners) will not work with DCC, though I doubt they’ll disrupt RC.
I think a comparison of "the principle" with DCC is potentially misleading. This doesn't matter to us but with 57,000+ views on this topic I guess some readers are less experienced in the hobby. DCC uses power conductors modulated with control information, while HF coach lighting puts a second supply of power onto the conductors. DCC gives the possibility of coach-by-coach control using decoders, or as you say simpler block control to switch everything off by disconnecting the traction power at the same time. Conversely, the HF system is on-an-off-able in its own right by removing the supply to its signal generator; so you can switch all of the lights together with no effect on traction.
It will be difficult to detect any effects on RC, though I suspect modern RC is pretty much immune to such things. At home, the distance from transmitter to receiver is never more than a few metres, a tiny fraction of the maximum range (proven) of 100m. When the RC loco visits other layouts, there won't be a HF power source to provide any interference (if it exists). Of much greater concern to me is the risk of blowing the bulbs by putting my coach onto track carrying DCC power. Maybe this coach has to stay at home.
Last edited:
RichardG
Western Thunderer
Here is a plot of temperature changes within the guard’s compartment earlier today.
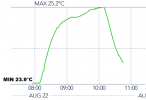
The compartment was heated by one of three 3V bulbs connected in series and driven from the Gaugemaster HF-3, for two hours from 08:06 to 10:06. Then the power was removed and the compartment allowed to cool. The compartment has one open window.
During the period on this graph, the day warmed slightly and the temperature in the room rose by about 0.5°C.
The temperature rise in the guard's compartment is much smaller than that recorded with the 12V bulb, yet the light looks subjectively brighter
More usefully, the increase is too small to trouble me for potential damage to the model.

The compartment was heated by one of three 3V bulbs connected in series and driven from the Gaugemaster HF-3, for two hours from 08:06 to 10:06. Then the power was removed and the compartment allowed to cool. The compartment has one open window.
During the period on this graph, the day warmed slightly and the temperature in the room rose by about 0.5°C.
The temperature rise in the guard's compartment is much smaller than that recorded with the 12V bulb, yet the light looks subjectively brighter

More usefully, the increase is too small to trouble me for potential damage to the model.
Last edited:
Yorkshire Dave
Western Thunderer
Of much greater concern to me is the risk of blowing the bulbs by putting my coach onto track carrying DCC power. Maybe this coach has to stay at home.
If you wanted to do this wouldn't the answer be a sub-miniature double pole centre off switch on the underside of the carriage with resistors in the DCC lighting circuit to reduce the input voltage to 9v or less. Could also install a reed switch in the roof if you wanted to turn on and off the lights with a magnetic 'magic wand'.
Or alternatively install a function decoder if you also want to turn off the lights - although the switch would still be required to keep the HF and DCC circuits isolated.
All you would have to do is remember to flick the switch when operating on DCC - which may be harder than leaving the vehicle at home.

RichardG
Western Thunderer
No switches for me. They would spoil my enjoyment of the hobby. If there is a changeover it needs to be automatic. I don't intend to use DCC for my 7 mm layout; so perhaps an answer is a relay with a 12V or so coil, this to trip and disconnect the bulbs (or insert a voltage-dropping resistor) when the wheels touch the higher DCC track voltage.
simond
Western Thunderer
Richard
by "in principle", I merely meant "AC powered lighting". Wholly agree with your distinction between the two.
I don't think your coach has to stay at home. I expect that the capacitor in the roof is there to block DC, but allow the HF signal to pass. I can't predict whether your bulbs will survive DCC so beware of that.
atb
Simon
RichardG
Western Thunderer
The new lighting looks good to me and this seems like a good time to pause for a while and post photos of two passenger trains for the railway.
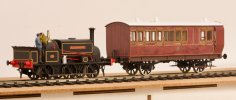
I like this, the size and proportions look right for how I imagine the railway to have been. I think low platforms will suit a small layout, so one day I will have to make some low footboards for the passengers.
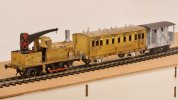
I am happy with this as well. The saloon looks fine from this angle but the lack of a floor becomes too obvious at a closer angle.
I want to move on to a new model (the stash of unbuilt kits has reached twelve) and I will post it here after I have made some progress.

I like this, the size and proportions look right for how I imagine the railway to have been. I think low platforms will suit a small layout, so one day I will have to make some low footboards for the passengers.

I am happy with this as well. The saloon looks fine from this angle but the lack of a floor becomes too obvious at a closer angle.
I want to move on to a new model (the stash of unbuilt kits has reached twelve) and I will post it here after I have made some progress.
RichardG
Western Thunderer
There are four GER vans on display at Mangapps museum, including one from 1912 which is similar to my model using the Connoisseur kit.A GER van built in 1912, especially door detail.
View attachment 193738
View attachment 193739
View attachment 193740
View attachment 193742
View attachment 193741
I had omitted the door stops because they were too fiddly so it was good to see this particular van doesn't have them. What was less good was to realise all four vans have safety loops on their brake gear and, in my haste to tidy up, I had missed these off.
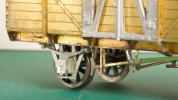
I found them in my box of wagon spares not the bin of scrap etches (what was I thinking?) so I have put them on and now the van really is complete except for its buffers.
Herb Garden
Western Thunderer
Then you are doing much better than many of us myself included(the stash of unbuilt kits has reached twelve)
RichardG
Western Thunderer
Twelve kits is still most of 5 kg in 7mm, and the largest items are two six-wheel GER coaches. I think my way ahead is to set two aside these two coaches for the end of the project, sell one very out of area wagon, and start to build something. This will reduce the 'apparent stash of unstarted' to eight, which is fewer than half of the seventeen I have built, so it sort of feels better.
RichardG
Western Thunderer
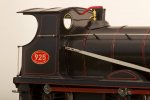
I stuck the number plates onto my Y14 this afternoon. These came from Light Railway Stores.
The cab windows remain unglazed. Simon (@simond) kindly cut me a couple of dozen discs using his laser cutter, with tiny variations in diameter so I had something just the right size. I armed myself with a bottle of Glue'n'Glaze (Deluxe Materials) but after fitting the discs, I realised they emerge from the laser with a slightly convex shape. This looks rather strange when they catch the light, much like the thick lens spectacles posted by Tony. One day I might try small squares of microscope glass, glued in from inside and with their shape disguised with paint. I can do this when I try the cab interior, and so with the plates on I will call the Y14 finished.
The colours in this photo are good. The background is off-white, and the warmth of Warren's choice of black paint really shines though. Also evident is how he has applied the lining to hide a hump in a boiler band and not accentuate it

Last edited:
RichardG
Western Thunderer
No need to apologise; it was a good idea and I am grateful for being able to try them.Curious, sorry about that!
I feel I have run out of steam with the Y14. Friends tell me it needs a crew and it needs coal and so on but I think Warren's paint is so good, the model will look like something I have bought ready-made and glued bits onto unless I do these really well. It is probably best to enjoy the model as it is for a while and have another go during the winter time.
PO 5-plank wagon 'Brymbo Steel Company'
RichardG
Western Thunderer
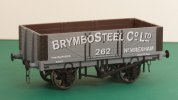
A PO wagon for specialised steel products ought to benefit the Heybridge Railway, so when a suitably liveried model from Dapol appeared in a small ad here I snapped it up.
The Brymbo Steel Company wagon is one of several models within Dapol’s 7F-051-nnn series of stock numbers. This series means it has five planks, a timber underframe and a nine-foot wheelbase (all good for the Heybridge Railway), opening doors (good for photography) but sadly a parentage which seems to have been drawn from multiple prototypes, and brake blocks sitting way too far from the wheels.
I have already bought a sibling to this model and sold it so it seemed best to make the effort to make this second one look a bit better.
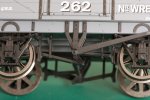
Much depends on what you know about RCH wagons. If you don’t know very much (like me) then only the brake blocks look really wrong.
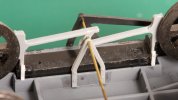
I cut all of the brake fittings away from one side. My feeling is, this operation cannot really go wrong because I will be happy enough to have a wagon with brakes on only one side.
I had spare brake parts left over from some Slater’s kits so I glued these into place. The Slater's combined twin brake arm and shoe moulding is too short so I cut it into three pieces and then glued them back together in position on the model. The joints on the brake hangers are reinforced with 1 mm square styrene.
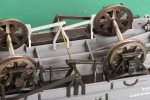
The original brakes on the opposite side were useful to hold a piece of wire to align everything while the solvent hardened.
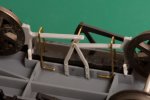
The safety loops are brass wire fitted into 0.7 mm holes and fixed with CA glue, and the inner vee hanger is also Slater's. The brake handle and the outer vee hanger are a one-piece moulding from a Three Aitch kit.
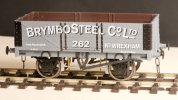
This effort took barely two hours (not counting taking the photos and writing this post) and I think the result looks a lot better. In fact the wagon now looks plausible if not prototypical. I can cut off the original brake gear on the other side or keep it to show what can be done.
I do wonder if the Brymbo Steel Company owned these wagons to carry coal for their furnaces rather than steel for their customers. If so then I will best accept “ignorance is bliss” for the purpose of the original wagons as well as the details of this model.
Osgood
Western Thunderer
Well - if one accepts the signwritten Empty Brymbo GWR to be accurate, the wagon is likely to have left Brymbo with a load of some kind as it was expected to be returned empty.
Brymbo had two collieries (one of which supplied coal for export via Liverpool) for its own use but also bought in coal from other producers.
It had its own ironstone quarry at Hook Norton and would also have brought in bulk limestone - but all these are loaded to Brymbo, not empty.
My guess would be crushed slag, but if a consignment of engineering steel (in short bars) or quality iron billets for Bentall's foundry had to be shipped to Essex then why not?
RichardG
Western Thunderer
Richard,
there’s lots of info re RCH wagons in the resources section of WT.
Isn’t Brymbo a bit out of area for your railway?
HTH
Simon
I am allowing myself a few wagons from well out of area. Without these, the traffic will be an interminable flow of GER in and salt and agricultural equipment out.
I am sure the root cause of this is excessive imagination. Essex received its coal from the North East, brought by ship and then on to Chelmsford by barge. Nevertheless, my railway is bringing in special grades of coal from South Wales, for Bentall’s foundry. Similarly, the region received its timber from Scandinavia, but my railway is bringing timber from Scotland - doubtless to make the frames of Bentall cars.
There weren’t many steelworks in East Anglia, so I reckon Wrexham is as feasible as South Wales (again) or the North East. Wrexham is quite a long way away all the same, so maybe one day I will make something more believable. The Modeller’s Licence is a fine thing.
Threadmarks
View all 124 threadmarks
Reader mode
Reader mode
