The Heybridge Railway, 1889 to 1913

Richard Gawler

Western Thunderer
Richard,

is there a risk your spigot might short the charging connector?

atb
Simon

Yes and no:
  • The spigot is a close fit into the socket, and cannot go in skew. The hole inside is usefully larger than the positive terminal pin, so a short cannot occur.
  • Conversely, if some electrically conductive debris got stuck inside the spigot, then a short would probably occur.
The spigot and the electrical connector are non-ferrous, so magnetically-charged debris won't attach itself.

A good point all the same . . . I did think about boring out the spigot a little further and slipping in a plastic tube (and I could still do this) but I felt the scenario was too unlikely to worry about. I can still have a rethink on this. For example, fill the spigot with epoxy glue and then bore out the central hole again.
 

Richard Gawler

Western Thunderer
3. Superstructure

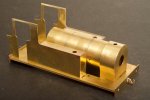
I have lopped 4mm from the bottoms of the outer tank sides and the bunker sides, and a whopping 20 mm from the inner tank sides. So I have my first sight of the proportions of 'River Pant'.

DSC_5939.jpeg
Trimming away the inner tank sides makes a better space for batteries (but see later), and hopefully the model will remain sufficiently robust. I have reinforced the tops of the cab sides with strips of brass.

DSC_5942.jpeg
A loose assembly on the running plate. It is difficult to visualise what a 4mm reduction in height will look like, but really it had to be 4mm to match up with the reduction in the height of the smokebox I forgot to mention at the time. I think there is a suitable 'light railway' look in here.

The sharp-eyed may see that all is not quite right. After the boiler and tanks are fixed, the flange on the back of the smokebox will be too deep to let me slide the smokebox forwards and release it from the model. Also, if the smokebox is to slide forwards at all, it needs a threaded fixing inside it to accept a machine screw passing up through a frame spacer underneath.

Worse, I am struggling in my mind with the real need for radio control in this loco. My life might be easier (and simpler) if I adopt analogue for all of the locomotives of the Heybridge and Langford Light Railway, and keep radio control for visitors from the foundry and the GER. After all, the layout is unlikely to have room for more than one loco in view at a time. This thinking is reinforced by 'Blackwater' being a RTR model which will be really difficult to convert to r/c unless I give it a permanently-coupled tender truck.

I might end up soldering everything here solid, with the mounting flange for the charging socket quietly entombed inside the smokebox. The concept is right, but the application would be better on a different loco.
 

Overseer

Western Thunderer
3. Superstructure

I have lopped 4mm from the bottoms of the outer tank sides and the bunker sides, and a whopping 20 mm from the inner tank sides. So I have my first sight of the proportions of 'River Pant'.

View attachment 206612
Trimming away the inner tank sides makes a better space for batteries (but see later), and hopefully the model will remain sufficiently robust. I have reinforced the tops of the cab sides with strips of brass.

View attachment 206611
A loose assembly on the running plate. It is difficult to visualise what a 4mm reduction in height will look like, but really it had to be 4mm to match up with the reduction in the height of the smokebox I forgot to mention at the time. I think there is a suitable 'light railway' look in here.

The sharp-eyed may see that all is not quite right. After the boiler and tanks are fixed, the flange on the back of the smokebox will be too deep to let me slide the smokebox forwards and release it from the model. Also, if the smokebox is to slide forwards at all, it needs a threaded fixing inside it to accept a machine screw passing up through a frame spacer underneath.

Worse, I am struggling in my mind with the real need for radio control in this loco. My life might be easier (and simpler) if I adopt analogue for all of the locomotives of the Heybridge and Langford Light Railway, and keep radio control for visitors from the foundry and the GER. After all, the layout is unlikely to have room for more than one loco in view at a time. This thinking is reinforced by 'Blackwater' being a RTR model which will be really difficult to convert to r/c unless I give it a permanently-coupled tender truck.

I might end up soldering everything here solid, with the mounting flange for the charging socket quietly entombed inside the smokebox. The concept is right, but the application would be better on a different loco.
I don't think there is anything wrong with simple DC control provided the locos are compensated or sprung. You could add a power connection tucked under the buffer beam of locos and build a wagon with batteries and R/C gear to use with whichever loco is out on tour.
 

Richard Gawler

Western Thunderer
I still get surprised how well 0 gauge locos run with very ordinary analogue controllers. I suppose this is something to do with the extra weight compared to a 4mm scale model, and also the greater width of the contact patch on the railhead. 'River Pant' is going to get a rocking front axle, and if she runs as well as 'Nellie' (rigid chassis for the driving wheels) I will be very happy.

DSC_5944.jpeg
I have pondered such a "radio truck" for ages, and it is rather cheering to see the idea posted by someone with much more experience.

A radio truck would be a straightforward way to bring the control of Nellie into line with the practice of using r/c for locos visiting the Heybridge railway; and reusable to let any analogue loco run anywhere.

I think Nellie looks pretty businesslike with a tender truck too.

Thanks Fraser, I might have finally made up my mind.
 

Richard Gawler

Western Thunderer
4. Abandonment

Well I have made up my mind, but not the way I was thinking last Monday.

I have given up trying to build this model. I have struggled with most everything since I started and the only things which I am truly happy with are the parts I have made myself, like the reinforced buffer beams and the re-worked chimney. The kit has been etched from 0.34 mm thick brass and in my opinion, this will not to let me make a sufficiently robust model.

DSC_5955.jpeg
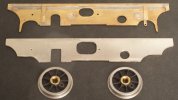
I cut some new frames from 0.5 mm nickel silver so here is a photo of these for the record. I tried to reinforce the kit frames but I felt (my opinion again) they were still not sufficently robust.

Today, I cannot persuade the cab to come “square” in all three planes, and the half-etched beading around the windows is proving too finicky for me to cope with. It is time to call a halt and do something I can enjoy.

I observe, the version of the kit bought new in May 2022 for Nellie my crane tank was etched from thicker material. I found this much more satisfactory to work with. Indeed it was my first etched loco kit and I am still happy with the model I built.

Perhaps, as Heraclitus said, "no man ever steps in the same river twice, for it's not the same river and he's not the same man."
 
Last edited:

simond

Western Thunderer
Very profound. I was going to say “very deep”, but then the tide might have been out.

I agree: put everything in the box, and give it a good dose of ignoring for a year and a bit, whilst you do something that you enjoy. No point in banging your head on the wall, we’re doing this for fun. If, when you come back to it, it’s still not fun, recover what you can on eBay.

atb
Simon
 

Richard Gawler

Western Thunderer
DSC_5958.jpeg
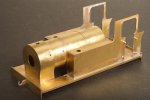
A final photograph to show I rather went to town with the alterations.

I suspect the model would look better if I remove the upper parts of the cab and provide a simple spectacle plate, but if I do this I will need a complete cab interior. I will have to make this from scratch because I have re-rolled the boiler 1.5mm smaller diameter (and the kit backhead is now too big), and then I will want some kind of remote drive to the rear axle because, with the frames now 2mm shorter top to bottom, a worm gear here will end up very visible.

But beyond these ideas, I have problems I can never expect to resolve. I will never be happy with a loco made from such thin brass (this is entirely my own opinion); and I originally envisaged this particular loco to be a four-coupled tender loco from the 1870s, in other words something completely different.

If I am honest with myself, I tackled this because I happened to pick up the kit for a very good price and I wanted an easy build to cheer myself up after the Slater's class F. I will be better to accept and enjoy the locos I already have for a while.
 

Chas Levin

Western Thunderer
Always a tough one Richard but I'm with Simon as I've also found it the case that sometimes, if you come back to something a long while later it can seem like a much happier experience, so perhaps a quiet cupboard is the best engine shed for this one for now...
 
Last edited:

Richard Gawler

Western Thunderer
The quiet place for 'River Pant' is a box of scrap etches which I never empty and rarely visit. One day I will chance upon the model, and feel sufficiently inspired to make a fresh decision.

I am reminding myself of the formal V&V processes in engineering, where 'validation' roughly means making sure you are doing the right thing, and 'verification' means doing the thing right. As a bit of detail person (so I have heard it said!) I tend to keep on verifying but overlook the validating.

I have attended to a Peco kit for a yard crane for a couple of gentle hours this afternoon, so I'll leave this topic for a wee while to make space for any further thoughts on River Pant; and then post some notes on the build. The crane has turned out just right.
 

James Spooner

Western Thunderer
The quiet place for 'River Pant' is a box of scrap etches which I never empty and rarely visit. One day I will chance upon the model, and feel sufficiently inspired to make a fresh decision.

I am reminding myself of the formal V&V processes in engineering, where 'validation' roughly means making sure you are doing the right thing, and 'verification' means doing the thing right. As a bit of detail person (so I have heard it said!) I tend to keep on verifying but overlook the validating.

I have attended to a Peco kit for a yard crane for a couple of gentle hours this afternoon, so I'll leave this topic for a wee while to make space for any further thoughts on River Pant; and then post some notes on the build. The crane has turned out just right.
I do sympathise with your feelings but would agree with Chas that putting it quietly into a box and leaving it for a good long while can work wonders. I started a Blacksmith Claud Hamilton in EM somewhere over thirty years ago but didn’t actually finish it until about six years ago (so a quarter of a century in gestation). I think I must have had about four separate ‘goes’ at it during that time until I finally beat it into submission. I think a part of that was my increasing skills and confidence - call it progression as a modeller if you will, which meant eventually I had the competence to finish the project to a level I was comfortable with.

Nigel
 

spikey faz

Western Thunderer
Hi Richard

I'm sorry to hear of your woes with your latest build. :( I've been there many times and that's when I get the G-scale stuff out and just have a bit of a play! Or I buy one of the excellent rtr O scale locos that we are now blessed with, safe in the knowledge that it should still run smoothly despite my efforts to modify it a bit! ;)

Mike
 

Herb Garden

Western Thunderer
The quiet place for 'River Pant' is a box of scrap etches which I never empty and rarely visit. One day I will chance upon the model, and feel sufficiently inspired to make a fresh decision.

I am reminding myself of the formal V&V processes in engineering, where 'validation' roughly means making sure you are doing the right thing, and 'verification' means doing the thing right. As a bit of detail person (so I have heard it said!) I tend to keep on verifying but overlook the validating.

I have attended to a Peco kit for a yard crane for a couple of gentle hours this afternoon, so I'll leave this topic for a wee while to make space for any further thoughts on River Pant; and then post some notes on the build. The crane has turned out just right.
Richard I would agree with the others. I can empathise with how you are feeling right now. Been there, done that, fallen out with a project, wanted to hurl it across the room. And I've got the scrap pile to prove it.

I would definitely echo the words of the others. Put it to one side. Change tack. Reflect and maybe one day it might come out of the box again. If it doesn't it's still a valuable learning experience.

Keep the faith matey you are a fine canny modeller who makes some awesome stuff!
 

Richard Gawler

Western Thunderer
Starting from the late 1960s I have had seventeen model railway layouts, this is not counting two baseboards which never got as far as receiving any track. Six of these projects remain - four completed, two in limbo. Of the rest, I still regret losing an N gauge effort with a Deane style fiddle yard. I was always pleased with the construction but this semi-portable contrivance complete with access well combined a need for an awful lot of space with little room for scenics and very limited operation. I know it could have become an essay in Sn2, but it had become an elephant in the room and it had to go to let me clear my head.

I have built other failed locos. One was a Branchlines kit for a Muir Hill rail tractor - a good model with a hopeless bought-in motor bogie as a chassis. It wouldn't run, but it was good enough to sell and recover most of the cost. For River Pant, I am plenty happy to think of this as the cost of a night in a Travelodge, but rather more enjoyable.

Past models can go in a cupboard but layouts take up an awful lot of space, and I don’t like parting with them! This is why I have been building 7mm locos and stock with no layout for a while.

I sold the Y7 (here) a while ago. I refurbished her with new pickups and wiring, and she ran well. I also sold an Ixion Hudswell Clarke and my GWR Hydra and with these gone I see better what I have. When 'Lady Marion' returns from Warren I will have four locos for a layout and really, this is probably enough. The fact that two are Manning Wardles (one belonging to the railway, one belonging to the Bentalls foundry) has come about without really thinking but it can reflect two small companies sharing a spares holding as well as company directors.

Added to this, ‘Lady Marion’ is the first loco which actually makes me want to build a layout. I don’t want to write about what I want to build next (I find this creates unwanted pressure and leads to contradictions) but I know, with all the ideas and support here I am in a happy place with my model making :)
 
Last edited:
A Sample of FB Track

Richard Gawler

Western Thunderer
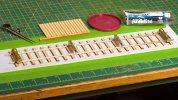
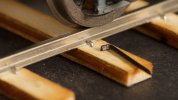
I have had a go at making some flat bottom track using code 100 rail from Kalgarin and 9 ft sleepers from C&L. This was a trial to find out how much the appearance would differ from Peco’s bullhead flexi track, and to end up with something to stand my Y14 on inside its display case.

DSC_5977.jpeg
This is the first time I have used graph paper for years. The sleeper pitch of 7/10ths inch represents a scale 30.5 inches. The code 100 rail is representing 60 to 70 lb/yard prototype.

The gauge is the wanted 31.5 mm at one end and almost 32 mm at the other end because I made an effort to hold the rails down onto the sleepers but no effort at all to push them sideways against the gauges. I cannot see the difference.

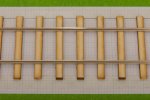
DSC_5986.jpeg
I would have rather have no spikes than overscale spikes but I am still searching for something reasonable.

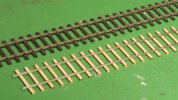
DSC_5991.jpeg
So, a marked difference with the flexi track. There isn’t any comparison really.

Now, I bought the code 100 rail because I thought (and still think) it looks reasonable under a Y14. It is the largest rail section I want for my layout, though I accept it may not really be strong enough for a Y14. Thanks to Col. (@Eastsidepilot) for his recent note on the relaying of the Middy. Hopefully, running at low speeds won't look out of place. I do think, the 2ft 6in sleeper spacing with this rail has a pleasing aesthetic; it looks “light”.

What I really do need to find out is, how to build this track so I can fix it down onto a baseboard and ballast it without the rails popping off during expansion and contraction. If the layout goes in a car in Winter and the hobby room in Summer then I am looking at a temperature variation of 0 to 30 degrees C.

Perhaps scale 40 ft lengths would be sensible for the rails. Perhaps, all I need to do is secure the sleepers below the rail joints and ballast using a latex-based glue. Perhaps, it would be best to leave the rails as long as I can and spike them all down. Any guidance here would be very welcome.

I have put the sample into the display case, it doesn’t photograph very well in there but it looks much better than its predecessor.
 
Last edited:

JimG

Western Thunderer
I would have rather have no spikes than overscale spikes but I am still searching for something reasonable.

There was a discussion about spikes a couple of years ago here :-


...which may give some pointers. I used Andy Reichert's etched spikes on my S scale layout and they looked very good, although I had to drill pilot holes on my firmer baseboard material.

Jim
 

Allen M

Western Thunderer
Hello Richard and all
Attached photos of my WC&PR Ebdon Lane for the Colonel Stephens Museum Tenterden.
013.JPG011.JPG

The sleepers are hardwood, the spikes are Peco and the rail Peco code 100 F/B which equates to 56Lb.

Concrete track sleepers 5.JPG

The third represents the track with sleepers and concrete pads on parts of the line. The sleepers are again wood the pads are plastic painted concrete colour.

Hope this is of interest and maybe help.

Regards
Allen
 

Richard Gawler

Western Thunderer
I bought these sleepers well over a year ago and asked a few modellers about spikes. And much the same replies came back: the Peco spikes, Micro Engineering, and cut-down staples. The Proto87 ones are new to me, they seem to spot-on for S and a bit undernourished for 0.

I have measured a Peco IL-13 spike and the head scales up to around 45 x 105 mm, which is a bit hefty but they look fine in Allen's model. Which I am sure I saw on my visit to the Colonel Stephens Museum last year. The Micro Engineering "medium" ones would be good to try but eBay vendors in the US are asking silly prices for postage to the UK so I'll skip these. And so I will enter geek mode:

DSC_5996.jpeg
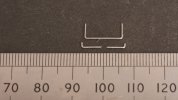
Here are two Rexel 26/6 staples, one trimmed and cut in half to make two spikes.

DSC_6003.jpeg
Five of these home-made spikes on my test piece, with a Peco spike to compare the sizes.

DSC_6004.jpeg
And again.

These spikes are easy to cut using Xuron track cutters. I need to pre-drill the holes in the ply sleepers, otherwise forcing the spikes into place breaks the sleepers off the rail. It would be sensible to pre-drill the sleepers before building the track.

The heads of the spikes cut from staples scale up to around 22 x 88 mm full size. Do we know how big the top of a real spike really is? I think I could put in a few hundred of these, and this would be straightforward if I had pre-drilled the sleepers, but it would be wise to get a few opinions first.

And it is interesting to see code 100 rail as representing 56 lb/yd rail. I have a chart of rail sizes somewhere to check.
 
Last edited:
Top