You are using an out of date browser. It may not display this or other websites correctly.
You should upgrade or use an alternative browser.
You should upgrade or use an alternative browser.
The Heybridge Railway, 1889 to 1913
- Thread starter Richard Gawler
- Start date
Threadmarks
View all 83 threadmarks
Reader mode
Reader mode
Recent threadmarks
GER 10 ton van (1910) - buffers and completion Rebalancing the Wagon Fleet New Standards for Building Plain Track New Sleeper-built buffer stop (1) construction New Yard crane New Water column New Sleeper-built buffer stop (2) finishing New Ballast - geology and sources NewRichard Gawler
Western Thunderer
heat shrink makes good hoses etc
or clingfilm, better yet, thin silver paper. And you get to eat the Kit Kat too.
Difficult decision. Go out and buy a Kit Kat or rummage through the stash of heat shrink. Or of course do both.
Richard Gawler
Western Thunderer
Yorkshire Dave
Western Thunderer
better yet, thin silver paper. And you get to eat the Kit Kat too.
Will be struggling now as Kit Kats are no longer wrapped in foil with a paper wrapping.

Sleeper-built buffer stop (2) finishing
New
Lancastrian
Western Thunderer
Richard,I can see two ways to continue this workbench thread. I can either try to paint the buffer stop (and each successive model) or just carry on with the building. I’m not very good at painting (might improve!) and I am waiting for warmer weather to spray primer outdoors, so I will carry on with the building . . .
Rewind to last January:
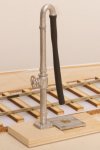
The yard crane for Heybridge Basin is from the Peco kit. I have shortened the jib a bit so the model looks better in the scene, not for any prototypical reason.
View attachment 213952
I have based the jib on a crane preserved at Ellesmere Wharf on the Shropshire Union Canal. The steel girders provided for the jib in the kit are wrapped up inside the white styrene to represent a timber beam.
View attachment 213949
I have added a brass spindle to attach the two stays. This arrangement seems to be more common than fixing the stays to the frame holding the pulley, as portrayed in the kit.
View attachment 213951
The rollers for the chain are brass wire, tube and 14 BA washers.
View attachment 213950
This all comes apart for painting.
I have picked up a particularly stupid habit of dipping the brush for Plastic Weld into the bottle of phosphoric acid flux, this being followed by pondering why the plastic joint has fallen apart. Also the brush carries contamination onto the model, hence the stains on the jib. Hopefully the primer will still stick
Don't paint the buffer stop, stain it with diluted Indian ink. 1 to 1 with water should suffice, and you can build up layers until you get a nice old and worn look to it.
Richard Gawler
Western Thunderer
Richard,
Don't paint the buffer stop, stain it with diluted Indian ink. 1 to 1 with water should suffice, and you can build up layers until you get a nice old and worn look to it.
Ian's post is very important for my whole project. I often say to people the layout is "mid-1890s with the ability to extend to 1912" - and the infrastructure especially timber parts could look brand new or well-weathered.
I have just bought a bottle of Vallejo 'Smoke' (70.939) on the recommendation of an experienced modeller, and this is indeed a superb rendition of fresh creosote. On a test piece of bare ply it even tones with the laser scorch marks, though I have cleaned the worst of these off the buffer stops.
Creosote fades (though I suspect the Victorian stuff was sturdier than what we used to be allowed to buy in the UK) and the layout might look rather prissy if too much of timber is a uniform dark brown. I'm glad I haven't yet painted these most recent models, I had a hunch it would be good to tackle them together. I can buy some Indian ink when I go out for my Toblerone

PhilH
Western Thunderer
Richard,
I use black and brown shoe dye diluted in IPA (Alcohol) for staining timber. I think creosote does have a brown tint, so mixing the two should give a reasonable result. The ply you are using probably has a rather dense surface and the laser cut edges may be hard to disguise. For scenic structures like your buffer stop its probably better to use general modelling stripwood such as basswood or lime, and these take any form of dye very well. Also if you stain the wood before assembly you get some variation in the individual timbers.
I use black and brown shoe dye diluted in IPA (Alcohol) for staining timber. I think creosote does have a brown tint, so mixing the two should give a reasonable result. The ply you are using probably has a rather dense surface and the laser cut edges may be hard to disguise. For scenic structures like your buffer stop its probably better to use general modelling stripwood such as basswood or lime, and these take any form of dye very well. Also if you stain the wood before assembly you get some variation in the individual timbers.
Richard Gawler
Western Thunderer

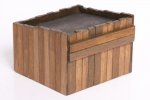
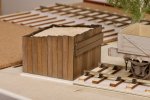
Posed at Heybridge Basin.
If I overdo the weathering on the railway’s infrastructure then I will deny myself the ability to portray the line in the 1890s and this would be a pity.

These particular ply sleepers take diluted paint well and I have settled for mixes of dark brown and silver Vallejo paints. The idea was to try for slightly faded creosote, but I ended up ended up with lightly weathered hardwood. I used the paint undiluted to hide the layers of the ply on the ends and edges. I tried some diluted Indian ink but the effect was too strong.

Then I added some eye shadow powders (greys and a green) to tone down the darkest and the palest sleepers so there is still some variation but not too much.

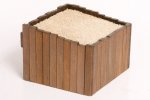
The infill is Woodland Scenics "buff" and "light gray" ballast.
Aggregates were extracted near Heybridge Basin but I still don't know what they were. I am guessing sand and gravel as found throughout the middle of Essex.
I have adjusted the colour balance of these last three photos to try to match what I see in my hobby room. The sleepers are a good match but the flash keeps catching the infill.
Last edited:
If I overdo the weathering on the railway’s infrastructure then I will deny myself the ability to portray the line in the 1890s and this would be a pity.
View attachment 214186
These particular ply sleepers take diluted paint well and I have settled for mixes of dark brown and silver Vallejo paints. The idea was to try for slightly faded creosote, but I ended up ended up with lightly weathered hardwood. I used the paint undiluted to hide the layers of the ply on the ends and edges. I tried some diluted Indian ink but the effect was too strong.
View attachment 214188
Then I added some eye shadow powders (greys and a green) to tone down the darkest and the palest sleepers so there is still some variation but not too much.
View attachment 214189
The infill is Woodland Scenics "buff" and "light gray" ballast.
Aggregates were extracted near Heybridge Basin but I still don't know what they were. I am guessing sand and gravel as found throughout the middle of Essex. This material doesn't drain well and I will need something else to ballast the track.
I have adjusted the colour balance of these last three photos to try to match what I see in my hobby room. The sleepers are a good match but the flash keeps catching the infill.
Your buffer stop looks very nice.
It’s really difficult to know what the colouring would have been in, say, 1910. None of us were there then and any surviving sleeper-built ‘stops (I remember seeing a few) won’t have been the same colour in 1975ish (when I saw them) as they were 60 years earlier. However, I do generally give credence to the colouring of contemporary model railway equipment.
I know a lot of folk are dismissive of models sold by mainstream model manufacturers a century ago. They are not accurate models (e.g. wheel profiles) by today’s standards. But they were as accurate as they could be — within the limitations of manufacturing technology and commercial constraints. The discussions in the model railway press of the time have plenty of examples of debate and criticism about accuracy of representation, as today. Also, much more model equipment was made in the same way as the full size prototype (wood to represent wood etc.). So I generally believe, for example, the livery colours of pre-grouping locomotives made in the pre-grouping era. They will be right because they could be (using paint samples supplied by the railway companies) — and if they weren’t right it’s very likely there would be comment in the contemporary model press to that effect.
I have models of sleeper built stops made in the 1920s and later by two different model companies. All of them look black. In bright light, yes, there is a brown-ness to the black, but the immediate impression is black.
Surely, there would have been variation in the overall colour of the real things. But I would expect manufacturers to have got the overall look right for a typical example. And I would expect to see complaints from contemporary modellers if they hadn’t.
Last edited:
Yorkshire Dave
Western Thunderer
If I overdo the weathering on the railway’s infrastructure then I will deny myself the ability to portray the line in the 1890s and this would be a pity.
As the layout is set on the coast/coastal estuary wouldn't the infrastructure be more exposed to the elements and subject to more of a battering than as if was inland? Plus there would be the additional effects of a saline atmosphere.
simond
Western Thunderer
I guess sleeper-built stops were built from new sleepers, so they’d probably be weathered new sleeper colour…Your buffer stop looks very nice.
It’s really difficult to know what the colouring would have been in, say, 1910. None of us were there then and any surviving sleeper-built ‘stops (I remember seeing a few) won’t have been the same colour in 1975ish (when I saw them) as they were 60 years earlier. However, I do generally give credence to the colouring of contemporary model railway equipment.
I know a lot of folk are dismissive of models sold by mainstream model manufacturers a century ago. They are not accurate models (e.g. wheel profiles) by today’s standards. But they were as accurate as they could be — within the limitations of manufacturing technology and commercial constraints. The discussions in the model railway press of the time have plenty of examples of debate and criticism about accuracy of representation, as today. Also, much more model equipment was made in the same way as the full size prototype (wood to represent wood etc.). So I generally believe, for example, the livery colours of pre-grouping locomotives made in the pre-grouping era. They will be right because they could be (using paint samples supplied by the railway companies) — and if they weren’t right it’s very likely there would be comment in the contemporary model press to that effect.
I have models of sleeper built stops made in the 1920s and later by two different model companies. All of them look black. In bright light, yes, there is a brown-ness to the black, but the immediate impression is black.
Surely, there would have been variation in the overall colour of the real things. But I would expect manufacturers to have got the overall look right for a typical example. And I would expect to see complaints from contemporary modellers if they hadn’t.
I wonder if, instead of just creosote, it was common practice for the sleepers to be tarred? That would indeed make them black when new. I’m sure I’ve seen pictures of sleeper built stops where it was possible to see that rail chairs had previously been attached to at least some of the sleepers. I believe used sleepers were also used to build lineside huts by some companies.I guess sleeper-built stops were built from new sleepers, so they’d probably be weathered new sleeper colour…
Chas Levin
Western Thunderer
I guess sleeper-built stops were built from new sleepers, so they’d probably be weathered new sleeper colour…
Please excuse me if I'm wrong here as it's not something I've researched or anything, but I'm sure I've read that structures made from sleepers - such as end stops, fencing, lineside walls etc - were always made from old sleepers. That had seemed sensible to me, because I thought that if you're milling timber into the shape of sleepers in the first place, it would be more economical to use them as sleepers first and cascade them down to other duties when they were too worn for reliable rail support. For building other structures, you could just request suitably shaped timber from the mill.
On the other hand, I also see that it might have been a case of the railway company economising in a different way, by buying sleepers in huge quantities (and therefore at a very good price) and using a few here and there for other purposes, thereby avoiding the need to specify, order and pay higher rates for different timber shapes...?
Looks like I've contradicted myself there: saves anyone else doing it!

simond
Western Thunderer
Chas,
I can see a delivery of two dozen extra sleepers (about 60’ of track’s worth) direct from the creosote plant being much cheaper than a rail-built stop, and much less hassle than rerailing something that has “escaped”.
And if you’re building a new railway line, where do you get used sleepers from?
I’d guess “new” was common, though probably far from universal.
atb
Simon
Osgood
Western Thunderer
Would almost certainly have been sand and gravel, either from the buried river channels which criss-crossed the area or from estuarial / ancient beach deposits....
Aggregates were extracted near Heybridge Basin but I still don't know what they were. I am guessing sand and gravel as found throughout the middle of Essex. This material doesn't drain well and I will need something else to ballast the track.
....
This material generally drains very well, unless it contains too much fine sand / silt / clay (which might be the case with material coming from further east where the rivers slowed and lighter particles dropped out.
As-dug, often rounded, aggregate was maybe not the best ballasting material compared to angular 4" down rock or slag due to insufficient large (+ 4") stone to help resist lateral movement but it certainly drained well, and was the staple ballasting material on light railways wherever deposits were found.
In the case of the Middy the (main?) source was just a short distance east of where construction started at Haughley station. where a ballast pit was dug.
The Heybridge Rly would have had to pay more for imported material if local aggregate was not used.
Dan Randall
Western Thunderer
I believe the two-finger version may still be wrapped in the traditional foil and paper, but I like my chocolate, so always get the four-finger version!Will be struggling now as Kit Kats are no longer wrapped in foil with a paper wrapping.

Regards
Dan
Chas Levin
Western Thunderer
Chas,
I can see a delivery of two dozen extra sleepers (about 60’ of track’s worth) direct from the creosote plant being much cheaper than a rail-built stop, and much less hassle than rerailing something that has “escaped”.
And if you’re building a new railway line, where do you get used sleepers from?
I’d guess “new” was common, though probably far from universal.
atb
Simon
Yes, I think you're right Simon - that option makes much more sense, doesn't it?
Where do you get used sleepers from, indeed. Not the sort of thing you could pick up for a few quid from someone at the pub...
Osgood
Western Thunderer
Used oak sleepers are now commanding a £40 price tag, invariably imports from Europe with their slightly narrower but deeper end profile.
Today proved to be a school day at Albury (and `I didn't get sent into a corner) - I learned from one of the Love Lane crew (might it have been Professor Birch?) that at one time an import duty was imposed on timber over 9ft length, so sleepers were coming into the country at 8ft 11" to avoid the duty!
Today proved to be a school day at Albury (and `I didn't get sent into a corner) - I learned from one of the Love Lane crew (might it have been Professor Birch?) that at one time an import duty was imposed on timber over 9ft length, so sleepers were coming into the country at 8ft 11" to avoid the duty!
Threadmarks
View all 83 threadmarks
Reader mode
Reader mode

