The Heybridge Railway, 1889 to 1913

James Spooner

Western Thunderer
That’s looking lovely Richard, but the real thing might work better if there was a flue up the chimney to enable the steam and gases to escape. Maybe drill a hole a little way up each part of the chimney to give the right effect?

Nigel
 

RichardG

Western Thunderer
. . . a flue up the chimney . . .

The lack of a flue has come from me changing my mind partway through. I mean, the original idea was to cover the base of the chimney with a tarpaulin, and then I decided to include the hinge to fill a gap so the chimney appeared to be attached to the loco.

I can put a wooden bung over the smokebox part, but I think I will have to go for some very matt black paint on the chimney part. If I drill out the steel pin holding this together, I fear it will drop to pieces.
 

RichardG

Western Thunderer
DSC_2386.jpeg
The towing bracket looks too low in any scale. It came off with the piercing saw, though I suspect it was held by just one of its pegs and the paint.

DSC_2397.jpeg
I have trimmed the bracket and glued it back with a fresh pin, another scrap of n/s wire. And removed some surplus rivets.

DSC_2395.jpeg
The two handwheels are a bit chunky so I have slimmed them down.

DSC_2403.jpeg
Clearly, some etched handwheels and slimmer columns would look better . . . but somehow I have got to remember the nature of this model. If I look closely, I can see a slot for a steering column for left-hand drive. There is no firebox door, nor any brake gear. I can only go so far with improvements, though I am rather encouraged to see what I can do with a diecast model. The nameplates will take around eight weeks to arrive. It might be best to put this model aside and come back to it then.
 
Last edited:

mswjr

Western Thunderer
I collect these corgi traction engines, the slot either side in the firebox is for a RH or LH engine, So you will have to fill one side, The wheels should just pull off, they are just pushed on a 2mm steel rod, no serrations on it just smooth. And i paint the ashpan a rust colour s they are always rusty.
 

RichardG

Western Thunderer
. . . So you will have to fill one side, The wheels should just pull off, they are just pushed on a 2mm steel rod, no serrations on it just smooth. And i paint the ashpan a rust colour s they are always rusty.

There is a pattern emerging here:
1. I do some modelling, and people click the “like” button.
2. I announce that the model is finished.
3. Some of these people point out the more major deficiencies in my efforts.
4. I go back to step 1.
I’ll call this the Western Thunder Effect, though maybe it already has another name. Eventually I escape from the loop, invariably with a better model, and start something else.

DSC_2414.jpeg
The hind wheels twisted and pulled off after applying rather a lot of force. The rear axle is knurled on at least one end, so perhaps Corgi have “improved” their design. Really, these models are made to a higher standard than some model railway stock.

DSC_2406.jpeg
The flywheel came off eventually as well.

DSC_2425.jpeg
I have found colour photos showing tyres of much the same colour as the Corgi ones so I am going to leave these alone.

DSC_2430.jpeg
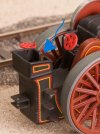
This is almost entirely the original Corgi model. I have added a length of brass tube and a washer, and tweaked some details.

DSC_2419.jpeg
Obvious omissions are the steering gears, brakes, and the strapping which connects the towing hitch to the frames. Still I think the result looks more convincing on the layout than the original 1:50 scale model, especially when placed as a load on a wagon.

I am expecting the nameplates in late June.
 

mswjr

Western Thunderer
Great job, just one last bit if you can do it, Fill this cut-out in, Corgi have done it as this locates the feast crane bit, But on full size this would be a whole plate and the coal door would be on the bottom near the floor, Other wise the coal would fall out as the coal would be filled right to the top.
Garry
 

Attachments

  • DSC_2430.jpeg
    DSC_2430.jpeg
    86.1 KB · Views: 14

Yorkshire Dave

Western Thunderer
though I am rather encouraged to see what I can do with a diecast model

At the end of the day it's just another alloy product to use as a starting point to fettle with, alter and/or add as much detail as you wish in order to bring the model up to your standards.

I use 4mm diecast buses as starting points and my aim is to remove the toy like nature by stripping, repainting. adding missing panel lines and detailing to bring them up to my modelling standards to represent vehicles I have seen or photographed. More recently I've chopped up two diecast Bristol single door RE LLs in order to create one dual door variant.
 

RichardG

Western Thunderer
The selection of diecast road vehicles suitable for my period is (understandably) quite limited. Corgi also do Burrell and Garrett locomotives in 1:50 scale, and if I try again I might go for one of these with a new chimney for 1:43 scale and a repaint into unlined black. To stand on the layout not as a wagon load. There are also some 1:43 cars and I must remember these as possible donors when I make my Bentall car.

If I allow my NER low machine wagon onto the layout at all then this has to be in 1913, the year the wagon was built and the year the line was dismantled. This is after the line officially closed, and into the reign of George V. So let the line go out in style, with a movement of a beautifully painted road locomotive heading for export. I will suppose it is going to St George's Island, from Yes Prime Minister, and so 'Deborah' will never be recorded again.
 

RichardG

Western Thunderer
At the end of the day it's just another alloy product to use as a starting point to fettle with, alter and/or add as much detail as you wish in order to bring the model up to your standards.

I suppose standards are the reciprocal of compromises, or at least they are inversely proportional to each other. My Fowler loco will always be a great big compromise: a 1:50 scale B6 reworked to make it pass as a 1:43 loco which probably never existed quite the way I have portrayed it. The bar is pretty low, because there are details like the spud tray which is out of place unless the model receives slatted tyres.

I haven't worked up the courage to remove a front axle assembly from these models. If I knew I was going to strip and repaint, I might be more ambitious.
 

Ian@StEnochs

Western Thunderer
Your engine could have been on strakes, with the spud tray, when new and fitted with rubbers later. Easy just to leave the redundant tray in place.

Traction engine builders offered a range of 'classes' of engine but as most were sold singly to users it is very unlikely that two of the same were identical in service. Quite different to railway engines where every one of a class looked the same. Mostly!
 
Top