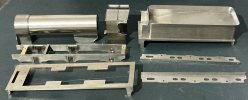
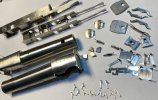
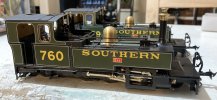
Tom Mallard’s Workbench L&B in 7mm scale, CR 828 in 7mm, GWR Saints in 4mm

Dave Holt

Western Thunderer
Tom.
As others have already said - absolutely superb modelling. A firm favourite of mine (I was a supporter of the Lyd project, and still love to see it at the FfR), I too look forward to seeing them painted.
It really was a shame we couldn't meet up on Saturday as I very much would have enjoyed seeing the locos in the flesh, so to speak.
Dave.
 

Tom Mallard

Western Thunderer
I can only echo what others have already said. Exquisite model making. You achieve a standard way above that of us mere mortals.

I can’t wait to see the finished painted engines as they are a particular favourite of mine. I’ll just have to settle for one of the Lionhart rtr offerings though!
Very kind Andrew. The Lionheart offering should satisfy a lot of L&B devotees, so I hope you enjoy yours.
Tom
 

Tom Mallard

Western Thunderer
Tom.
As others have already said - absolutely superb modelling. A firm favourite of mine (I was a supporter of the Lyd project, and still love to see it at the FfR), I too look forward to seeing them painted.
It really was a shame we couldn't meet up on Saturday as I very much would have enjoyed seeing the locos in the flesh, so to speak.
Dave.
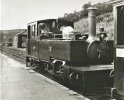
Thankyou Dave,
I passed LYD while travelling on the FR back in 2013 and as I hadn't expected it did a real life double-take!
I too was very disappointed that Saturday's meeting had to be put off as it would have made a very pleasant change to staring at specks of metal. Maybe some other time.
Best regards
Tom
 
Last edited:

Tom Mallard

Western Thunderer
IMG_E2961.JPG
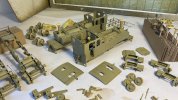
Another chunk of time to review, revise, add to, clean and check prior to masking and then the tense job of spraying primer. I use two part etching primer in this fetching khaki hue. I really like the flat finish as all the details become much more noticeable just like photographic grey. The spraying so far has been a little more forgiving than imagined, so long as the paint is kept nice and thin (about 1 part paint/2 parts etch thinners/1 part cellulose thinners) and the nozzle and needle periodically cleaned during spraying it mostly went OK.

The valvegear has been a chore to get functioning correctly but I think I am about there.

I will have to think about which type of paint I am going to use on the chassis. Cellulose is so nice with the super quick drying time. For the bodywork I am limiting myself to commercially available SR Maunsell green enamel from Phoenix Precision Paints. I've often used their paint for things like bufferbeams and the red between frames and liked it so I am hopeful.

Best regards

Tom
 

J_F_S

Western Thunderer
Great Post Tom and many thanks for the update.

I wonder, why not 'cellulose' for the upperworks? It is equally effective there as on the chassis, with the added benefit that the lining can then be done in enamelsallowing correction without risk of interaction. You can get small quantities mixed in any one of 5,000 hues... should be a Maunsell green in there somewhere!

Really looking forward to seeing the finished job!

With Best Wishes,

Howard
 

Tom Mallard

Western Thunderer
Great Post Tom and many thanks for the update.

I wonder, why not 'cellulose' for the upperworks? It is equally effective there as on the chassis, with the added benefit that the lining can then be done in enamelsallowing correction without risk of interaction. You can get small quantities mixed in any one of 5,000 hues... should be a Maunsell green in there somewhere!

Really looking forward to seeing the finished job!

With Best Wishes,

Howard
Howard,

Til now, I've used cellulose for the upperworks on all of the work I spray myself. Why am I changing approach? I've not got a good answer other than... In my tiny mind, enamel sounds more resistant to all sorts of things, very hardwearing, is available in the right colour off the shelf and cellulose being solvent based is reversable. I liked the permanence of enamel. It goes on top of the primer nicely, and overspray is very easy to clean up. This might be the main benefit over cellulose but is still 'not a thing' if I'm spraying enamel red bufferbeams onto a black cellulose painted engine for example. This also runs into the imagined wisdom of lining onto cellulose. I also like that compared to the solvent for spraying cellulose it is a tiny bit less harmful to me. Maybe.

There is some considerable dogma about these two paint choices which I had been swallowing for a while (maybe a couple of decades), being impressionable, young (naive), looking up to those who spout their own successful opinions and so on. One such is that cellulose can be applied more thinly when spraying. This is nonsense of course, but I have been swayed by this view for years and years. Technique dictates how thick the paint layer is. Objectively, cellulose dries more quickly and I think this is generally beneficial, but it can lead to unhelpfully quick drying of wet surfaces or wet edges before sufficient paint has been added. Being solvent based, complete removal of a failed spraying attempt is relatively simple, though enamels will very easily be dissolved before they are hard. My record for this is 7 resprays.

I have placed faith in two books - Ian Rathbones book Painting and Lining, and the well regarded book 'How (Not) to Paint a Locomotive by Christopher Vine. They both line onto enamels - once enamel is properly hardened it behaves just as cellulose does and is impervious to subsequent lining and/or weathering operations. Of couse some solvents can be relied upon to attack enamel but it takes a while. I belive turpentine can eventually dissolve it, but turpentine is quite complex and can eventually dissolve all sorts of things. Cellulose thinners will destroy an enamel finish, but none of us use this agressive solvent for lining and weathering activities.

I may yet resort to having cellulose Maunsell green mixed! As you can see, I'm quite an indecisive and fickle type - another of my super personality traits.

Well it has been quite a pleasant change writing about things other than metalwork.

Best regards

Tom
 

J_F_S

Western Thunderer
Hello Tom, many thanks for a comprehensive and interesting reply.

I did not want to come across as advocating any particular approach: since my experience has been with unlined, or simply lined liveries, I think that might have biased me in favour of cellulose since the rapid flash-off of the solvent allows many coats very quickly - or put another way: requires less skill to avoid runs and sags :)

But for fully-lined liveries considerations must be different; so Ian R is much the better person to sway your deliberations!

Best wishes,
Howard
 

Tom Mallard

Western Thunderer
CR 828 rods.jpgIMG_3840.JPG828 wheels.JPGIMG_3843.JPG
Something very different... Coarse scale O gauge with clockwork power. Feeling fortunate to have this opportunity though.

Drawings took 14 months to appear from Glasgow University North British archive which I don't think is really acceptable for a commercial service... They say that there was still a back log from lockdown they were working through, not helped at all by sharing a copy facility with the University.

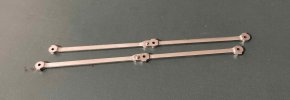
Steel rods, no knuckle joint modeled though.

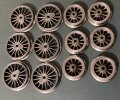
Wheels have a refined coarse scale profile and the drivers are yet to recieve crankpin holes and the square hole for the axles... Anyone out there with a 1/8" square push broach? The driving wheels are modern castings, the tender wheels from vintage (antique?) castings.

Front 4 axleboxes will have the facility to drop or move a little to assist track holding with the finer flange.

Best regards

Tom
 
Last edited:

Dave Holt

Western Thunderer
Beautiful work, as always, Tom.
My, those front frame extensions look a bit vulnerable. The sort of thing I'd end up bending. Hopefully, some frame spacers/stretchers will stiffen things up a bit.
Dave.
 

Brian McKenzie

Western Thunderer
Drawings took 14 months to appear from Glasgow University North British archive which I don't think is really acceptable for a commercial service... They say that there was still a back log from lockdown they were working through, not helped at all by sharing a copy facility with the University.
Greetings Tom,

I had a similar experience, but may have been luckier than you. My £285 prepaid order took only six months - following many excuses to my gentle reminders, and long before the pandemic. However, I do appreciate they house and care for this historical material. I received superb service whenever visiting in person many years ago.

. . . the square hole for the axles... Anyone out there with a 1/8" square push broach? The driving wheels are modern castings, the tender wheels from vintage (antique?) castings.

The fiendishly expensive commercial offerings £xxx would seem disappointing, requiring a 0.1285" dia oversized pilot hole to start with. The broach nicks out the corners while leaving small radii on the flats.

JYTool in Australia has 1/8" push broaches on eBay at about £50. This is markedly less than from other vendors.
1/8" Square Coating Broach Inch Size High Speed Steel Cutting Tool | eBay

A wobble or rotary broach is an alternative. This type of broach is easily made, but making the holder for it is rather more work.

Hemingway Kits offer parts for making the holder. Compact Rotary Broach - hemingwaykits.com

Some hobbyist discussions are at:

and
 

Tom Mallard

Western Thunderer
Greetings Tom,

I had a similar experience, but may have been luckier than you. My £285 prepaid order took only six months - following many excuses to my gentle reminders, and long before the pandemic. However, I do appreciate they house and care for this historical material. I received superb service whenever visiting in person many years ago.


The fiendishly expensive commercial offerings £xxx would seem disappointing, requiring a 0.1285" dia oversized pilot hole to start with. The broach nicks out the corners while leaving small radii on the flats.

JYTool in Australia has 1/8" push broaches on eBay at about £50. This is markedly less than from other vendors.
1/8" Square Coating Broach Inch Size High Speed Steel Cutting Tool | eBay

A wobble or rotary broach is an alternative. This type of broach is easily made, but making the holder for it is rather more work.

Hemingway Kits offer parts for making the holder. Compact Rotary Broach - hemingwaykits.com

Some hobbyist discussions are at:

and
Thanks Brian, this is good to know. I’d wondered about the Australian supplier, and will likely follow this route. For the time being I only need to do the 6 holes on this model...
Tom
 

adrian

Flying Squad
Wheels have a refined coarse scale profile and the drivers are yet to recieve crankpin holes and the square hole for the axles... Anyone out there with a 1/8" square push broach? The driving wheels are modern castings, the tender wheels from vintage (antique?) castings.
My apologies if I've missed anything - but why do you need squared holes? As Brian mentions solutions are expensive, for all the loco's my Dad scratchbuilt not one of them used squared axles. We bought the cast iron wheels and turned them up, we then had a 3/18" taper reamer to "drill" from the rear of the wheel. The wheels were then pushed onto round axles by hand and quartered by the Mk 1 eyeball (aligning spokes). We then checked the chassis would roll correctly and then finished by pushing the wheel fully onto the axle using the lathe and tailstock to ensure everything was square and correct B2B. We never needed a squared axle - and to be a pedantic Scale7 nerd - neither did the prototype! :D

I'm sure you could do the same with an 1/8" taper reamer.
 

Brian McKenzie

Western Thunderer
Cast iron as a material may not take too kindly to broaching, especially if the wheels are to be broached full depth of the axle hole. I'd be wary of splitting a casting or wheel boss. I assume Tom is replicating some vintage practice.

Expanding on Adrian's suggestion of using a taper reamer - the taper at the end of a regular hand reamer would suffice.

(Hand reamers are easily identified by having a square at the end of the shank. Machine reamers have parallel flutes full length and no square on the shank.)
 

J_F_S

Western Thunderer
My apologies if I've missed anything - but why do you need squared holes? :D

I'm sure you could do the same with an 1/8" taper reamer.
Possibly because the axles have squared ends?

Those of us of an age will have seen many such axles - time was when that was all there was and one suspects that the customer might have certain requirements.
Best Wishes,
Howard
 

40057

Western Thunderer
Cast iron as a material may not take too kindly to broaching, especially if the wheels are to be broached full depth of the axle hole. I'd be wary of splitting a casting or wheel boss. I assume Tom is replicating some vintage practice.

Expanding on Adrian's suggestion of using a taper reamer - the taper at the end of a regular hand reamer would suffice.

(Hand reamers are easily identified by having a square at the end of the shank. Machine reamers have parallel flutes full length and no square on the shank.)
It was ‘vintage practice’. Bond’s, Leeds Model Company and others all used a system where the wheel had a square central hole for quartering but the square hole was only about half the depth of the wheel. The end of the axle had a screw thread and the outer face of the wheel boss had a recess for a slotted nut that was used to secure the wheel. It meant the wheels could easily be removed and replaced (e.g. for replacing the mainspring in the motor) and the quartering preserved.
 

Tom Mallard

Western Thunderer
IMG_4090.JPG
IMG_4094.JPG

Hello again,

here's a short update and snapshot of the L&B Manning Wardle project. So many little things needed either making or attaching (I'd avoided all the oilpots and lubricators - 4 types on the cylinder assembly! - plus completion of the cab fittings' installation til now). There was also the small matter of making the things run smoothly with all the properly working Joy valvegear...

Proper photographs will be done soon, but I was excited to show where these two had got to after a long gap in updates. The weathering is much needed now to highlight the small details and bring them properly to life.

The madness of the lone model maker exemplified in narrow gauge form.

Best regards

Tom
 
Top