Hobbyhorse. Some more work on the Stirling Single

45609

Western Thunderer
Hi Simon,

Thanks for the extra photos and info. That all makes sense. I figured that you might have a common reference point on the horizontal and vertical copy master. Successful machining of parts is mostly about the planning the steps. I'm mostly working in 4mm scale so I have the added challenge of some very small components. So far I haven't attempted something with more than one profile plane. Where I've needed the depth I've split it into layers. But obviously you're not able to get any scallops or blended profiles with this method. I did some replacement brake gear for a Comet Ivatt 2MT recently (photos below). You don't really need 3D profile in this case but I do have some coupling rods to make soon and would like to have a thinner section between the bosses blended in/out correctly.

Cheers...Morgan

img_2528-jpeg.245758


img_2535-jpeg.245759


img_2536-jpeg.245760
 

Hobbyhorse

Western Thunderer
Hi Simon,

Thanks for the extra photos and info. That all makes sense. I figured that you might have a common reference point on the horizontal and vertical copy master. Successful machining of parts is mostly about the planning the steps. I'm mostly working in 4mm scale so I have the added challenge of some very small components. So far I haven't attempted something with more than one profile plane. Where I've needed the depth I've split it into layers. But obviously you're not able to get any scallops or blended profiles with this method. I did some replacement brake gear for a Comet Ivatt 2MT recently (photos below). You don't really need 3D profile in this case but I do have some coupling rods to make soon and would like to have a thinner section between the bosses blended in/out correctly.

Cheers...Morgan

img_2528-jpeg.245758


img_2535-jpeg.245759


img_2536-jpeg.245760
Those look good Morgan,
Machining valve gear can be successful cut on the panto, but side and connecting rods with blended bosses and h section are another challenge. I was lucky to spend some time with Tony Reynolds who walked me through his methods. The basic rod cut on the panto with fluting/ boss shaping cut with fly cutters, it’s still a challenge for me. Also getting free cutting Nickel silver sheet in the required thickness is difficult, I tend to use bar machined to size.

Simon
 

45609

Western Thunderer
Thanks Simon. The finished brake gear on the loco is hardly noticeable but I'm much more satisfied with the way it looks.

1782827929219.png

Funny you should mention Tony Reynalds. He also showed me his set up for fly cutting coupling rod flutes on the one and only visit I had to his workshop a number of years ago.

Cheers...Morgan
 

Hobbyhorse

Western Thunderer
Morning Morgan

Loco looking good, it’s always nice knowing the small additions made to any model is your own work.
I always treasured my visits to Tony’s plus working with him under the Hobbyhorse banner for a few years was very rewarding.

Simon
 

Hobbyhorse

Western Thunderer
With most of the drawing completed other than the bits around the castings which I can’t finish until the castings arrive, but I can start on the water tank and coal space.
Firstly a thank you to everyone that has helped with plans, photos and advice. Interpreting everything to produce this tender has been interesting as it’s certainly an odd ball and I think it’s a close representation.

On the original model the tender water tank was built around a rigid box, so same again.
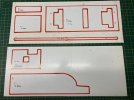
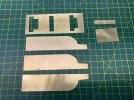
With the master patterns made and the brass bits cut, assembling these bits was fairly easy other than turning the iron up to maximum.
55363890453_99598c699c_b.jpg
55364147820_c3c7186e14_b.jpg
55363741391_65954919e3_b.jpg

The benefit of the box structure is I can use 10 thou nickel silver for all the cladding, which is easy to work.
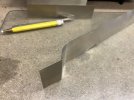
With the body sheet cut to length and height I used the hand shaper to cut small V’s on the corners, these give a crisp
edge when bent.
55362798467_a4fb5ee9fc_b.jpg
55364147890_4d8129bd24_b.jpg

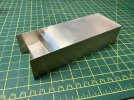
I cut three sides for the box, but haven’t used the third as I thought I could get way with only the sides supporting the top sheet, best made plans don’t aways work as the top sheet did distort a bit requiring some additional bracing inside the box, but the third one did provide a good template for forming the top sheet and the overlays.
55364147840_87de2c5948_b.jpg
55363890768_b16ab25e29_b.jpg

With the side and end cladding added.
55363931359_d4a39534b5_b.jpg

I’m pleased with progress so far, next on the list is the flares , tank overlays inside and the front for the coal space.

Simon
 
Top