You are using an out of date browser. It may not display this or other websites correctly.
You should upgrade or use an alternative browser.
You should upgrade or use an alternative browser.
Brettell Road, 1960s black country (ish)
- Thread starter Jim S-W
- Start date
David Waite
Western Thunderer
The signals look amazing
David
David
Looking at that bonk the truck is goin down reminds me of Level Street before the Merry Hell (sorry Hill) Shopping Center obliterated the area.
Level Street 2 rail level crossings, 1 canal 'half' hump back bridge (because of the steepness of the hill), 5 houses 3 of which were public houses.
Regards
Allen
Level Street 2 rail level crossings, 1 canal 'half' hump back bridge (because of the steepness of the hill), 5 houses 3 of which were public houses.
Regards
Allen
Kier Hardy
Active Member
Lovely job Jim. I'm guessing the lorry is stuck down, with all that dust accumulating underneath it? 

Jim smith-wright
Western Thunderer
It is. All the vehicles with lights are. The ones without are movable. The whole layout needs a good dusting before I take it to Crewe in a month. I usually use a soft keyboard brush for things I need to get under but it's currently gone AWOL! ♂️
Jim smith-wright
Western Thunderer
Ive always quite liked the Midland 3f tender locos. They seem to be quite nicely proportioned, more so than the 4F's that looked kind of tall and somewhat top heavy. A while ago in quick succession I picked up a Bachmann body followed soon after by a tender body and a Brassmasters Easychas for it. In the last week or so Ive decided to get some sort of progress on it.
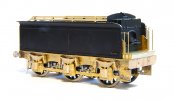
So starting with the tender. I never had the Bachmann chassis and if its anything like most RTR tender chassis it will no doubt have all been a bit flat and kinda naff. Brassmasters do a detailing kit to replace the tender chassis completely so I used that. This is just built as per their instructions.
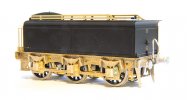
The rear end. Buffers are from Lanarkshire models as is the vac pipe. I think I'll replace the lamp irons too.
On to the loco. If I had the original chassis then based on the 1F I did I'm confident you could have something up and running in a somewhat leisurely afternoon. If you use the Bachmann coupling rods and brakes you might not even need to fire up the soldering iron! However as I didn't have the Bachmann chassis I decided to build the chassis up as a more conventional one by adding spacers left over from a High Level Models Jinty chassis kit. As the easychas caters for EM and p4 the EM spacers are perfect. If you don't have any leftover Jinty bits though Alan Gibson do a neat little etch of spacers.
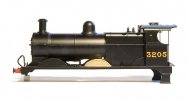
Before I show you the chassis though some decisions need to be made. The splashers suffer from the usual RTR problem of being too big. Brassmasters do a separate etch for ones that are the right size. The above image shows a comparison so you can decide if it bothers you or not.
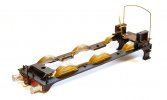
As you can probably guess it bothered me so they were all replaced. The original footplate has a solid floor back to the front of the chassis casting so I cut that out. The new reversing lever is part of the chassis kit and the boxes on the side of the cabs have been thinned down by 2mm as per the instructions.
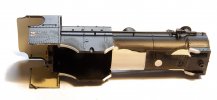
All this means that a little bit of rectification is needed on the body as it had recesses in the boiler for the original splashers that are no longer needed. I believe the Bachmann chassis block comes quite far forward so the base of the boiler was put back in using layers of thin plasticard. Theres not really much else to do to the body other than this.
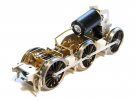
Back to the chassis then - with the inside motion kit from the 4f - You didn't expect me to leave a gaping hole did you? The gearbox is a high level loadhauler+
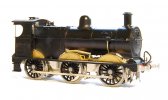
How the loco looks mocked up. I will leave the sandpipes until the very end as they will trap the centre wheels in place.
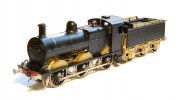

So starting with the tender. I never had the Bachmann chassis and if its anything like most RTR tender chassis it will no doubt have all been a bit flat and kinda naff. Brassmasters do a detailing kit to replace the tender chassis completely so I used that. This is just built as per their instructions.

The rear end. Buffers are from Lanarkshire models as is the vac pipe. I think I'll replace the lamp irons too.
On to the loco. If I had the original chassis then based on the 1F I did I'm confident you could have something up and running in a somewhat leisurely afternoon. If you use the Bachmann coupling rods and brakes you might not even need to fire up the soldering iron! However as I didn't have the Bachmann chassis I decided to build the chassis up as a more conventional one by adding spacers left over from a High Level Models Jinty chassis kit. As the easychas caters for EM and p4 the EM spacers are perfect. If you don't have any leftover Jinty bits though Alan Gibson do a neat little etch of spacers.

Before I show you the chassis though some decisions need to be made. The splashers suffer from the usual RTR problem of being too big. Brassmasters do a separate etch for ones that are the right size. The above image shows a comparison so you can decide if it bothers you or not.

As you can probably guess it bothered me so they were all replaced. The original footplate has a solid floor back to the front of the chassis casting so I cut that out. The new reversing lever is part of the chassis kit and the boxes on the side of the cabs have been thinned down by 2mm as per the instructions.

All this means that a little bit of rectification is needed on the body as it had recesses in the boiler for the original splashers that are no longer needed. I believe the Bachmann chassis block comes quite far forward so the base of the boiler was put back in using layers of thin plasticard. Theres not really much else to do to the body other than this.

Back to the chassis then - with the inside motion kit from the 4f - You didn't expect me to leave a gaping hole did you? The gearbox is a high level loadhauler+

How the loco looks mocked up. I will leave the sandpipes until the very end as they will trap the centre wheels in place.

Jim smith-wright
Western Thunderer
Probably. Nothing was screwed together yet and the body hasn't got much weight in it either so it's sitting high on its springsJim, I clicked like yesterday - still like it but looking at the photos again I wonder if the loco body is sitting a bit high on the chassis? The gap between the axle and the top of the foot plate looks a bit more than it should be, but it may be an optical illusion.
Jim smith-wright
Western Thunderer
Much as I quite liked the accidental JPS tribute look of my 3F (Fans of retro Formula 1 will know what I mean) My 3f has now been painted and weathered.
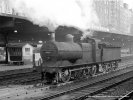
I found this image of 43687 at New Street on station pilot duties around 1957. The loco was allocated to Bournville shed at the time so it seemed suitable to me. Image ©John Turner 53A Models of Hull Collection and used with his kind permission.
Below a few images of the finished model.
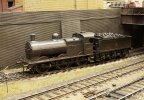
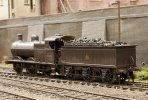
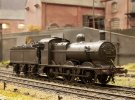
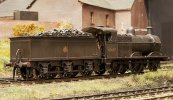
Just waiting for a Modelu crew to arrive. Does anyone know how the cab rain sheets were attached to the tender on these locos? Ive found several images of them with the sheets stored on the edge of the cab roof but none with them in use. I guess back in the day people didn't go out to take photos of mundane freight locos if it was raining!

I found this image of 43687 at New Street on station pilot duties around 1957. The loco was allocated to Bournville shed at the time so it seemed suitable to me. Image ©John Turner 53A Models of Hull Collection and used with his kind permission.
Below a few images of the finished model.


Just waiting for a Modelu crew to arrive. Does anyone know how the cab rain sheets were attached to the tender on these locos? Ive found several images of them with the sheets stored on the edge of the cab roof but none with them in use. I guess back in the day people didn't go out to take photos of mundane freight locos if it was raining!
I agree, Jim. I couldn't find any photos either. My guess would be tied with string to the coal rails.Does anyone know how the cab rain sheets were attached to the tender on these locos? Ive found several images of them with the sheets stored on the edge of the cab roof but none with them in use. I guess back in the day people didn't go out to take photos of mundane freight locos if it was raining!
The model looks very nice!
Jim smith-wright
Western Thunderer
This weekend I was helping Tim at Railex (helping in the loosest term - I was there anyway!) and had a very interesting chat with a chap about lighting on layouts. He explained that lighting is what he does and he was obviously somewhat of an authority on the subject.
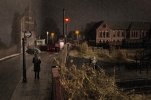
Anyway the subject of this image came up, Apologies for posting it again, I get people are probably sick of seeing it but I have added a bit of rain as some people asked for it. He explained that sodium lighting on a scale of colour gives a very high spike in the yellow range and doesn't output any other colours. For this image to have the colours it does it would need a white light source, I cant say its the moon because its raining! It actually does have a white light source as I have a string of dim-able LEDs on the wall of the shed that I use to infill my night pictures. He very obviously knew exactly what he was on about! People may have noticed that at night we sometimes see in black and white. It was something I was already aware about on a very basic level. Cameras are much better at picking up colour in low light than the human eye as anyone who recently saw and photographed the northern lights probably noticed.
So I could say that the above image has a certain degree of artistic licence to it. Or at least I could if it was deliberate but the reality is it wasn't. I hate it when people throw the term artistic licence around to justify missing something or some sort of mistake after its been pointed out. It's OK to miss things, just don't try and claim it was deliberate after the event.
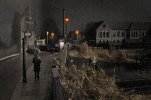
So by taking all of the colour out except yellow (and putting some back in for the lorry lights and inside the phone box) we have an image that more accurately depicts what you would see if you were really standing on a rain sodden bridge in the Black Country at the end of the 1950's. Two questions now though, The first is which of the two is actually the more pleasing, or nicer image? and the second is anyone actually bothered?

Anyway the subject of this image came up, Apologies for posting it again, I get people are probably sick of seeing it but I have added a bit of rain as some people asked for it. He explained that sodium lighting on a scale of colour gives a very high spike in the yellow range and doesn't output any other colours. For this image to have the colours it does it would need a white light source, I cant say its the moon because its raining! It actually does have a white light source as I have a string of dim-able LEDs on the wall of the shed that I use to infill my night pictures. He very obviously knew exactly what he was on about! People may have noticed that at night we sometimes see in black and white. It was something I was already aware about on a very basic level. Cameras are much better at picking up colour in low light than the human eye as anyone who recently saw and photographed the northern lights probably noticed.
So I could say that the above image has a certain degree of artistic licence to it. Or at least I could if it was deliberate but the reality is it wasn't. I hate it when people throw the term artistic licence around to justify missing something or some sort of mistake after its been pointed out. It's OK to miss things, just don't try and claim it was deliberate after the event.

So by taking all of the colour out except yellow (and putting some back in for the lorry lights and inside the phone box) we have an image that more accurately depicts what you would see if you were really standing on a rain sodden bridge in the Black Country at the end of the 1950's. Two questions now though, The first is which of the two is actually the more pleasing, or nicer image? and the second is anyone actually bothered?
Last edited:
Dave F.
Western Thunderer
I think I prefer the second image Tim though the first image looks as though a setting sun has broken through the heavy rain clouds and is behind the camera giving a touch of colour to the buildings, the second image after sunset looks as though there are strong street lights to the right of the camera that are shining on the buildings. To me both images are superb.
Cheers.
Dave.
Cheers.
Dave.
Dan Randall
Western Thunderer
Hi Jim
Both versions work for me and I never tire of looking at this rain-sodden view.
Much as I love this country’s beautiful countryside, I also have a thing for its urban grot and can almost feel the cold and wet being endured by the solitary member of the town’s plastic population, daft enough to be out walking on such a wretched evening.
Is that a bus stop he’s stood next to? If so, perhaps he’s thinking about taking refuge in the nearby phone kiosk, while he waits for his bus to turn up? (and could this possibly be the only layout in existence, that doesn’t have a bus on the bridge?…).
Love the reflections of the lorry’s rear lights on the wet asphalt too!
Regards
Dan
Both versions work for me and I never tire of looking at this rain-sodden view.

Much as I love this country’s beautiful countryside, I also have a thing for its urban grot and can almost feel the cold and wet being endured by the solitary member of the town’s plastic population, daft enough to be out walking on such a wretched evening.
Is that a bus stop he’s stood next to? If so, perhaps he’s thinking about taking refuge in the nearby phone kiosk, while he waits for his bus to turn up? (and could this possibly be the only layout in existence, that doesn’t have a bus on the bridge?…).

Love the reflections of the lorry’s rear lights on the wet asphalt too!

Regards
Dan
simond
Western Thunderer
Firstly, I’d agree with your chap about sodium lights. They emit only two very precise wavelengths (colours) of light, which we perceive to be yellow. Some references below, including an electric pickle. (Mercury lights are blue-white for the same reasons, and the colours of “neon” lights also - neon itself emits a dull orange, but the coatings inside the tube make for the classic “fluorescent” light colour spectrum and other gases are used to excite the coatings to emit)
So what?
White LEDs have similar colour spectra to fluorescent lights, so your phone box light stands out as a different colour, which is ideal, you might want to dim it, lots of simple ways of doing that.
There are some yellow leds that are going to emulate sodium lighting quite well, and being monochrome they’ll give a similar appearance which might be worth playing with. These are 590nm so pretty much spot on. Maybe create an ambient yellow illumination with a few of them? https://docs.rs-online.com/7bcf/A700000009318177.pdf
Raining with moonlight? Why not? Broken cloud and heavy rain. Sounds like a Bank Holiday…
and personal preference, I think I prefer the second one. But I never tire of seeing this model.
atb
Simon
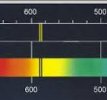
sodium

mercury - much wider range of emissions
So what?
White LEDs have similar colour spectra to fluorescent lights, so your phone box light stands out as a different colour, which is ideal, you might want to dim it, lots of simple ways of doing that.
There are some yellow leds that are going to emulate sodium lighting quite well, and being monochrome they’ll give a similar appearance which might be worth playing with. These are 590nm so pretty much spot on. Maybe create an ambient yellow illumination with a few of them? https://docs.rs-online.com/7bcf/A700000009318177.pdf
Raining with moonlight? Why not? Broken cloud and heavy rain. Sounds like a Bank Holiday…
and personal preference, I think I prefer the second one. But I never tire of seeing this model.
atb
Simon

sodium

mercury - much wider range of emissions
timbowales
Western Thunderer
As usual an absolutely superb rendition of a dank, rain-sodden oop north.
I also prefer the second picture and, personally, I love seeing your pictures. They remind me of my 50’s/60’s childhood albeit spent about a hundred miles to the NNE of there.
Tim T
I also prefer the second picture and, personally, I love seeing your pictures. They remind me of my 50’s/60’s childhood albeit spent about a hundred miles to the NNE of there.
Tim T
I think the second image is better — just. But the second image is the only reason I don’t think the first image is perfect and as good as it is possible to be.
As to being bothered — not really. Your first image has achieved the goal of looking completely convincing and transporting the viewer into the scene portrayed. We are there. So once that is achieved, nothing else is needed. Has anyone ever looked at the first image and given the immediate reaction ‘That’s not right’. Surely not.
I have not (sadly) ever seen your wonderful layout except in photos. But it must contain devices, like shortened perspective, 2-D back-scene etc, that are departures from strict reality but a necessary part of creating the illusion. I would view some adjustment in lighting similarly. It might look better for being not quite right. After all, in an exhibition, you do want people to be able to see the model — so I am guessing the light level has to be somewhat above that of a real dark night with heavy cloud cover? It might be more realistic if it was so dark nothing was clearly visible, but it wouldn’t transport people back to to the time and place you have modelled.
Jim smith-wright
Western Thunderer
Thanks Dan.Is that a bus stop he’s stood next to? If so, perhaps he’s thinking about taking refuge in the nearby phone kiosk, while he waits for his bus to turn up? (and could this possibly be the only layout in existence, that doesn’t have a bus on the bridge?…).
It is indeed a bus stop and it's presence on the bridge without said bus is very much deliberate!
