Chas Levin

Western Thunderer
With the Lancia 3Ro's raised strapping pieces in place, the body sections can be detached from the sprue, which has provided a very convenient way to manipulate them up to now:
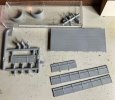
IBG Lancia 3Ro 20221221 (1) body.jpg

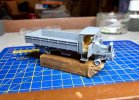
Once the basic body was assembled, a quick trial fit of the body and cab on the chassis:
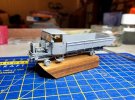
IBG Lancia 3Ro 20221228 (1) .jpg

IBG Lancia 3Ro 20221228 (2).jpg

As you can see, the body is quite different from either version as catered for in the kit, one of which has the full canopy and one the framework for it, both of which are gone in favour of a low wooden look, more like the civilian versions of the vehicle.

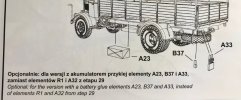
There are a couple of chassis variations, mainly concerning whether or not to include a battery:
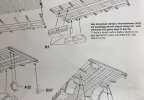
IBG Lancia 3Ro chassis variations (1).jpg

IBG Lancia 3Ro chassis variations (2).jpg

Does anyone know which might be more suitable for a civilian version - battery, or storage box? Would batteries have been a military enhancment, perhaps to do with long range operation, or specialist tasks? I have found some info on these lorries (most notably at https://tanks-encyclopedia.com/lancia-3ro/) but no mention of variations and the reasons behind them other than things to do with the body and cab. One of the notable military variants was the Mobile Workshop which I'd assume would have need of extra battery power. Interestingly though, amongst the photos of civilian versions I've found, while most seem to have the storage boxes, a few do have what look like the battery so I think it could be either...
 

Osgood

Western Thunderer
For a while back then truck starters were an option, after all the handle is thrown in for free and you have the (acetylene?) lamps already fitted, so your choice whether to go elementy - or elementow. (edit: although it looks like there are rear lights fitted so they'd benefit from a battery).
 

Chas Levin

Western Thunderer
For a while back then truck starters were an option, after all the handle is thrown in for free and you have the (acetylene?) lamps already fitted, so your choice whether to go elementy - or elementow. (edit: although it looks like there are rear lights fitted so they'd benefit from a battery).
Ah - thank you Tony. I'm not used to thinking about older vehicles and I'm embarrassed to admit that my perceptions of battery provision and use were rather grounded in more modern usage: believe it or not, I simply assumed that there would be an onboard battery as part of the standard under-the-bonnet equipment of the vehicle, to take care of such things as starting (I'd assumed the obvious handle was as an adjunct to battery power) and lights.
Therefore, I'd further assumed that this larger optional battery on the chassis must be for heavier duty, non-standard power requirements.
Now you've pointed it out though it makes perfect sense of course and also explains the differing rear lights in the instructions: serves me riht for making assumptions, doesn't it?
A quick google and I learn that car batteries started to become widely used from about 1920 when cars became equipped with electric starter motors, so - at the risk of another assumption - it seems reasonable to think that a truck might indeed have one in the 1930s... Excellent :)
 

Chas Levin

Western Thunderer
Progress today on painting the body. I'd originally intended to do an initial full body coat of the cream / yellow and then add the black on top with a bow pen, but two things worried me: the various protruberances and changes of profile of the additional raised beading I've added to the body would cause endless problems with the bow pen, and the amount of paint deposited would almost certainly obliterate much detail. Therefore spraying seemed the best option, though it meant some time-consuming masking: I didn't want to do an all-over coat of black and then over-paint the cream either, as the multiple coats would cover the planking detail, which is subtle to start with.
I didn't fancy cutting out quite that many small shapes sufficiently accurately and tried instead placing a piece of low-tack masking tape over the entire primed side, then slitting along the lines of the raised beading with a razor and lifting the tape from the beading, corners etc - these pictures should explain (and the green traces by the way are Liquid Green Stuff filler):

IBG 3Ro 20230101 (1) body painting.jpg

IBG 3Ro 20230101 (2) body painting.jpg

The results turned out rather well I think - quite a bit of cleaning up and touching in to do, but not bad with the tape just off:

IBG 3Ro 20230101 (3) body painting.jpg


IBG 3Ro 20230101 (4) body painting.jpg
 

Chas Levin

Western Thunderer
Some wood colouring yesterday, on the inside of the body of the Lancia as well as sides and floor of the D&S GN wagon kit I'm also building (details on that build over on RMWeb), because mixing up the various colour washes seems more efficient for the two at once:

IBG 3Ro 20230104 (1) wood painting.jpg

The truck inside actually looks greyer in real life - the lighting here was a touch intense I think!
 

Chas Levin

Western Thunderer
Various part of the painting of the Lancia 3Ro have progressed.

The body (just posed on the chassis here) has had the yellow panels filled in, but it'll need at least one more coat and then a quick run round the colour boundary edges of the black with a ruling pen (at any rate on the upward and sideways facing lines) to give a straighter edge, while the engine has also had some attention:

IBG Lancia 3Ro 20230118 (4) painting.jpg
I'm keen to model it with one side of the bonnet open (which, with a cab door also open and no driver in the cab, will allow it to stand at the side of the road as if being worked on), otherwise I wouldn't be painting the engine; also, it seems a shame to hide it completely...

Speaking of ruling pens, I also used one to do the chrome frames of the windscreen panes, by opening the pen blades a little wider than usual, just wide enough to rest on the raised edge of each pane:

IBG Lancia 3Ro 20230118 (1) painting.jpg

After a little cleaning up with a 10/0 brush dipped in white spirit, here's the result (which looks neater at normal size, of course!):

IBG Lancia 3Ro 20230118 (2) painting.jpg

IBG Lancia 3Ro 20230118 (3) painting.jpg

I'm trying to do as much painting as possible before assembly, but assessing where the black and yellow should intersect on the cab may need the cab itself to be fixed to the chassis so that the bonnet can be positioned: the horizontal bonnet top is black and the sides will be yellow, with the line between them continuing along the side doors and round the back of the cab, as per the photo I'm working from...
 

Chas Levin

Western Thunderer
Further painting has been done on the Lancia 3Ro and the colour scheme is now a little more obvious - here are some shots of it, with the body and cab just sitting in place unfixed, as are the two bonnet pieces, in order to ascertain for certain where the black/yellow division will be on the cab side, using the break between the upper and side bonnet pieces as the datum line:

IBG Lancia 3Ro 20230126 (1) paint & dry assy.jpgIBG Lancia 3Ro 20230126 (2) paint & dry assy.jpgIBG Lancia 3Ro 20230126 (3) paint & dry assy.jpgIBG Lancia 3Ro 20230126 (4) paint & dry assy.jpg

The body needs a turn on the lining pen with the yellow to give a straighter line above the middle black strapping and the cab sides have only had a couple of very thin coats of both colours, but it's all getting there. I'm probably going to do that raised band on the cab sides between the black and yellow in silver (for chrome), which will make achieving a straight line easier, as each of the two other colours colours will butt up against either side of that raised band and use its line, rather than having to meet each other in free space.
I've also been experimenting with mixing some matt white into silver, to get something like used and somewhat oxidised aluminium for the step areas - more of that in the next post...
 

Chas Levin

Western Thunderer
Morning all, can anyone please tell me what are those things that look like red discs on long, upright right-angled stalks coming from the front mudguards in this picture (apologies for posting this without the originaltor's permission, but I've cropped only the detail I'm asking about and blurred the license plate):
Lancia 3Ro GNR numberplate CROP (1).jpg
I thought they might be side mirros, but in quite a few other pictures, the objects on the ends of the stalks look to be globes rather than discs which would seem to rule that out; they're also white rather than red - I also wondered if perhaps they're clearance or gauge markers as they would seem to be the widest points on the vehicle?

The majority of civilian 3Ro versions in pictures I've found don't actually have them fitted, but some do, so it's an option, but I'd like to know what they are before deciding and I've so far been unable to find any views from the rear that show what they might be!

Any help appreciated :)
 

Osgood

Western Thunderer
Width and front markers for driver - common on military bonneted trucks. Expect they'll be red on rear face too. But mostly white.
Much more common on preserved trucks than those in working days - if they were present at all :D
For example I cannot recall any wartime picture of a U.S. recovery truck with them - although same trucks in post-war Danish & Swiss army service had them.
Have you found any period civvy photos showing them?

I wonder if that lump at the front is an inertia starter?
Note lack of marker sticks....(although there are a couple of tubes to take the usual Stars & Stripes for parade duty in retirement - and maybe even red flags for oversize load work during its working life).
 
Last edited:

Chas Levin

Western Thunderer
Brilliant, thanks Tony, I thought that's what they might be.
Re. your asking if I've found any period civvy photos with them in use I'll check through and report back.
That clip also shows something I've been trying to find in photos, an open half-bonnet: was that the usual angle, with the side piece still near-vertical and the top up at a sharp angle, rather than folded flat on top of the other half of the bonnet?
I've seen vintage cars where the open half of the bonnet was folded down flat on top of the other half (I hope that makes sense, not sure how else to express it and I can't immediately find a suitable photo) which is what I was planning to do but this looks like the side piece just moves upwards and the top piece maintains an angle upwards too - would that be the case with the 3Ro too? Do you by any chance have any other photos of trucks with military style bonnets where one side is open please?
 

Chas Levin

Western Thunderer
Tony, I do have three contemporary civvy pics with those width indicators - well, that's definitely what they are in the first one and I'm fairly sure it is in the other two as well, but please correct me if that's wrong. Apologies again for posting photos for which I don't have the rights or permission, but as in the previous cases, I've cropped to only the sections being legtimately used here for study:

Lancia 3Ro 464 tanker, Viberti long cab, post-1940 white bands (1) CROP 1.jpg

Lancia 3Ro C, Borgondo Autotransporti, Carrozzeria Orlandi body 1948 CROP 1.jpg

Lancia 3Ro 464, Viberti short cab, metal sheet cargo bay, aircraft weight 2 tonnes (1) CROP 1.jpg
 

Chas Levin

Western Thunderer
Well having said I couldn't find any, I've now found one photo of a 3Ro with the bonnet up, but it's also a model, though as it shows a very similar angle to the clip you posted Tony, I'd hazard a guess that it's also accurate? One thing though - I can't see any prop or stay to keep the bonnet up and there must surely have been one - can anyone advise please on where that would be and how it would sit?

Lancia 3Ro open bonnet (1) MBK Crop 1.jpg
 

Osgood

Western Thunderer
That Reo 606 bonnet will fold over flat - and in true Blue Peter fashion, here's a 606 bonnet we lifted up earlier (even got some sticky tape in the shot):

Reo 606.jpg

No stays on the wartime Yankee trucks as far as I know - mostly you just lift it up enough to jam on something somewhere near vertical, as (due to it having an attitude problem and not being very stable due to flexing) it is all you want to do to manhandle it that far let alone drop it over - you really don't want to fold it over.... :rolleyes:

I wouldn't like to call it for the Lancia bonnet - my guess is it probably does go right over, but as you now know you don't really want to do that if you're on your own unless essential the answer on where to model it is apparent.

Here's a complete Ward laFrance bonnet - this must be the most awkward thing I have ever had to manhandle in my life, it has no interest in anything but trapping your fingers. Rant over.
WLF ex M. Loopy.jpeg
 
Last edited:

Chas Levin

Western Thunderer
Thanks Tony, food for thought! It occurs to me too that the bonnet angle on my model will be dictated partly by the hinges: there are hinge pieces along both bonnet halves' edges and I suspect that folding the open half back too far will prevent them engaging, which would of course look bad as it would look like the two halves of the bonnet had parted company
(I'm not with the model right now so I can't check that until later).

Very helpful though, thank you; I'd been assuming that it should fold back flat and if I do find that the hinges won't engage with it folded that far, I wouldn't have thought of it being usual to put it up vertically and I'd have been at a bit of a loss!

When you say that latest photo is a 606 bonnet "we lifted up earlier", do you mean that it's a truck you were running or working on yourself?
 

Osgood

Western Thunderer
Yes, I'd brought it in from Colorado to pull a wartime USAAF refuelling tanker, we were just getting the gasoline engine running in that shot.
Restoration was about to start - a diesel had been sourced after much scheming, but it was then urgently in demand for film work - a reality check on time left to do all this stuff sadly prompted its disposal at the end of 2020.
No matter, there's still that yellow Ward laFrance bonnet and also a Federal one to do workouts on :D
 

Chas Levin

Western Thunderer
Wow - shipping something like that over from the US (I'm assuming you meant that you shipped it here, to the UK?) is seriously dedicated and pretty impressive! Sorry to hear it had to go though... :'(

Getting rid of things is never easy, though it can lead to focussing on and getting more enjoyment from those things you keep, which leads me neatly ont o thank you also for posting the picture of the Ward laFrance bonnet, which is makes the arragnement of hinges on this type of bonet much clearer.

Also noted and thanks re. the absence of stays; slightly worrying on the real thing (if I were lifting a bonnet that heavy and unstable I'd want all the support - in every sense - I could get!) but fine here, as the two pieces will simply be glued in place and any stay would have been purely for visual detailing.

I love seeing original vintage vehicles in period TV and film, but they're often so pristine, which doesn't look quite right; on the other hand, I completely understand why the owners of such gorgeous machines might not want them dirtied up and dented for effect by a studio props team! I'm slightly guilty of double standards here: I don't weather anything I build, as I love the pristine look of models, yet I expect anything on screen to look suitably used... :confused:
 

Chas Levin

Western Thunderer
Further painting of the IBG Lancia, in between other things as usual. Looking at contemporary photos I realised that the division between yellow and black on the bonnet and cab sides on some civvy lorries had a chrome (or similar) band, so I thought I'd add that, as another feature. There's a very slightly raised ridge along that division which takes the silver paint to sit on top of it quite easily whilst also supplying straight edges on both sides, so it's actually easier that trying to achieve a straight line on between yellow and black on the flat. Here are most of the parts as they look currently:

IBG 3Ro 20230202 (1) paint inc Liquid Chrome.jpg

The paint colour on the flat front areas of the front mudguards and on the steps below the cab doors, a colour which has caught the light somewhat in these photos and looks like light grey, is in fact an experiment in producing an aluminium finish, by mixing two parts Phoenix Precision Aluminium (which looks to my eye too similar to their Silver and is too shiny when it dries) with one part matt white. It looks better in real life and next time I'm taking pictures in good light I'll try and show it a bit more clearly. It has a metallic sheen, with a very subtle glitter, but is not glossy and it's very different looking to the silver I've used on parts of the engine, the cab trim and the windscreens' frames.

I also finally tried out a Molotow Liquid Chrome pen I bought a while back for another job but have put off testing - I used it on those (acetylene?) lamps mounted either side of the windscreens, on the side mirrors and on the insides of the headlamps (not shown in this photo). Here's a photo showing the lamps (and where you can also see the chrome trim between the yellow and black) and a rather poor one showing the wing mirrors, which proved difficult to capture:

IBG 3Ro 20230202 (2) paint inc Liquid Chrome.jpg

IBG 3Ro 20230202 (3) paint inc Liquid Chrome.jpg

The black/white border on the back of the cab is deliberately rough, because it sits below the level of the front of the wooden cargo bay and won't be visible. The eagle-eyed will also have spotted a slightly wiggly line between the silver and black on the left-hand cab side which isn't so obvious in real life, looking straight-on: there seems to be a slight projection of the black which hides a section of the silver when viewed from above, but I'll retouch it anyway. The wing mirrors also need their frames retouching in black but I want to let the Liquid Chrome dry overnight.

I'm not sure what type of paint it is, but it doesn't lift easily with white spirit and seems to need cellulose thinners. I was able to lift tiny amounts that strayed, using a 10/0 brush exceedingly sparingly dampened with cellulose thinners but it's safer to go over errors I think, rather than risk damaging other colours. It's very free flowing and dried pretty quickly, but providing you get a decent amount on, it flows quickly into the smooth gloss mirror finish fairly reliably.

I then finally tried it on the project I originally bought it for, whcih i'll post about in a minute, and was so taken with the effect I thought about using it on this Lancia for all the chrome areas. Problem there is, they'll then look identical to the lamps and mirrors and I liked the idea of them looking slightly different. Also, I only have one with a fairly wide nib, compared to the scale I'm working at on some areas of this model (I think it's 1mm from memory) so the risk of overflow and straying would be high, given how thin the paint/ink is, so I'll probably hold off.

Mind you, I might try ordering the one with the narrowest nib I can find, just to see what I can do with it...
 
Last edited:

Chas Levin

Western Thunderer
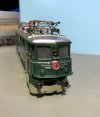
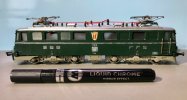
The project I originally bought the Liquid Chrome pen for was to try re-colouring what are meant to be the chrome areas - most especially the bands along the sides and each end - on the 1960s Fleischmann SBB Ae 6/6, a favourite vintage friend. They're coloured with white paint on the original and while chrome often appears white in some lights and at some angles, most of the time, this looks quite wrong - here's an end, in case you're not familiar with the original RTR appearance:

Fleischmann Ae6 6 & Liquid Chrome 20230202 (2).jpg

I was a little nervous of how freely the ink/paint flows so I tried a couple of short bands just to see, and found that the surface tension holds the stuff on those raised ridges quite well and it rarely overflows, but I nevertheless didn't try to get too fancy. This is a vintage RTR loco after all, very much a 'layout loco' and there are so many things about it that are not up to modern standards of appearance that there seemed little point in trying to get this chrome perfectly edged everywhere. That being said, I found I could also do the SBB and CFF letters after the practice doing the long lines and I even did the loco numbers and the box round the '1334':

Fleischmann Ae6 6 & Liquid Chrome 20230202 (7).jpg

Fleischmann Ae6 6 & Liquid Chrome 20230202 (6).jpg

Fleischmann Ae6 6 & Liquid Chrome 20230202 (4).jpg

Fleischmann Ae6 6 & Liquid Chrome 20230202 (5).jpg

Fleischmann Ae6 6 & Liquid Chrome 20230202 (10).jpg

It's terrific stuff and it's improved the look of those areas no end, including the red backed Swiss cross shields which look a lot better.
I wasn't quite confident enough to try doing those central boxes on the sides and their contents, but I'm going to see if I can get one of these pens with a finer nib, or I may just feel braver tomorrow!
I have also tried forming a small pool of the stuff in a plastic dish and brushing it on with a 10/0 brush and it is do-able, but it dries very quickly and also the settling out into the mirror finish is affected.

Anyway, a bit of fun: I imagine I'm not the only person who wishes Fleischmann had used silver paint on the chrome areas of these locos at the time and at least this shows that there is a fairly easy remedy...:)
 

Attachments

  • Fleischmann Ae6 6 & Liquid Chrome 20230202 (12).jpg
    Fleischmann Ae6 6 & Liquid Chrome 20230202 (12).jpg
    80.9 KB · Views: 0
  • Fleischmann Ae6 6 & Liquid Chrome 20230202 (1).jpg
    Fleischmann Ae6 6 & Liquid Chrome 20230202 (1).jpg
    206.6 KB · Views: 0

Chas Levin

Western Thunderer
One thing that's been taking some of my time away from the Lancia has been a D&S white metal kit of a 10 Ton Open Wagon. I've covered the build in detail on RM Web so I won't double up here, but below are some photos for anyone who doesn't read RM Web:

D&S 254 GNR 10T 20230203 (1) final, empty.jpgD&S 254 GNR 10T 20230203 (2) final, empty.jpgD&S 254 GNR 10T 20230203 (3) final, empty.jpgD&S 254 GNR 10T 20230203 (4) final, empty.jpgD&S 254 GNR 10T 20230203 (5) final, empty.jpgD&S 254 GNR 10T 20230203 (6) final, empty.jpg

Have a good weekend all! :thumbs:
 

Chas Levin

Western Thunderer
Back in June last year I posted some photos of a Rivarossi PLM Boubonnais 0-6-0 loco I'd picked up that needed some de-greasing but otherwise ran well, except that the unpowered loco (it's a tender-drive) was a little on the light side, so I popped some lead into it yesterday. There isn't a great deal of room as it's a small prototype and you don't have access to the inside of the boiler (or leastways, I haven't discovered how to access it without possibly damaging it) so it called for some fiddly lead cutting:

Rivarossi Bourbonnais loco weighting 20230118 (1).jpg

Rivarossi Bourbonnais loco weighting 20230118 (2).jpg

Then everything was reasonably well secured with a combination of blutak and insulating tape and the wheels and cylinder assembly popped back on as I wanted to run it before getting out the araldite and securing things, to make sure I hadn't altered the balance of the loco in such a way that it tipped up or down while running:

Rivarossi Bourbonnais loco weighting 20230204 (2).jpg

There's one of those contact wires on the drawbar that needs to rub along companionably with the pin under the front of the tender that drops through the drawbar hole and the main point of weighting the loco was because it was bouncing around and giving intermittent contact at that point, but moving its centre of gravity too far forward or back might have made things worse.
It ran perfectly and the lead has now been araldited in place. The loco's also looking better for the addition of a crew, some minimal highlighting in brass colour paint of a little backhead piping and the coating of the somewhat unrealistic plastic coal 'hump' with cruashed real coal on PVA:

Rivarossi Bourbonnais coal & crew 20230205 (1).jpg

I did toy with carving off the main coal hump and replacing it with something a little less excessive, but this was only supposed to be a quick RTR detailing mini-project rather than a major reworking and too manu kits await...
 
Top