You are using an out of date browser. It may not display this or other websites correctly.
You should upgrade or use an alternative browser.
You should upgrade or use an alternative browser.
4mm Jan's 4mm WB: Hello, Old Friend
- Thread starter Lyndhurstman
- Start date
")
Lyndhurstman
Western Thunderer
Thank you, AdrianIt looks a sturdy little unit and any pillar drill is better than no pillar drill. I use mine daily so always a useful investment.
I hope it proves to be.
For those wondering, the spec is here
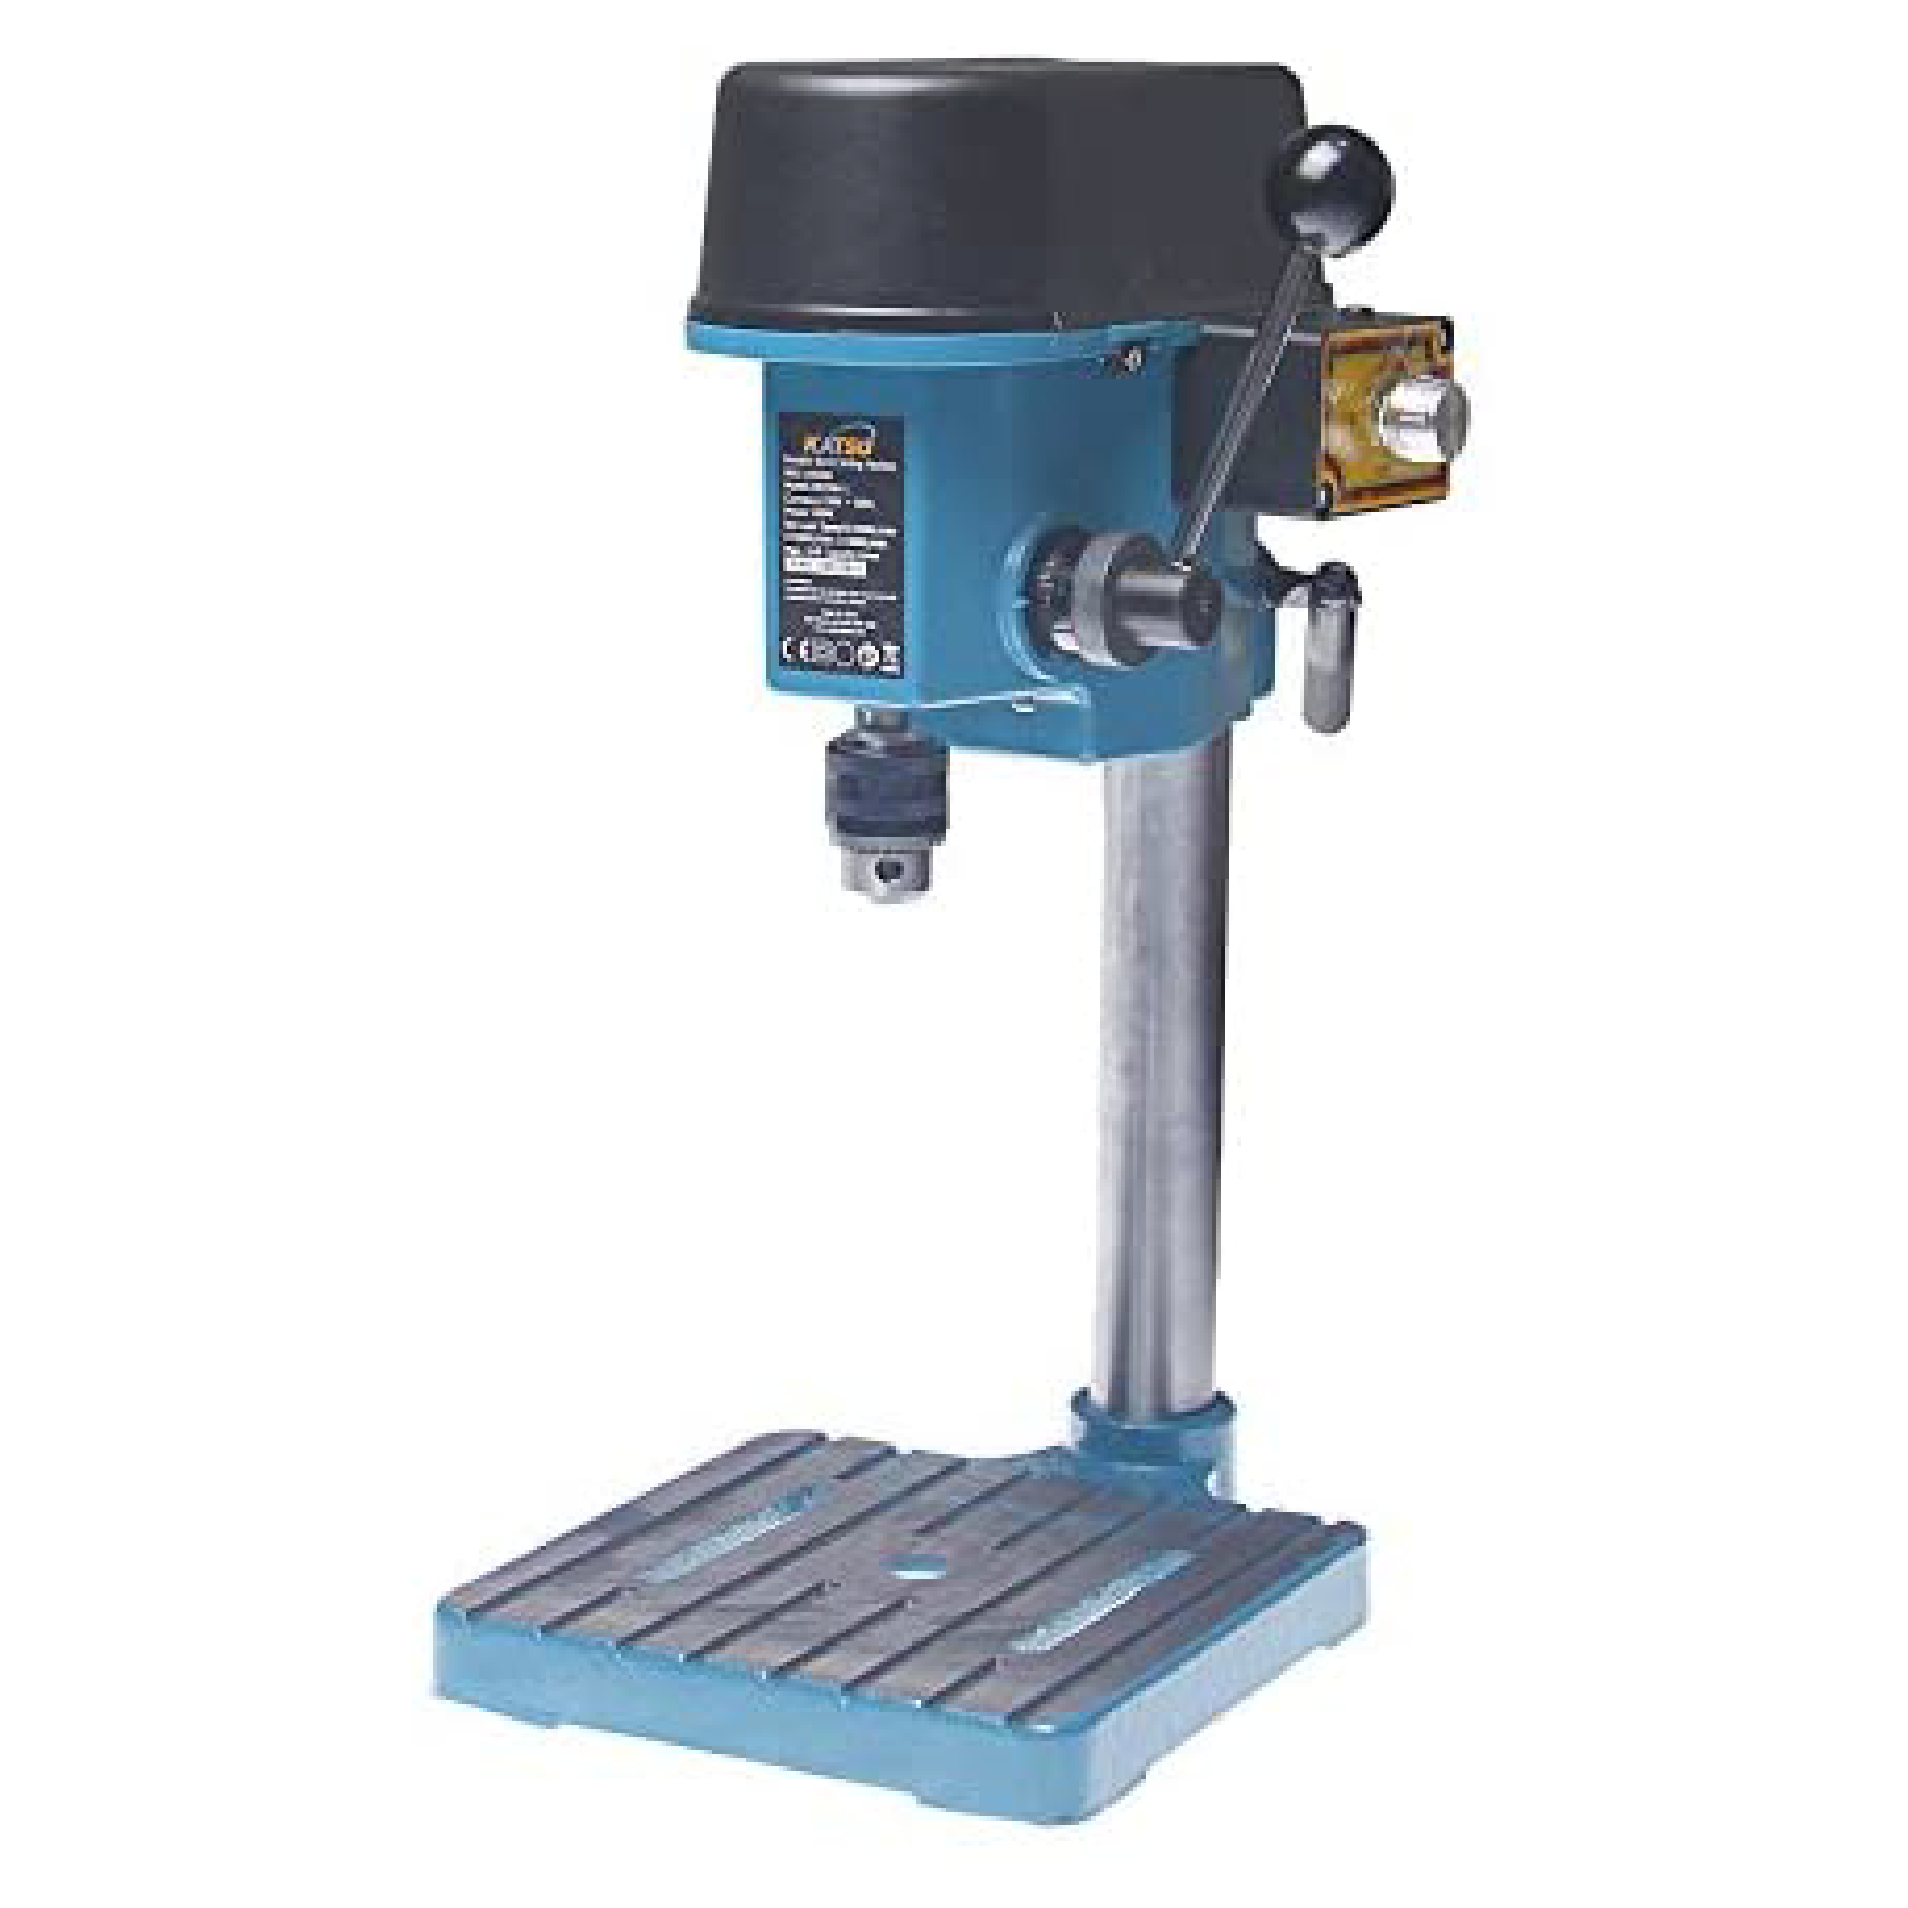
Mini Bench Drill Press Fully Adjustable Speed
【Powerful】 Provides great power (100 W motor), durability, and accurate drilling in wood or metal【Adjustable Speed】 Adjust speed from 0 to 8500 rpm to meet your requirements【Ergonomic】 Easy to handle while performing any desired drilling【Convenient】 Includes a handle lock to hold the drill press...
www.aimtools.co.uk
Next up is a small machine vice..... #itneverends

Cheers
Jan
Lyndhurstman
Western Thunderer
Hi Jon,Sorry to hear of your woes with the filler: back to Squadron, I guess, Jan?
Handy and sturdy bit of kit, Jan
You can’t beat ‘proper’ tools
Jon
Not sure. I'll try to get the rest of the Milliput out - so the replacement filler has a decent bed to lie upon. Maybe I'll try Tamiya.. the granularity is important..
No. It - and my Unimat - deserve a 'proper' home. But I'll be relying on their portability until that Lottery win rolls in
")
Al the best
Cheers
Jan
adrian
Flying Squad
To be perfectly honest although I have a small machine vice for the drill I very very rarely use it. 99% of the drilling is thin sheet and plastic so most of the time I hand hold it on a small hardwood block. For drilling brass bar stock or slightly bigger items I use engineer clamps to hold the material and then hand hold the clamps on the hardwood block. I just find it far easier to get the centre punched dimple under the drill that way.Next up is a small machine vice..... #itneverends
It's only when drilling thicker steel bar or round stock - that I'll resort to the machine vice.
Lyndhurstman
Western Thunderer
Hi @adrianTo be perfectly honest although I have a small machine vice for the drill I very very rarely use it. 99% of the drilling is thin sheet and plastic so most of the time I hand hold it on a small hardwood block. For drilling brass bar stock or slightly bigger items I use engineer clamps to hold the material and then hand hold the clamps on the hardwood block. I just find it far easier to get the centre punched dimple under the drill that way.
It's only when drilling thicker steel bar or round stock - that I'll resort to the machine vice.
Thanks. I have the full panoply of toolmakers clamps - from the wee to the brute - including some I made half a lifetime ago as an apprentice! The wee ones are very useful, and I’ll certainly consider them in this regard, so thanks for sharing your knowledge. It’s appreciated. However, I do get a bit twitchy with fingers and drills; something to do with all those overly-gruesome H&S videos we had to watch as apprentices back in the 70s, perhaps
Cheers
Jan
Last edited:
LarryG
Western Thunderer
I found the Katsu drill very useful and precise enough for my needs drilling out hundreds of whitemetal bogie sideframes for bearings. I set the depth to almost the full length of the axlebox and the drill did the job admirably with no holes poking through. It is rarely used these days but its there when needed.
Lyndhurstman
Western Thunderer
See change
As a break from filler fun (I’m being sarcastic….) I’m planning on having a dip into mixed media, with a GNR 8 wheel brake van from Diagram3D (GN04-W007) https://www.diagram3d.com/index.php?route=common/home . I made the D&S kit moons ago, but the etched steps were too fragile and haven’t survived very well…
It looks interesting; hopefully it will be OK to build to P4…. One thing I notice is that my default settings see the beautiful precision of the technique as lacking in 'character' (when compared to whitemetal, that is) and the thickness of the sides appears to make them ultra-flat (even compared with brass). I guess we'll see how it translates....
The roof is card, so that will serve as a template...

Cheers
Jan
As a break from filler fun (I’m being sarcastic….) I’m planning on having a dip into mixed media, with a GNR 8 wheel brake van from Diagram3D (GN04-W007) https://www.diagram3d.com/index.php?route=common/home . I made the D&S kit moons ago, but the etched steps were too fragile and haven’t survived very well…
It looks interesting; hopefully it will be OK to build to P4…. One thing I notice is that my default settings see the beautiful precision of the technique as lacking in 'character' (when compared to whitemetal, that is) and the thickness of the sides appears to make them ultra-flat (even compared with brass). I guess we'll see how it translates....
The roof is card, so that will serve as a template...
Cheers
Jan
Lyndhurstman
Western Thunderer
Steps Taken
A little progress on the Brake Van, and other things. The headspace hasn't been great these past few days, and the TTR has become more of a sanctuary than a workspace. But I've done some stuff.

The Basic box of the Brake Van has been built and some confirmatory research undertaken; I was wondering about the presence of the high mid-point side lamp in BR days - Tatlow's Wagons of the LNER shows it as being present on the GNR version, but I could find no photos of the later years. However, a request on The Clearing House FB group directed me towards DaveF's thread on RMWeb; and lo, my question was answered.... https://content-eu.invisioncic.com/...3044.jpg.a2af81260c12c930290f7047f5d24584.jpg So now I have to find some measurements for the footboard and associated handrail...
While I do that, I've been occupying my fingers (and mind) with some ScaleModelScenery cable drums. Lovely work and design... I've tried to do them justice...

I'm hoping to make it to Uckfield over the weekend. If the weather is kind, and the car survives the 11 hour round trip....
Cheers
Jan
A little progress on the Brake Van, and other things. The headspace hasn't been great these past few days, and the TTR has become more of a sanctuary than a workspace. But I've done some stuff.
The Basic box of the Brake Van has been built and some confirmatory research undertaken; I was wondering about the presence of the high mid-point side lamp in BR days - Tatlow's Wagons of the LNER shows it as being present on the GNR version, but I could find no photos of the later years. However, a request on The Clearing House FB group directed me towards DaveF's thread on RMWeb; and lo, my question was answered.... https://content-eu.invisioncic.com/...3044.jpg.a2af81260c12c930290f7047f5d24584.jpg So now I have to find some measurements for the footboard and associated handrail...
While I do that, I've been occupying my fingers (and mind) with some ScaleModelScenery cable drums. Lovely work and design... I've tried to do them justice...
I'm hoping to make it to Uckfield over the weekend. If the weather is kind, and the car survives the 11 hour round trip....
Cheers
Jan
Last edited:
jonte
Western Thunderer
Steps Taken
A little progress on the Brake Van, and other things. The headspace hasn't been great these past few days, and the TTR has become more of a sanctuary than a workspace. But I've done some stuff.
View attachment 198450
The Basic box of the Brake Van has been built and some confirmatory research undertaken; I was wondering about the presence of the high mid-point side lamp in BR days - Tatlow's Wagons of the LNER shows it as being present on the GNR version, but I could find no photos of the later years. However, a request on The Clearing House FB group directed me towards DaveF's thread on RMWeb; and lo, my question was answered.... https://content-eu.invisioncic.com/...3044.jpg.a2af81260c12c930290f7047f5d24584.jpg So now I have to find some measurements for the footboard and associated handrail...
While I do that, I've been occupying my fingers (and mind) with some ScaleModelScenery cable drums. Lovely work and design... I've tried to do them justice...
View attachment 198451
I'm hoping to make it to Uckfiled over the weekend. If the weather is kind, and the car survives the 11 hour round trip....
Cheers
Jan

Safe journey, Jan
Jon
Lyndhurstman
Western Thunderer
A Glue ton for punishment
More work on the brake van. I’m not sure what this wood is (Bamboo?) but it’s both very light and very dense. As well as being very brittle in areas like the verandah pillars. Its density - and smoothness - means that any glue applied is held on the surface. I’ve tried a couple of different superglues (I started out using wood glue, as I naturally thought… well, let’s just say that I was wrong, and leave it at that….)


The basic shell is done. The instructions say that adding the sides takes five minutes. More like half an hour, for me. There’s no positive location for the sides against the internal tray/cabin/floor; you have to go off the ends of the cabin lining up with the edges of the verandah apertures. Tricky when you’re also trying to keep the sides flat upon on the glass… and not disturb the other side in the process…. The last photo shows that the sides are actually about 0.6 mm shorter (0.3 mm each end) than the base/ends combination. So I’ve had to cut a channel in the rear of the ends to make them flush with the sides. A lot of pain, during which I snapped one of the corner uprights (see my earlier comment..) and the bufferbeam… Some thin superglue was applied to fix that.
I have drilled out the holes for the handrails on the sides, plus the two horizontal ones at each end on the uppermost edge. These holes weren’t provided in the kit. I’ve used the photo in Tatlow’s LNER Wagons as reference.
Frustrating it’s been.
Cheers
Jan
More work on the brake van. I’m not sure what this wood is (Bamboo?) but it’s both very light and very dense. As well as being very brittle in areas like the verandah pillars. Its density - and smoothness - means that any glue applied is held on the surface. I’ve tried a couple of different superglues (I started out using wood glue, as I naturally thought… well, let’s just say that I was wrong, and leave it at that….)
The basic shell is done. The instructions say that adding the sides takes five minutes. More like half an hour, for me. There’s no positive location for the sides against the internal tray/cabin/floor; you have to go off the ends of the cabin lining up with the edges of the verandah apertures. Tricky when you’re also trying to keep the sides flat upon on the glass… and not disturb the other side in the process…. The last photo shows that the sides are actually about 0.6 mm shorter (0.3 mm each end) than the base/ends combination. So I’ve had to cut a channel in the rear of the ends to make them flush with the sides. A lot of pain, during which I snapped one of the corner uprights (see my earlier comment..) and the bufferbeam… Some thin superglue was applied to fix that.
I have drilled out the holes for the handrails on the sides, plus the two horizontal ones at each end on the uppermost edge. These holes weren’t provided in the kit. I’ve used the photo in Tatlow’s LNER Wagons as reference.
Frustrating it’s been.
Cheers
Jan
Last edited:
Lyndhurstman
Western Thunderer
Round the bend
I’ve made a start on the plethora of handrails that are dotted about this van. Maybe it’s just me, but the Eastern side of the country seemed to have had some sort of handrail fetish going on… It’s 0.45 mm wire, bent using one of Bill Bedford’s handrail jigs; one of the most useful of modelling aids, for me.

I’m torn between painting them separately, and then adding them to the (subsequently) painted body, or painting them in situ.
Cheers
Jan
I’ve made a start on the plethora of handrails that are dotted about this van. Maybe it’s just me, but the Eastern side of the country seemed to have had some sort of handrail fetish going on… It’s 0.45 mm wire, bent using one of Bill Bedford’s handrail jigs; one of the most useful of modelling aids, for me.
I’m torn between painting them separately, and then adding them to the (subsequently) painted body, or painting them in situ.
Cheers
Jan
Mike Garwood
Western Thunderer
Jan
Interesting project - what's going to be used as a chassis? Just browsed the GWR range, these seem like an aid to scratch building. I like the multi-media approach.
Mike
Interesting project - what's going to be used as a chassis? Just browsed the GWR range, these seem like an aid to scratch building. I like the multi-media approach.
Mike
Lyndhurstman
Western Thunderer
Hello @Mike GarwoodJan
Interesting project - what's going to be used as a chassis? Just browsed the GWR range, these seem like an aid to scratch building. I like the multi-media approach.
Mike
Thanks. The ‘chassis’ is a 3D print (separate print for the brake gear), with holes for the pinpoint bearings. I might put some MJT RTR compensating units on the outer axles. I’ll wait and see how flat the chassis is… one thing I’ll have to do is add a strengthening piece between each footboard hanger and the solebar; the 3D printing process doesn’t render them all the same thickness, and some are more bendy the others…
Yes; these are definitely a scratch aid. I suppose it’s all to do with how much you want to add. But handrails are a must - especially as the kit is pre-holed for most of them.
The windows are acrylic ‘bricks’. A slightly loose fit in the apertures; might need a thicker glue for them.
The roof is a piece of card. Pre-punched for the chimney gubbins. I’ll probably replace that.

Cheers
Jan
Last edited:
Lyndhurstman
Western Thunderer
Well Handled
The GNR Brake gets side rails.

I used 0.45 mm brass for this, and softened the ends of the horizontal rail so as to be able to squish it flat. Then, with the help of a rebate filed in the back of the two uprights, solder it up. Far easier to do than try to butt joint the ends…

It’s come out OK, I think. The bras is maybe too soft, so I might (MIGHT) revisit this with nickel silver instead ... The handrails are set 1 mm clear of the sides. I got this dimension from a GWR brake van diagram in Tourett et al.

Cheers
Jan
The GNR Brake gets side rails.
I used 0.45 mm brass for this, and softened the ends of the horizontal rail so as to be able to squish it flat. Then, with the help of a rebate filed in the back of the two uprights, solder it up. Far easier to do than try to butt joint the ends…
It’s come out OK, I think. The bras is maybe too soft, so I might (MIGHT) revisit this with nickel silver instead ... The handrails are set 1 mm clear of the sides. I got this dimension from a GWR brake van diagram in Tourett et al.
Cheers
Jan
John57sharp
Western Thunderer
Top tip! Thanks
John
John
I have built a few of this firm's kits in 7mm and I think that they have been developing their technology over time as the later versions are easier that early kits. For the LNWR carriages there is a neat jig to hold the various layers of the sides. Some parts are not as successful as others, but they seem to form the basis of some good rolling stock. At a slight risk of usurping Lyndhurstman's thread, here is a photo of a 7mm LNWR OCT which is built as it came, with the addition of wheel, buffers and couplings.Jan
Interesting project - what's going to be used as a chassis? Just browsed the GWR range, these seem like an aid to scratch building. I like the multi-media approach.
Mike

jonte
Western Thunderer
Neat, JanWell Handled
The GNR Brake gets side rails.
View attachment 200788
I used 0.45 mm brass for this, and softened the ends of the horizontal rail so as to be able to squish it flat. Then, with the help of a rebate filed in the back of the two uprights, solder it up. Far easier to do than try to butt joint the ends…
View attachment 200787
It’s come out OK, I think. The bras is maybe too soft, so I might (MIGHT) revisit this with nickel silver instead ... The handrails are set 1 mm clear of the sides. I got this dimension from a GWR brake van diagram in Tourett et al.
View attachment 200786
Cheers
Jan
Jon
Lyndhurstman
Western Thunderer
Usurp away @Tim Birch. That’s very nice.I have built a few of this firm's kits in 7mm and I think that they have been developing their technology over time as the later versions are easier that early kits. For the LNWR carriages there is a neat jig to hold the various layers of the sides. Some parts are not as successful as others, but they seem to form the basis of some good rolling stock. At a slight risk of usurping Lyndhurstman's thread, here is a photo of a 7mm LNWR OCT which is built as it came, with the addition of wheel, buffers and couplings.View attachment 200832
I fully understand these are a scratch aid, and am fully prepared to add the usual stuff (buffers, wheels, couplings etc.). There’s no jigs for us Minor Scale guys
which makes the assembly ‘interesting’.Cheers
Jan
adrian
Flying Squad
Intriguing - new to me & looks nice. Judging from the instructions I guess we have to source axle boxes and brake gear as well.I have built a few of this firm's kits in 7mm and I think that they have been developing their technology over time as the later versions are easier that early kits. For the LNWR carriages there is a neat jig to hold the various layers of the sides. Some parts are not as successful as others, but they seem to form the basis of some good rolling stock. At a slight risk of usurping Lyndhurstman's thread, here is a photo of a 7mm LNWR OCT which is built as it came, with the addition of wheel, buffers and couplings.
Lyndhurstman
Western Thunderer
Hello @jonteNeat, Jan
Jon
Thank you. fiddly. Measure 12 times... I've finally found a 'proper' use for the Stanley small anvil I've had for many years
Hello @adrianIntriguing - new to me & looks nice. Judging from the instructions I guess we have to source axle boxes and brake gear as well.
Allow me to respond on Tim's behalf;
Yes; the 4mm instructions say
This kit is intended to reduce the time, complication and labour associated with the construction of a model of a railway vehicle. It uses wooden parts which have been cut and scribed by laser. This is not a complete kit of parts. The choice of wheels and other fittings is left to the modeller
Cheers
Jan