Liver & Fry's workbench

GER open wagons

Liver & Fry

Western Thunderer
Apologies for any offence cause, but for me personally, I hate leaving a project unfinished. Generally when I start something, I like to get it done before I move on. However, because I'm still unsure about the wisdom of soldering with a wrist in cast, I've put the M&GN wagons on hold and my need to keep busy has pushed me in another direction.

@Herb Garden has previously dabbled with (what I hope he won't mind me calling) an experimental form of kit design, whereby a wagon should be made from the corresponding materials of a prototype; wood bodies being made of wood and metalwork being made of metal. Me and him are originally cut from the same GER cloth and so when he decided to use this method to design a kit/parts for some GER open wagons, how could I say no? Especially when it's a concept I fully endorse!

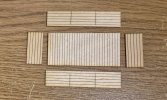
What I ended up with was some laser cut wood and a sheet of brass etch. My focus currently is on the wooden body so, here's what I had to work with:
20240804_214545.jpg

These parts will specifically make a Dia.17 open, of which 12,050 were built between 1886 and 1903 - Basically, if you model the GE, you need this wagon!

I also have some 7 plank sides which will allow construction of either a Dia.48 or a Dia.17R should I desire.

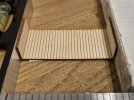
I started by fixing the ends to the floor using PVA:
20240804_213943.jpg

You may note I've slide a section of plasticard under the floor. This is to bring the floor to the correct height in relation to the half-plank at the bottom of the bodyside.

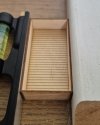
Next I affixed the sides:
20240805_084311.jpg

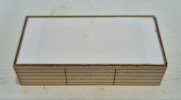
And once dry, I then cut a section of plasticard to the correct size and fitted it under the wooden floor:
20240805_200750.jpg

This has two benefits; the first is that the bottom of the wagon needs to be a flush surface to allow continuation of the kit built (raising the floor was me being unnecessarily pedantic) and the second is that this way provides additional floor strength.

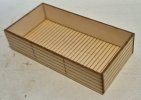
So currently I now have a structurally rigid body for my wagon:
20240805_201119.jpg

The nature of laser cut wood at this thickness means that only one side can be given planking, so my next move will be to add my own, in a similar manner to how I did the floor planking on the GE lowmac back at the start of my workbench thread. Yes, that steps away from "wood made from wood" but the final product will still, I'm sure, be something of great interest!

I'd just like to thank George for letting me have a go with these - I wouldn't have (and didnt) tackle these previously but now I feel like I can and I'm quite excited for the challenge of a different medium to work with.

As with the M&GN wagons, this may be a stop-start project depending on how I feel when I get to the metalwork section, but at least I've started it and done something!

- James
 
Last edited:

40057

Western Thunderer
Apologies for any offence cause, but for me personally, I hate leaving a project unfinished. Generally when I start something, I like to get it done before I move on. However, because I'm still unsure about the wisdom of soldering with a wrist in cast, I've put the M&GN wagons on hold and my need to keep busy has pushed me in another direction.

@Herb Garden has previously dabbled with (what I hope he won't mind me calling) an experimental form of kit design, whereby a wagon should be made from the corresponding materials of a prototype; wood bodies being made of wood and metalwork being made of metal. Me and him are originally cut from the same GER cloth and so when he decided to use this method to design a kit/parts for some GER open wagons, how could I say no? Especially when it's a concept I fully endorse!

What I ended up with was some laser cut wood and a sheet of brass etch. My focus currently is on the wooden body so, here's what I had to work with:

View attachment 221136

These parts will specifically make a Dia.17 open, of which 12,050 were built between 1886 and 1903 - Basically, if you model the GE, you need this wagon!

I also have some 7 plank sides which will allow construction of either a Dia.48 or a Dia.17R should I desire.

I started by fixing the ends to the floor using PVA:

View attachment 221139

You may note I've slide a section of plasticard under the floor. This is to bring the floor to the correct height in relation to the half-plank at the bottom of the bodyside.

Next I affixed the sides:

View attachment 221140

And once dry, I then cut a section of plasticard to the correct size and fitted it under the wooden floor:

View attachment 221141

This has two benefits; the first is that the bottom of the wagon needs to be a flush surface to allow continuation of the kit built (raising the floor was me being unnecessarily pedantic) and the second is that this way provides additional floor strength.

So currently I now have a structurally rigid body for my wagon:

View attachment 221142

The nature of laser cut wood at this thickness means that only one side can be given planking, so my next move will be to add my own, in a similar manner to how I did the floor planking on the GE lowmac back at the start of my workbench thread. Yes, that steps away from "wood made from wood" but the final product will still, I'm sure, be something of great interest!

I'd just like to thank George for letting me have a go with these - I wouldn't have (and didnt) tackle these previously but now I feel like I can and I'm quite excited for the challenge of a different medium to work with.

As with the M&GN wagons, this may be a stop-start project depending on how I feel when I get to the metalwork section, but at least I've started it and done something!

- James
I do like the approach of using the appropriate material to represent similar material in the prototype. It’s not a new idea, of course. Bassett-Lowke advertised their best quality hand-made wagons as being more realistic on exactly this basis — before WW1. It raises a fundamental question about what constitutes an accurate model. I guess in our current culture, realism = external appearance. Even if not explicitly stated, an accurate model is deemed to be one that copies superficial appearance very closely. Even if it is made of all the wrong materials and functions completely differently. To my mind, overall similarity to the prototype is an equally valid measure of accuracy. Wood representing wood etc.

Whichever criteria are used, yours are really good models.
 

Herb Garden

Western Thunderer
I do like the approach of using the appropriate material to represent similar material in the prototype. It’s not a new idea, of course. Bassett-Lowke advertised their best quality hand-made wagons as being more realistic on exactly this basis — before WW1. It raises a fundamental question about what constitutes an accurate model. I guess in our current culture, realism = external appearance. Even if not explicitly stated, an accurate model is deemed to be one that copies superficial appearance very closely. Even if it is made of all the wrong materials and functions completely differently. To my mind, overall similarity to the prototype is an equally valid measure of accuracy. Wood representing wood etc.

Whichever criteria are used, yours are really good models.
The original concept of the kits was an experiment developed around the fact that you have to tool up for an etched sheet whereas laser cutting the tooling is minimal. The GER wagon fleet is helpful in that a variety of wagon types use the same ironwork pieces.

So I can supply a common etch of metalwork which can be made in reasonable volumes and then a variety of wooden pieces in there s case to make at least 7 different produced in much smaller volumes

That was my thoughts when I started at any rate....

IMG_20240804_222848057.jpg
James one should look something like this when done
 

adrian

Flying Squad
The nature of laser cut wood at this thickness means that only one side can be given planking,

What thickness? The reason I ask is that I don't believe this should be a problem to laser "etch" planking on both sides of the one sheet. I have fitted a little laser crosshair pointer to my laser cutter and it has transformed the capability. I can laser etch and cut a wagon side in 2mm ply, flip it over and then using the laser crosshairs align the plywood to etch the inside planking very accurately.

I'd like to do something very similar in 7mm mixing wooden components, etched ironwork and 3D printed components - definitely the way to go, especially for producing a rake of PO wagons. I've got the tools to do it just short on the spare time to make any progress.:(
 

Herb Garden

Western Thunderer
What thickness
1mm ply so not margin for error. And not something the laser cutter was able to offer when they made these parts

I could have doubled up the wall thickness and done internal sides but as these wagons ran sheeted 95 % of the time it really seemed pointless to do so. And I quite liked planking the inside by hand.

Someone said to me recently why didn't I just 3d print the bodies with all the strapping etc. well the kit wasn't designed around what was the fastest process but with the materials I find it most pleasant to work with. Proper mindfulness modelling...
 

John Duffy

Western Thunderer
When the first side is complete but before removing the parts, you can flip the sides over. This was how I started and have done this down to 4mm using 1mm ply.

IMG_0658.jpeg

The ironwork was also cut on the laser using a product called Laserboard Polybak which is 0.3mm

Great for small numbers and very therapeutic.

John
 

Oban27

Active Member
Hi,

just come across this. Glad to know I'm not the only one who likes using real wood to make wagons! I've built some CR wagons, although I use modified Parkside chassis and plastic strip, not real metal. I read somewhere that painting wood can be a bit of a pain, but I haven't found that be an issue, although it depends on the porosity of the wood. If the porosity is an issue I just use a blast of primer, otherwise I paint the bare wood. A future project is to build a Gresley teak coach. I have some sheet teak and wood sections in store ready to have a go. One day!

Looking forwards to seeing this develop.

Roja
 
Great Central D.8 wagon

Liver & Fry

Western Thunderer
Remember how I recently said "I hate leaving a project unfinished"? Well, how's this for a throwback:

20240809_194741.jpg

Having been fortunate enough to receive a set of GC transfers, I've finally been able to work toward completing this wagon, which has been on hold since the beginning of March.

It's amazing how something as simple as a pair of letters can change the look of a wagon...

- James
 
GER open wagons

Liver & Fry

Western Thunderer
Having finished the GCR wagon, I took a small step away from modelling this last week, finding my motivation had dipped slightly. That said, the production line for the GER opens has slowly soldiered on, with a second five plank and a seven plank body being put together:

20240818_183102.jpg

These will, in turn, gain internal plank detailing too.

I've also been planning another wagon build, but as I say, motivation has dipped this last week so it'll happen when it does!

- James
 
LDEC 6 plank wagon

Liver & Fry

Western Thunderer
I'd argue most of us are guilty of going down a rabbit hole once in a while. Well, here is the tale of my latest such adventure!

When I was working on the M&GN opens, I found myself looking through photos of the M&GN system for reference, as once does, and I came across a photo taken at Attlebridge showing a mix of wagons in the yard, including one of each of the ubiquitous MR 5 plank and GN 4 plank, some private owner wagons and a 6 plank wagon from the LDEC. The latter caught my eye, because I remembered that in one of the 'Stations and Structures' books, there is a photo at Wisbech docks in which the caption specifically highlights the presence of such a wagon.

I saw this as a sign, so I began looking into LDEC wagons (a challenge in itself!). It turns out the LDEC hired a fleet of 6 plank end door wagons for coal traffic in 1900, but had them painted in their own colours. Below is a cropped example from a photo showing the entire fleet lined up upon delivery:

Screenshot_20240805_095035_Gallery.jpg

So, how could I model this? Well, a quick Internet search gave me Slaters kit 4036 - A Gloucester 6 plank with end doors. This wasn't an exact match, but I figured it was a good starting point.

In the kit you get the following:

20240822_180221.jpg

And instantly decisions were made:

- The solebars would need replacing (the ones in the kit are flat as if to represent a wooden frame and the prototype has a steel frame). This would also allow me to add detailing as I pleased.

- New brake gear would need to be sourced as the prototype looks more akin to a Midland Railway style than that in the kit

- The strapping would need altering/adding on the wagon sides

- The trussing under the floor would need removing to allow me to fit MJT W-Irons

So with that, brake levers and shoes were sourced and the floor was modified accordingly. Then I turned my attention to the wagon sides...

... And made a bit of a hash of it!

Inspired by the ongoing (never ending) plank work on the GE opens, I then figured "why not make my own sides?". So I cut some plasticard and planked it up accordingly (3mm top plank and the rest 2mm)

20240819_193808.jpg

I then ordered an etch of wagon strapping, corner plates etc that I'll use to make the sides up to how I want them to be.

With that, I began putting the main body together, as if I were building the kit as intended (so sides first, then the floor):

20240820_195625.jpg20240821_144247.jpg

Then I used some 4mm deep channel section for the solebars and planked the inside:

20240821_155138.jpg
20240821_220710.jpg

Which brings me up to where I find myself currently! At the same sticking point as the other on hold projects... (hopefully the cast comes off next Friday and I can get on with all the metalwork for, well, everything!)

Still, I'm quite pleased with this so far! It's more akin to a scratch build given I've discarded half the kit, but I feel it'll be worth it in the end!

- James
 

Liver & Fry

Western Thunderer
Does anyone have any experience with either Isinglass Models or Diagram3D?

Both offer kits for a GNR Dia.245 6 wheel 3rd but I can't decide which is the better option?

Isinglass provide a 3D print and Diagram3D an MDF/card construction.

Any thoughts/advice would be appreciated!

- James
 

Lyndhurstman

Western Thunderer
Hello
On my WB thread is a stop/start account of building a Diagram3D GNR brake in 4mm. I have to say that it’s been an interesting introduction to the world of lasercut kits. But based on my experience, I would heartily recommend them to you. In particular, they have benefitted from the excellent support of the designer; Tad had helped me no end in converting the kit from 00 to P4 (which it really wasn’t designed for). I haven’t threaded my posts yet, but you’ll see my required modifications to the printed solebars, which resulted in Tad printing several sets of new ones.
IMG_1612.jpeg
Tad sees the kit as an aid to building. So it’s light on the details; the kit comes without handrails or lamp brackets; I’ve made the former and used Extreme Etchings for the latter.

Drop him a line; like I say - he’s very helpful.

Cheers

Jan
 
Top