Liver & Fry's workbench

Liver & Fry

Western Thunderer
I'm in the process of finishing my one for the stand I was under the impression that the whole of the ends were red but I noticed that only the buffer beams are red on yours. Not being a GER expert is there a livery shift where one goes to the other?
Marc

Hi Marc,

To my knowledge, the GER never painted full red ends on brake vans, only headstocks. Both Tatlow (LNER Wagons Volume 1) and Digby (The Liveries of the Pre-Grouping Railways Volume Two) reference this.

- James
 

Herb Garden

Western Thunderer
Hi Marc,

To my knowledge, the GER never painted full red ends on brake vans, only headstocks. Both Tatlow (LNER Wagons Volume 1) and Digby (The Liveries of the Pre-Grouping Railways Volume Two) reference this.

- James
I would agree with that James. Full red ends aren't a GER thing.

Headstocks/buffer beams were red on brake vans but I do believe the buffer bodies were also red which you haven't done on this interpretation was there a logic behind that?

As someone who has one of these in the shelf yet to build the issue with the doors troubles me. Guessing I will have to cut them out with a piercing saw and go from there. Annoying as drawings and photos are readily available for this prototype.

If I'm butchering the kit to make the doors more accurate I might as well go the whole hog and butcher it further into a diagram 2.... Food for thought.

In any case you've made a cracking job of that lettering!
 

Liver & Fry

Western Thunderer
I would agree with that James. Full red ends aren't a GER thing.

Headstocks/buffer beams were red on brake vans but I do believe the buffer bodies were also red which you haven't done on this interpretation was there a logic behind that?

As someone who has one of these in the shelf yet to build the issue with the doors troubles me. Guessing I will have to cut them out with a piercing saw and go from there. Annoying as drawings and photos are readily available for this prototype.

If I'm butchering the kit to make the doors more accurate I might as well go the whole hog and butcher it further into a diagram 2.... Food for thought.

In any case you've made a cracking job of that lettering!

Thank you!

I may have been somewhat literal in my interpretation of the source material, insofar as both sources state vermillion headstocks but also specify black buffer casings for all goods stock. If there's evidence brake van buffer casings were red to match the bufferbeam then it's easy enough to repaint.

- James
 

Marc Dobson

Western Thunderer
Very much appreciated gents. I will put my van through the paint shop this weekend hopefully, having just masked off the buffer beams. I have just ordered some more GER 4mm transfers finger crossed on them arriving before scale form.
Marc
 

Liver & Fry

Western Thunderer
Very much appreciated gents. I will put my van through the paint shop this weekend hopefully, having just masked off the buffer beams. I have just ordered some more GER 4mm transfers finger crossed on them arriving before scale form.
Marc

Out of interest, where did you order your transfers from? I use Powsides for the large G E lettering but I know they've had ongoing difficulties and subsequent delays.

- James
 

Marc Dobson

Western Thunderer
I should add the only had a small stock of GER 4mm (white) letters the black letters were out of stock.
I have ordered to packs of the white so I don't know how that effect their stock levels.
 

Liver & Fry

Western Thunderer
Screenshot_20250908_215546_Chrome.jpg

Posting on this thread will be paused temporarily as I've been asked to lend a hand with some wagons for @Herb Garden 's Skeetsmere.

You can follow the progress (if you so wish, of course!) by heading on over to Post 795 on the Canary Sidings thread, which can be found here:


When I return, I will be working on another L&Y project before finishing off the GE brake vans which, likely, will see out 2025 (although I do have a "quick" wagon build that I may get to squeeze in if all goes well!).

Until then, it's ta-ta and farewell!

- James
 

Tony 1

New Member
There's been plenty of progress but I think I may call it here for now until after the other project(s) I have planned. All will become clear...

First of all, the underframes of both vans got painted black, along with the buffer heads and drawhooks:

View attachment 246951

Then I cut and curved some plasticard for a roof or two:

View attachment 246958

I had to replicate a cap on the chimney, so I used a cocktail stick for the flue and found a pair of brass rings on a discarded sprue (I think they were spares from an L&Y etch?). This is what i ended up with:

View attachment 246959

It looks more effective now its been painted:

View attachment 246960

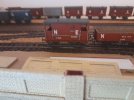
Finally, the 10ft 6in van has received its large G E lettering this evening:

View attachment 246961

Applying these has made me realise something that has been bugging me about these kits, but I hadn't quite put my finger on until now; they look as if they've taken a hard shunt and been squashed, seeming a touch short in length compared to a tall appearance. I've figured out why: The doors are a plank too small, having 4 instead of 5, so the doors aren't as tall as they ought to be, making the verandas seem taller when viewed from the side. I discovered this when counting planks to get the correct position for the lettering.

Now, in terms of what comes next, I had to think about how to achieve the correct font for various lettering such as yard allocation, for which I am at a slight loss. The later van can be passed off easy enough using generic 2mm lettering from Fox Transfers, but this discrepancy will be more noticeable on the earlier van, which was a lot more 'wordy'. I also have handrails to do, but I'd rather fit these after lettering as I'm not keen laying the vans on their side too much once handrails are fitted.

As such, I may well attack the later van tomorrow evening, but the early one will have to wait now, possibly until November. Its a shame, and those of you who've followed for a while know I don't like to leave things open ended, but I feel its a conundrum that I dont have time to answer right now.

- James
This is a D&S kit. You are right about the doors. Regards Tony.
 

Attachments

  • 20250909_085657.jpg
    20250909_085657.jpg
    225.1 KB · Views: 19
L&Y Dia.49 Meat Van

Liver & Fry

Western Thunderer
Hello again!

I'm not back officially, with the GER cattle wagon builds Skeetsmere still ongoing. However, like @Herb Garden, I too am attending Workshop Wise (North East and Borders Area Group EM Gauge Society show on 25th October) where I'm doing another wagon building demo, following on from my LDEC wagon build last year.

With that in mind I need to get a project off the ground so that I have something to work with on the day. My focus this year (I've has this planned since my L&Y jolly at the start of the year) is going to be an L&Y Dia.49 meat van.

Introduced in 1901, these were an upgrade of the older Dia.20 and shared ideology with the Dia.72 fish vans, being 18ft long on a 10ft wheelbase. They are somewhat elusive vehicles and thus far I've only seen a single photo of one. Equally, because of this, kits of such vehicles are but a pipe dream, meaning this will be my first scratch built wagon...

So why bother? Well, it's the next one in the "rainbow van" series (what, you didn't think I'd leave that at a trio, did you?). Pastel pink this time! That's certainly going to stand out...

My approach to this has been to build up the four sides as individual parts, and then I can put them together as if they were a kit, thus following a more logical (and familiar) sequence of steps.

Below is an example of how I've figured things out in my head:

20250915_155526.jpg

Its not to scale and in all honesty I dont expect anyone to get it, but hopefully it will become clear as we go on...

So far I've started making up the two sides. For the main structure, I've used 1mm thick plasticard, cut 4mm shorter than the full length of 72mm (18ft), over which I've then laid out the planking (2mm high, with a 1mm thick strip at the bottom) and cut to the correct length for the van:

20251007_211433.jpg

Over this I've then started adding 1mm square strip to make up the outside framework:

20251008_221924.jpg20251008_222203.jpg

A tiny 1mm square has been left at the top corners to allow the ends to slot in.

The sides are going very much according to plan and hopefully the ends will follow suit accordingly! I'm not sure how far to take this before Workshop Wise, but logically I need to at least have four complete sides that I can put together there (along with the rest of the vehicle). Thankfully motivation is on my side and the wind is in my sail this time!

- James
 

Liver & Fry

Western Thunderer
I should probably post the update I penned a few days ago really, shouldn't I?

I continued with one side of the van, adding cut down square rod to make up a pair of doors. The opening on these vans was 4ft 7in wide and the sides were marked up accordingly before placement.

Ive then used some small amount of model filler to remove the gaps at the corners, but have made sure to keep the actual gaps above and below the doors:

20251013_200015.jpg

This one was very much "testing the theory". I've concluded that, actually, making up the sides in this way is a good task to do at Workshop Wise as a demonstration of scratch building.

I plan to prepare some additional parts (floor section etc) so that I can begin putting the body together on the day, if I get that far.

- James
 
Last edited:
GER Dia.55

Liver & Fry

Western Thunderer
So, I've weirdly found myself in a place of limbo. I have prepared the L&Y meat van as much as I need to for now and work on the GER cattle wagons for @Herb Garden has paused until a solution can be found for the chassis (see the 'Chronicles of Canary Sidings' thread for more info). As such, with a week to go, I am without a project (and no, I have no desire to go back to those GE brake vans yet. I'm now considering surgery to correct the incorrect doors and I am yet to decide on an appropriate lettering solution for the 9ft variant. Its all a bit disheartening!).

Followers of 'Canary Sidings' will no doubt have seen the build for a rare Stelfox kit of a GER Dia.55 7 plank open wagon. I was fortunate enough to come across one on a well known auction site recently and so I took the opportunity.

I'm not intending to rush this one through before I head to Newcastle next week for Workshop Wise; this is simply something to fill my time today, but there is no harm in starting by getting the body cleaned up and some sides put together. Like @Herb Garden I will eventually be using brass w-irons instead of the plastic sprue provided.

20251017_115405.jpg

- James
 

Liver & Fry

Western Thunderer
Later that day, I had actually put the two halves and the floor together, before sanding/finishing the corners and applying some filler to the underside of the wagon to plug some gaps in the corner (the floor had rounded corners and so daylight could be seen through the wagon).

I had hoped to sand that off before posting a larger update to incorporate all of the above, but alas other duties called, so here's a photo of the sides and floor once put together!

20251017_133508.jpg

I plan to make more progress later today after work.

Looking ahead, I was wondering if anyone has (or can point me towards) any photos of these wagons in GE days. The only one I've seen is of No.4390 in Tatlow, which shoes two brake shoes on one side only. However, later photos show a single shoe each side, and the kit instructions only suggest this option. Tatlow suggests both types of brake as being extant on the fleet, but there's no indication of era (as in, was the double sided arrangement a later solution, or was this used on different batches by the GE?). That said, Dia.71 cattle vans used this single shoe/both sides arrangement, whilst the earlier Dia.7 had two shoes on one side.

Any guidance would be appreciated!

- James
 

Liver & Fry

Western Thunderer
Sunday afternoon was a productive one, with w-irons and solebars finding their way onto the wagon.

20251019_224407.jpg

The solebar was fully moulded with plastic w-irons, axleboxes and springs. I have removed these but will be salvaging the axleboxes for use on the wagon still.

20251019_220225.jpg

I believe I also have an answer to the brake query but I'll address this when I get to that stage. I plan to dedicate some time to this tomorrow evening so we'll see how far I get!

- James
 
L&Y Dia.49 Meat Van

Liver & Fry

Western Thunderer
Well, Workshop Wise has now been and gone and progress has been made.

I'd actually worried that I'd run out of things to do given I'd limited myself to building the sides up and maybe putting the body together. @Herb Garden kindly provided some back up projects, but in the end these weren't necessary.

The day started by continuing the side I'd previously test run making the doors on:

20251025_105152.jpg

An outer door frame was added, and then I started on the upper portion of the body that features ventilation.

I've previously searched extensively for something that would be appropriate to represent this and settled on an A1 Models etch for a Class 20 bodyside grille (use what you can!). I put the lower framework in, cut the grille to size, slotted each bit in and then placed framing over top.
20251025_114046.jpg20251025_114046.jpg20251025_114046.jpg

I then added the lower framing:

20251025_121151.jpg

And repeated it all on the other side:

20251025_154745.jpg

This took me to the end of the event, but unfortunately I forgot my model filler so even if I had time, I wouldn't have been able to finish these fully. The gaps in the frames need filling and filing. That said, it's a significant step forward in the build!

My thanks go to @Herb Garden and the team at Workshop Wise, and it was also good to see @Ian N too!

- James
 

Liver & Fry

Western Thunderer
Previously I questioned the brake arrangement as described in the instructions for the Dia.55 kit, and it would appear correct to have done so.

Having sought advice from @Buckjumper, who was kind enough to provide a detailed analysis of various batches of Dia.55's, it would appear the Stelfox kit does not represent the brake arrangement on the wagons as built, but rather a later variation.

As such, I have mostly ignored the brake components provided and made up an arrangement that best matches the photo of GE No.4390.

This involved a whitemetal double-shoe component (Midland Railway, but near on identical), a brass v hanger and a brass brake lever. The GE open-ratchet type brake guide was acquired from the original one piece plastic component on the kit sprue and the brake shaft hanger was fashioned from the end of the brake lever of the same original part.

20251029_215115.jpg20251029_214204.jpg20251029_214910.jpg

I still need to add safety loops, but otherwise its just buffers and drawhooks to fit now before painting!

- James
 
Top