7mm On Heather's Workbench - 37 Varieties

richard carr

Western Thunderer
The other thing that isn't on the PH etch are the buffer steps you can just see them onthe photos posted on page 2.
I got some etched for myself and I have a few spare if you would like them.

Richard
 

Dog Star

Western Thunderer
Heather,

Welcome to the exciting world of EE Co-Co bogies.

Cliff's photo of 37403 has shown me another feature of these bogies for which I am grateful... however, consider this photo. Brian Daniels has a Flickr album for Class 50 engines and the linked photo shows another variant of fittings on the corners of the EE Co-Co bogies. Some years back there was a topic on the other channel which established that the physical dimensions and bolster / springing arrangements were such that an individual bogie could be found under a 37 / 50 / 55 provided that the appropriate / relevant motors / gearing / brakes were fitted to that bogie.

I do not know the purpose of the corner fitting shown in Cliff's photo, I suspect that the fitting shown in Brian's photo is to restrict the sideways movement of brake blocks under heavy braking conditions.

What this interesting discussion shows is that not everything on a Class 37 detailing etch is going to be required when detailing a 7mm model.

regards, Graham
 

Heather Kay

Western Thunderer
The other thing that isn't on the PH etch are the buffer steps you can just see them onthe photos posted on page 2.
I got some etched for myself and I have a few spare if you would like them.

Richard

Do you mean the spindly steps under the nose on each corner? If so, then yes please! :thumbs:
 

Cliff Williams

Western Thunderer
Aha! thanks Cliff!

I will have to check the references I have for 106 to see if those features were fitted.
John’s pic from his ED days shows 37106 had fabricated bogies with cut fairings, so no need for the bracket on the bogie side, no need for the front bogie etch detail either at that point.

Another shot, while very poor quality shows 37106 with fairings and fabricated bogies.
 

Heather Kay

Western Thunderer
fairings and fabricated bogies.

Interesting those images also show it has oval buffer heads. It seems to have been part way through being brought up to later specs. The model I’m doing will retain the original round buffers.

Cliff, thanks ever so much for sharing this information. It’s all really helpful, and has enthused me enough to get cracking with things again!
 

Martin Shaw

Western Thunderer
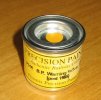
Well I have found this unopened pot of paint, it must be pretty old judging by the fading on the label and disappointingly it makes no satisfying liquid sounds when shaken vigorously. I didn't buy it so I have no idea of it's age, it may be alright and I'll quite happily post it to you if you want to take a chance, if not then I will bin it.
Regards
Martin
IMG_1206.JPG
 

richard carr

Western Thunderer
Hi Heather

Yes I do mean those spindly steps I'll dig some out for you and get them in the post to you.

Martin I fear your yellow paint is a little too late.

Richard
 

Martin Shaw

Western Thunderer
I think your right Richard, it's probably pointless sending it southwards so I feel you would be better off with a new one Heather. I took it outside and opened it. There was liquid oil inside however the solids at the bottom were just that, I doubt a usable paint would result however much stirring, sorry.
M
 

Heather Kay

Western Thunderer
Bit of a rubbish week, I’m afraid. I wanted to get lots done, but Life found another monkey wrench in its bag to lob at me.

One hurdle worth clearing, though, was the CPL couplings.

A22467AE-6AB4-4060-BBB3-E0FCC222D0FA.jpeg

A lot of fiddliness and clearing out of tiny holes. A spare 12BA tap also comes in handy. Many of the holes, for example in the bob weight, were cast adrift, and opening them caused the metal to break out. The nickel silver was also very soft, and I snapped one of the upper shackle parts just attempting to gently file away the feed gate. Anyway, they’re done now, and they still work, the bits that should move do so, and the screw threads didn’t strip.

Now, what’s next? Ah, yes, the weekend. See you on Monday! :D
 

Heather Kay

Western Thunderer
Although this week is likely to have a couple of Life Interruptions, I wanted to try and make some progress on this job.
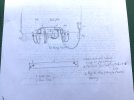
95C5EE30-4E5F-401F-8B1D-B25C186A8A5C.jpeg

Specifically, work on the drawbar areas. First, I did a sketch so I could work out what sort of gubbins was going on, and where it went. Inevitably, this area is going to be somewhat simplified, but I want to attempt to replicate something that looked like the air pipe runs from the control pipes under the buffers.
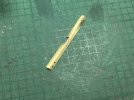
9386BBE2-9017-4F2F-9884-6A9F3D661C2E.jpeg

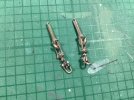
One point was how to attach the cast pipes from JLTRT/MM1. On the model, Heljan give you moulded plastic jobs that fit directly into moulded holes in the lower edge of the body moulding. That wasn’t quite going to work for what I had in mind, and modifying the castings to fit the same way wasn’t going to be easy. I decided some kind of plate would work, onto which I could fit some wire to represent the pipe runs, as well as mount the dangly pipes. After some consideration, I chose some brass 3mm angle section and modified some of it like the picture. The slot in the centre fits around the Heljan lump that represents the coupling bang plate. The holes at the ends are offset slightly, to match the real hoses.
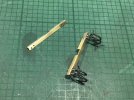
374913EA-C93C-4943-9D5E-586BD9D1427B.jpeg

The brass hoses still need some adjustment, essentially carefully straightening the right-angles in the pipework, before they can be fitted. After a bit of a fiddle, this is what I ended up with.
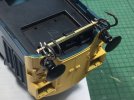
9D6FE62B-7361-4E13-9D79-738D03AF900D.jpeg

Here we are popped into place. I find I will need to add a little packing so the assembly is clear of the bodywork properly, but that’s not too bad. Happy with that, so the next job is to arrange something to simulate the pipe runs, and add a replacement coupling bang plate as the original is now covered by the angle! I’ll also tidy the hoses where they protrude through the angle.
 

Heather Kay

Western Thunderer
6EDBDB83-0360-4B13-9818-132F47F623F6.jpeg

Some fine wire carefully soldered to the front of the angle, plus a replacement bang plate. The wire is a bit wonky, because the real ones weren’t exactly as straight as a die.

Right, what’s next? I suppose I should deal with the remaining dangly bits round the drawbar area.
 
Last edited:

Heather Kay

Western Thunderer
5092D1C1-77C1-486B-9FC1-F9545799B600.jpeg

It seems I am destined to have one of those "why the heck am I bothering" kind of weeks.

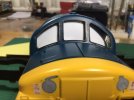
I've tentatively begun work on the body upgrades. These are limited to replacing the horn grilles (as evidenced by the picture above!) and adding windscreen surrounds. I don’t know if you can see, but there’s daylight under the outer surrounds. They barely fit the moulded shapes as it is, with something like a couple of nanometres here and there to which to apply glue. I’m going to refit the glazing later to see if the etched beggars pop off.

I ought to have stayed in bed this morning. In fact, I think staying in bed for the rest of the weeks sounds favourite right now.
 

Heather Kay

Western Thunderer
It will be good when it’s finished.

I think it will. Muttley is currently being a real *rse, but I’m managing to peck away at small tasks.

E68BA04A-2E7A-426E-9163-1BB3F5DA9D19.jpeg

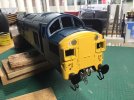
I have plonked the body shell on the cast chassis, but as you can see it’s not quite seated properly. However, I think all the dangly bits under the buffers look about right. The nearest pair, though, do look wrong, but that’s the body on the wonk. The MU pipework will have to be the Heljan moulded parts, because I don’t have the right bits in stock and the usual suppliers don’t have any either. The plastic bits look alright, and will actually fit properly.

Despite being held on by the thinnest smears of CA glue, the windscreen surrounds are fine, and don’t foul the moulded glazing. The horn grilles are now in place, and I had a delivery of yellow warning paint earlier. I think I shall give some attention to the bodywork with some fine wet and dry and see if I can get some primer on things soon. There’s not a lot else needed on the body, detail wise, though I’d like to see if there are any little enhancements along the roof area that could be useful. I’m not happy with the blanked off exhaust, for example, and I am sure there should be a whole galaxy of little clips and latches up there. That sounds like a cue for some serious armchair modelling this afternoon!

Onwards!
 
Top