TFW’s workshop

Tim Watson

Western Thunderer
A visitor to Copenhagen Fields returning to York.
The beautiful Coronation set was made by John Aldrick and is more normally seen on Peter Kirmond’s superb York layout. Must get my one under way. The observation car was 3DP by Mike Trice.

Tim
 
Last edited:

Tim Watson

Western Thunderer
Jim Watt has started to draw up the artwork for the York Road, Piccadilly Line, Hungarian Gate stock. We have had great help from Piers Connor, in getting the outlines and dimensions.

IMG_0768.jpg

IMG_0767.jpg

The trailer cars will be a mirror of the non-driving end of the control car. The sides and chassis will be etched and the roof very likely a 3D print, as well as the louvres on the power car.

Any comments from those that know about these vehicles?

Tim
 

Yorkshire Dave

Western Thunderer
There's also the driving control trailers with the partially enclosed cabs as noted on District Dave's forum.

Will you be running these as 3 car 6 car sets?
 

Tim Watson

Western Thunderer
Back to working on the big engine (Raven 4-6-2 class) with lubricators, sandbox filers and a small footplate handrail.
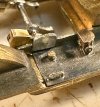
IMG_9996.jpg
The lubricator was ‘lost plastic’ cast from a very detailed 3DP courtesy of Simon & Andy Grand. It is amazing how the detail has picked up in the casting.
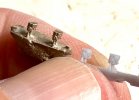
IMG_9983.jpg
The base peg was used to help locate the steel running plate that is also held down by magnets. The sand box filler also started off as a peg through a hole into the brass sub-structure. As always, easier to start with a large component - to hold whilst soldering - and then trim to size.
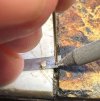
IMG_9991.jpg
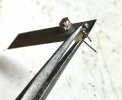
The little nickel silver handrail was bent up with two locating holes in the running plate and a spacer gauge whittled from a scrap of paxolin. IMG_9993.jpg
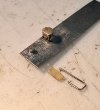
This was then soldered in place clamping the handrail between some jaws of titanium tweezers (they don’t take solder) and soldered in place from underneath. Any excess solder and wire was simply filed away.
IMG_9992.jpg
Finally, a picture of the prototype for comparison. IMG_9995.jpg

Tim
 
Last edited:

Heather Kay

Western Thunderer
Over on the Britmodeller forum, I see comments from folk who generally work at 1/35th scale and up. They see a model at 1/48th and exclaim their amazement at the detail and how can anyone work at such small scales.

I smile, thinking of the modelling performed at scales so much smaller still.

I'd struggle with this detail at 4mm scale!
 

Tim Watson

Western Thunderer
Turning attention to the cab spectacle e on the NER 4-6-2 class, I have put in the quarter light separator bar within the window frame. This was made from brass strip let in to a notch cut in the spectacle plate itself with a large piercing saw blade.
IMG_0002.jpg
IMG_0004.jpg
The over width strip was then paired down to be flush at the front. I’m not sure how much lining out was applied to cab fronts on NER engines, but the brass window surrounds will probably just be achieved by scraping the edges of the windows.
IMG_0011.jpg
The gap between the firebox and the cab will be covered by a cleading strip.
IMG_0773.jpg
The steel cab roof has also now been fitted, making for a suitably rigid structure. Does anyone have any details of the cab roof ventilators on these Raven cabs?
IMG_0010.jpg

Tim
 

Tim Watson

Western Thunderer
Are you using more steel in your models recently or have you always used this much?
The Baldwin 2-6-0 had steel running plates and a few bits of the Stirling 8’ single, Gareth. More recent engines, Mons Meg & Valour, were derived from various sources e.g. an etched kit and castings, so less scope for my input on material choice. The Raven Pacific will be very much to the standard of the Baldwin & Single and as I will be painting it in full NER livery is being made with separate components to make that easier. Completely scratch building a loco enables the choice of materials to suit and I actually find it very enjoyable.

The advantage of steel is that it is better at holding paint than brass or nickel silver and also can be very effectively chemically blacked - a major benefit on running plates and cab roof edges. Steel is also stronger than the non-ferrous metals: especially useful with valve gear. It solders easily enough with strong fluxes (their residues are removed by boiling in water for a few minutes).

Hope that gives some insight into my thinking.

Tim
 
Last edited:

Tim Watson

Western Thunderer
After 2.5 days at Missenden Railway Modeller’s summer school, the Raven 4-6-2 class now has a completed cab roof and front buffer beam.
IMG_0030.jpg
After massively zooming in on the GA drawings, I decided that the cab ventilator on the cab roof would have been a semi-internal sliding variety. IMG_0032.jpg
The front buffer beam was drilled out, being soldered to some sacrificial brass angle to ease holding in the vice. IMG_0023.jpg
It had a very significant pair of cut-away to avoid platform faces with the side swing of the engine front end.
IMG_0031.jpg
I have now worked out how to make the smokebox front, which will probably be the next job.

Tim
 
Top