The Yard - A small industrial layout in 7mm

Pencarrow

Western Thunderer
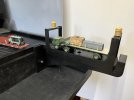
Good morning Martin, some lovely work going on on the layout. Interesting that you're not the first to report mould issues in recent days!

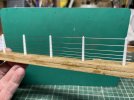
A minor observation if I may. One thing that jumped out at me on your recent build was the span over the road. In reality this would need quite a substantial beam to support the brickwork above.

You could have had an exposed steel beam, but probably too late for that. The second option would be to pretend the beam was there and it was faced with brick. Normally the brick would have been oriented vertically on end. Again probably a bit late for that.

So that leaves a concrete beam. Probably a good 4 bricks deep and sitting a good 12" into each side. You could retrofit this by gluing some thin plasticard over the brick.

This is the bit I mean:
Screenshot_20240130-072333~3.png
 

Greengiant

Western Thunderer
Pencarrow, you are indeed correct about the beam, I did mention I had forgotten it in my post. Annoyingly the beam has been on my bench all the time and I still forgot it
It is an RSJ, but I may opt for your suggestion of a concrete overlay beam, that would be the easiest to do.
Martin
 

Greengiant

Western Thunderer
I have made some electrical switch box cabinets and junction boxes on the laser cutter and given them a coat of paint.
53547449459_04bde1d306_b.jpg 1708708399047.gif
Made a start on a power box for the gantry crane, mainly as something to cover the fixing bolt of the crane chassis!
53546245867_1f05527c3d_b.jpg 1708708399057.gif
Laser cut some pipe end caps as a two part item. I kept them in frames to make the gluing together easier. Once dry they are then snipped out from the frame.
53547117991_687005ff6e_b.jpg 1708708399067.gif
Some of the new pipe runs with the laser cut end caps and brackets painted with primer. Tube is Evergreen with 3D printed bends.

53547117946_0cf21a6927_b.jpg 1708708399076.gif
Now with the top coat applied. Here I am installing small wire pins, these are to help strengthen the fixing bonds to the building walls. I need to do this because the layout experiences all sorts of knocks and bangs while taken to exhibition, failure to do this quite often leaves you will detail parts fallen off on the layout, not a good start to a show.
53547117771_1d8521285f_b.jpg 1708708399085.gif
Martin
 

Greengiant

Western Thunderer
For a while now we have wanted to make a new transmitter box for the gantry crane. One reason was because the current transmitter is far too complex. We only need forward/reverse, left/right and up/down, just three channels.
It is too easy to accidentally hit a function button when picking up and putting down.
At one show this happened and it changed the transmitter mode to 'Helicopter' and started to zero the channel that controls the hook, winding it up into the drum being unable to stop it!
Luckily Neale saw what was happening and immediately cut the power to the crane itself to prevent disaster. The winding motor is strong enough the easily snap the chain.
Another reason is the current handset is rather a bright orange and stands out a bit.

The new transmitter box will be a mix of laser cutting and 3D printing, I did the laser bits first.
Needing curved ends for comfort, I experimented with different settings for a 'Living Hinge' cut to enable the curving of a 2mm thick, solid MDF sheet.

The best setting was 1.5mm spaced cuts, here shown with gravity alone forming a curve.
53547117736_e26d4a23a9_b.jpg 1708716884397.gif
The three main parts of the case cut out, my schoolboy maths came in useful at last to calculate the length of curve, I could then get the Living Hinges the correct length and the dovetail joints to meet up at the rear.

The cutouts either end either end make up the access hatch once the outer is wrapped and assembled. Case hatch yet to be cut. The baseplate with the offset hole is for the 3D printed battery pack. Joystick holes and fixing holes are obvious.
53547557195_d13bea949a_b.jpg 1708716884406.gif
The rear hatch cover needed a lip to rest on and have captive nuts for fixing. Brass nuts soldered to scrap NS sheet were then epoxied to the frame.
53547449889_763136233f_b.jpg 1708716884415.gif
To enable me to accurately glue the lip to the case, I cut a jig to align the lip precisely.

In this photo the hatch can be seen, below that the lip and alignment jig, not yet bolted in place.

53547557265_b59cacc06c_b.jpg 1708716884425.gif

The jig in action while the glue sets.
53547117931_c68385af93_b.jpg 1708716884435.gif

This resulted in a neat and accurate finish, not that it really matters, only we will see it, but I just like it to be right. It also shows the dovetail joint holding the case together.

The whole case assembly did stay together without glue while I was checking the fit, I was pleased with that.
53547450049_5240cd90b3_b.jpg 1708716884446.gif
Cover fixed in place with four brass CS bolts.
53547450054_f65fdb263c_b.jpg 1708716884457.gif

From the front.
This has now been coated with MDF sealer ready for painting, but we liked the raw look, so will not be painting it for now.
53547309078_b560867393_b.jpg 1708716884467.gif

Side by side with the transmitter it will replace.
53547557365_fb6b4fabfe_b.jpg 1708716884478.gif
The box is now with Neale for fitting out.

Martin
 

Greengiant

Western Thunderer
Back to the extractor units.
For durability 8BA bolts were epoxied in place which had already been soldered to brass sheet, hopefully they won't detach.

53546246017_97f46654f2_b.jpg
From scrap MDF bits from previous jobs, small packing pieces were cut. Their purpose just to hold the unit clear of the supporting foamboard during painting.

53546246002_875d3a141a_b.jpg
Here mounted on foamboard prior to painting, keep it clear of the foamboard, which itself makes a very useful method of handling until painting and weathering are complete.

53547118011_446301a0c1_b.jpg
Some of the units assembled, some brackets and electrical switch boxes.

53547450094_5b1de36a9a_b.jpg
Ready for painting, the fronts held with double sided tape.

53547118066_af5abd9006_b.jpg
All primed.

53547117856_07b6e1b0f0_b.jpg
Initial paint applied.

53547449944_87e0a6af62_b.jpg
First application of weathering, which then gets blended and feathered to taste.

53547557135_82a4da3b7d_b.jpg
A before and after of this type of unit.

53547449934_611beba3ef_b.jpg

Martin
 

David Waite

Western Thunderer
Hi Martin
The Transmitter box looks fabulous so neat and with a lovely Art Deco style about it, modern laser cutting is certainly
changing how woodwork is done.
David.
 

Greengiant

Western Thunderer
A bit of below the scene work done this weekend.

Not all shows provide barriers. We need them to stop people getting into our line of sight when operating the crane and lorries. It also keeps fingers away, the front edge of the layout has taken some punishment at shows. Takes hours to make and seconds to ruin.

We welded up some strip and tube and used a set of tent poles for the bar.

To attach the legs to the layout I used Rivnuts, one of those tools you don’t use much, but very useful when you do. For this purpose M6 nuts to match the rest of the bolts were used. It acts like a big pop rivet gun to fix the threaded inserts.

Rivnut blanks
53553451781_20da8a00b8_b.jpg 1708970102644.gif
The layout support on its back ready for drilling the rivnut holes.
53552595557_79760352ba_b.jpg 1708970102654.gif
Rivnut insert loaded onto the expanding tool.

53552595552_aae95c116e_b.jpg 1708970102665.gif
The tool ready for action, it is just a simple operation of pushing the two arms together, this pulls the tool through the insert which collapses it and splays it behind the metal sheet.

53553899155_c098459c17_b.jpg 1708970102675.gif
Job done. This leaves us room to walk along the front if required. Standing against the barrier with arms outstretched, I can just touch the baseboard edge.
53553451796_40fe623622_b.jpg 1708970102686.gif
If the barrier is pushed, the thin strip along the floor bends up slightly taking the impact from the layout support.
Martin
 

Greengiant

Western Thunderer
The latest bit of work on the layout is the wiring. We don't have a vast area of scenery, so I am trying to get as much included as possible.

Whether the end result is worth the effort involved, only time will tell.

I have used 0.7mm wire for the cabling and bent up cable clips from 0.45mm wire. It took a bit of trial and error to come up with a technique that gave consistent results for making these clips. They have a long spigot because this is passed through the building wall and bent over to hold the clip and wire in place, no glue required.
53560301066_7d18595c88_b.jpg 1709295057861.gif
Clips inserted with tweezers. This is then held down tight with the tweezer handle while the wire is bent over inside the building.
53560741965_cf7c80c0de_b.jpg 1709295057871.gif
The cabling is effectively floating above the wall surface, this means small pieces of paper can be slipped between wall and cable to mask while painting the cable. The cable is initially coated with a black marker pen prior to installation, this then seems to take black acrylic fine.
53560301071_9803d2efb3_b.jpg 1709295057881.gif
A couple of installations, just a few more buildings to go now.
53560498048_71fe01791f_b.jpg 1709295057891.gif

53559442122_2f853b45a0_b.jpg 1709295057903.gif
Martin
 

Greengiant

Western Thunderer
We made some tweaks to the barriers to get them just where we want them, pleased with the result. An added bonus, I had some rubber end stops in stock left over from a car project which fit the pole.
53573134713_3c04f7c626_b.jpg 1709811027435.gif
Neale has kitted out the new crane transmitter box, very pleased with how it has turned out. Far simpler and not as distracting as the original orange handset.
53572069142_2389218ba6_b.jpg 1709811027445.gif
A Brucie bonus is its fits the control panel shelf as well!
53573134718_17a0c7f053_b.jpg 1709811027458.gif
The buildings are all back on the baseboard now.
53572069152_6b50d1476c_b.jpg 1709811027469.gif
All I need to do now is service the rolling stock and weather the Class 08. If I get time a few little scenic bits to add to the layout. Then we will have a test running session next week to familiarise ourselves with operating, especially now that Neale has tweaked the lorry control handsets with different power curves for steering and drive and the crane with flatter curves.

If all goes well, we shall be ready for Ally Pally in just over a weeks time and a magazine shoot in April.

Martin
 

Greengiant

Western Thunderer
We are all set up in the Great Hall at Alexandra Palace, all very easy, especially being able to take our vehicles into the hall. Back home by 4pm, looking forward to the two days of the show. Very pleased with the amount of space we have.
Only downside was the London traffic!
53589490181_8725acf343_b.jpg 1710533397212.gif


53588618302_8c8db625a5_b.jpg 1710533397221.gif

53589808609_9ca8b9b06d_b.jpg 1710533397231.gif
Martin
 

Greengiant

Western Thunderer
We had a great time with The Yard at Ally Pally, very pleased with all the kind comments we received, much appreciated, makes all the hard work worthwhile. The lorries and crane were popular, the supplied sturdy show barriers proved popular for leaning and watching the layout in operation.
The show Stewards were all very helpful.
The only downside, which is entirely our own doing, we did not get much chance to see the rest of the show, the layout needs constant operating, there is nothing you can just leave running. Will rely on the photos and YouTube videos posted over the coming days to catch up.
The weekend is catching up with me today, will leave it a while before working through the small snagging list, ready for the next show in July.
53595354559_7eea824e35_b.jpg 1710772927740.gif
Martin
 

Greengiant

Western Thunderer
This Sunday we had a photo shoot for Hornby magazine, for those that have done these you will know what a long day that can be to get the right shots, plus some video.

They always seem to come up with angles and views we had never considered. Looking forward to seeing the results, just the article to write now!
53655617368_f9d193316f_b.jpg

53655744539_5e27bdeb74_b.jpg

53654519342_3a2f7eb1b3_b.jpg

53655744549_7c552d22da_b.jpg
Martin
 

Greengiant

Western Thunderer
We now have 13 shows under our belt, each time, we have a list of tweaks and improvements to incorporate before the next outing.

One such improvement is a simple operator notification that a train is ready indicator. We do not run to a sequence or timetable, but just wing it and go with the flow.

An issue we (mainly me) did have was forgetting if a loaded or unloaded train had been sent under the crane. Because everything runs slowly, it can take a while for a train to be loaded/unloaded. Also talking to spectators which I enjoy, distracts me from what is going on, but talking is a vital part of the showing experience.

The up shot of all this is when I look under the crane I cannot remember was the train I sent loaded or unloaded and ready to depart? Sometimes your progress is prevented by a lorry blocking the exit, so you go back to shunting the front line instead.

I changed the operating method by adding a simple rule, empty trains from factory to crane and loaded trains from crane to factory. Which worked well, but I kept forgetting to check if the train had been loaded and move it out of the way.

We do not shout to each other when a train is ready, it is usually a knowing look or nervous twitch which alerts you!

To improve on this we simply cut two new control panels on the laser, which included space for two extra switches and yellow LEDs (see photo below).

53655391076_98b270c523_b.jpg
Now when the crane operator is ready for the train to be moved, they press the switch next to the relevant track the train is on and the LED flashes on the crane end control panel and the factory end panel. I take control of the train and press the same switch on the factory panel and this cancels the flashing LED. All very simple and basic I know, but when you are operating 7-8 hours a day over two days, every little helps.

A short video demonstrating the procedure.


Martin
 

Greengiant

Western Thunderer
I have now finished the fiddle yard amendments and painted the changes.


The TK turntable has also been painted, I may have to paint the knobs.

 1719580322801.gif
A start has been made on making a section of post and rail fencing to go alongside the track in front of the 'Castleton factory'.

 1719580322810.gif
Martin
 

Attachments

  • 1719580322791.gif
    1719580322791.gif
    43 bytes · Views: 0
Top