InvernessTMD
Western Thunderer
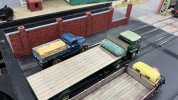
Thinking about the lorry positioning, could some form of ir detection system that shows a green when the lorry is fully on the turntable?
We are going to try a simple LED in a tube set into the road bed of the turntable. If that does not work, a sensor may be an option, but the activation indicator has to be in the same filed of vision as the lorry.Thinking about the lorry positioning, could some form of ir detection system that shows a green when the lorry is fully on the turntable?


Simon, also stop by at London Road Sidings and say hello.Hopefully see you tomorrow…


I have a set on my 72 Stag, I measured them for size of the front one.Oh they really are nice. I had a full size set made for my 1966 Anglia 105E HFS674D and they looked a treat on her too.
Do pop by and say hello we are on stand 56, very near the cafe.Hoping to get to Railex on Sunday.