You are using an out of date browser. It may not display this or other websites correctly.
You should upgrade or use an alternative browser.
You should upgrade or use an alternative browser.
7mm David Andrews Princess - 6206 Princess Marie Louise
- Thread starter Rob Pulham
- Start date
michael080
Western Thunderer
I've also been wondering.Numpty question. Rather than plating brass, why not use copper wire?
Whenever anything with a power cord goes into the trash bin, the cord ist cut and put on stock. Mainly cheap chinese cables have quite coarse indvidual wires in stranded wires.
Michael
adrian
Flying Squad
A lot of copper wire supplies will be coated wire - which needs cleaning or abrading before soldering. I used this site for bare copper wire buy a variety of sizes and you'll never need to buy any more ever again. 0.4mm 111m for £6.60. wires.co.uk : Bare Copper WireNumpty question. Rather than plating brass, why not use copper wire?
wide range of sizes (Maplin were good for this, not much help now, I realise) and easily straightened by a good tug.
oldravendale
Western Thunderer
Bare copper wire is available in a vast range of sizes from ebay. I've isolated the UK suppliers here bare copper wire for sale | eBay If you are looking outside the UK there seems to be a pretty well infinite choice of suppliers and wire sizes.
Even better, support your modeling suppliers - I know Phil at Hobby Holidays can supply copper wire in a multiplicity of sizes. Hobby Holidays online shop
Brian
Even better, support your modeling suppliers - I know Phil at Hobby Holidays can supply copper wire in a multiplicity of sizes. Hobby Holidays online shop
Brian
Max M
Western Thunderer
Whilst copper is very malleable it can be difficult to keep its shape particularly if there are multiple runs or you need to remove the component for (say) painting.Numpty question. Rather than plating brass, why not use copper wire? ...and easily straightened by a good tug.
The benefit of brass is that it holds its shape but would need painting if it would have been bare metal on the prototype.
I did this more as an experiment and like most things in life do what works for you.
To straighten copper wire an alternative to giving it a good tug is rolling between two flat surfaces
Max M
Western Thunderer
A close up of the plated article.
The bottom wire has been polished with T Cut and it looks like the plating may have come off so it made have needed a bit longer.
The rest is as it came out and I quite like that it doesn't have a uniform finish. Instant patina!
Also, the importance of the cleanliness of the work piece can be seen on the runner which has an impression of my finger print.
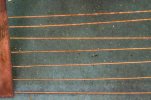
The bottom wire has been polished with T Cut and it looks like the plating may have come off so it made have needed a bit longer.
The rest is as it came out and I quite like that it doesn't have a uniform finish. Instant patina!

Also, the importance of the cleanliness of the work piece can be seen on the runner which has an impression of my finger print.

simond
Western Thunderer
Nice. I entirely get the issue if you’ve a need to dismantle - copper is very soft (though the “good tug” does work harden it a bit)
I recall reading something about needing to respect a maximum current density (current / area) for a good plated finish, too much and the plating becomes very porous or flaky, iirc.
so, of course, I went looking, and by chance found this gem from nearly fifty years ago, though I suspect when written in 1950 military surplus was cheaply available
enjoy!
Simon
Rob Pulham
Western Thunderer
Progress since my last post has been steady with a number of small details added to the build.
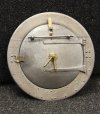
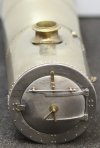
I added the door latch and the lamp iron to the smokebox door. It looks slightly wonky in these views something I will need to double check.
As I mentioned earlier I had added the wrong covers for the pipes leading from the top feed so these were removed and replaced with the correct ones.
Finally for this post I also fitted the cab seats after adding a stay which allows them to be lowered into position.
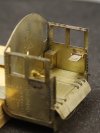
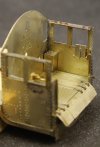
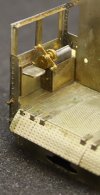
I added the door latch and the lamp iron to the smokebox door. It looks slightly wonky in these views something I will need to double check.


As I mentioned earlier I had added the wrong covers for the pipes leading from the top feed so these were removed and replaced with the correct ones.

Finally for this post I also fitted the cab seats after adding a stay which allows them to be lowered into position.


Rob Pulham
Western Thunderer
I am trying to get all the small details at least made into sub assemblies before I add them to the footplate once the firebox and boiler have been attached. I have worked on the firebox print and got that to sit down nicely. I needed a bit removing from the underside of the cutouts in the ring that fits inside the boiler to get it to sit down over the rear splashers.
I also assembled the reversing levers which was an exercise in clumsiness n my part. The various parts are all held together with rivets but I decided to turn some nickel pins to do the job instead backing them up with some etched washers.
Using some 2mm nickel rod I fit it in a collet and having the smallest stick out that I could I attempted to turn them down to 0.8mm. I broke the first three off, trying different tools (carbide insert first and then a round nosed HSS tool). Lastly and successfully I tried a new sharp edged HSS bit straight out of the packet. As supplied it had a diamond shaped grind on it with the leading point towards the chuck.. Running the lathe at approx 2000 rpm I managed to make the four different pins needed for this part of the build.
I mentioned clumsiness on my part as I was starting to assemble the various bits on to the turned pins I thought it a good idea to pop a few etched washers onto the longest pin to make filing of the etching cusps a bit easier. No sooner had I got them threaded on than I dropped the thing on the floor. Or rather I dropped it onto my apron where it rolled to the edge, hesitated for a second then dropped off. Could I find it, not a chance. despite moving various items stored under my bench and wiping over the laminate floor with a cloth.
Back to the lathe I went and turned another. I got most of it assembled when I happened to bend down to pick up a file that I dropped and found the missing pin complete with washers. However not 30 seconds later I managed to drop the last pin that I was fitting almost a repeat of the first where it dropped into the ether after slowly sliding down my apron. Thankfully the one that I found has allowed me to escape having to turn yet another.
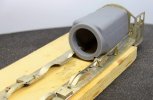
Below is the reversing levers all assembled but not yet fixed in place.
Lastly I returned to the lathe to turn down the spigots on the bottoms of the safety valve castings so that they would fit in holes drilled in the top of the fire box as they came of the sprues the spigots were anything but round or parallel.
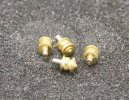
I wrapped each casting in a slice of aluminium drinks can to protect it and popped it in a collet. Then I faced the ends of the spigots off and turned them all to 1.7mm diameter.
I also assembled the reversing levers which was an exercise in clumsiness n my part. The various parts are all held together with rivets but I decided to turn some nickel pins to do the job instead backing them up with some etched washers.
Using some 2mm nickel rod I fit it in a collet and having the smallest stick out that I could I attempted to turn them down to 0.8mm. I broke the first three off, trying different tools (carbide insert first and then a round nosed HSS tool). Lastly and successfully I tried a new sharp edged HSS bit straight out of the packet. As supplied it had a diamond shaped grind on it with the leading point towards the chuck.. Running the lathe at approx 2000 rpm I managed to make the four different pins needed for this part of the build.
I mentioned clumsiness on my part as I was starting to assemble the various bits on to the turned pins I thought it a good idea to pop a few etched washers onto the longest pin to make filing of the etching cusps a bit easier. No sooner had I got them threaded on than I dropped the thing on the floor. Or rather I dropped it onto my apron where it rolled to the edge, hesitated for a second then dropped off. Could I find it, not a chance. despite moving various items stored under my bench and wiping over the laminate floor with a cloth.
Back to the lathe I went and turned another. I got most of it assembled when I happened to bend down to pick up a file that I dropped and found the missing pin complete with washers. However not 30 seconds later I managed to drop the last pin that I was fitting almost a repeat of the first where it dropped into the ether after slowly sliding down my apron. Thankfully the one that I found has allowed me to escape having to turn yet another.
Below is the reversing levers all assembled but not yet fixed in place.

Lastly I returned to the lathe to turn down the spigots on the bottoms of the safety valve castings so that they would fit in holes drilled in the top of the fire box as they came of the sprues the spigots were anything but round or parallel.

I wrapped each casting in a slice of aluminium drinks can to protect it and popped it in a collet. Then I faced the ends of the spigots off and turned them all to 1.7mm diameter.
Ian@StEnochs
Western Thunderer
Rob,
When turning small diameter Brass or Nickel Silver I find the best results are from HSS tools ground, then stoned, with a nice sharp point. The text books tell us that no top rake is required and that is true for leaded brass. However I find NS turns best with about 3-5 degrees of top rake especially on 1-2mm diameter rod which I suspect is drawn so likely to be work hardened.
Ian.
Rob Pulham
Western Thunderer
Thanks Ian,Rob,
When turning small diameter Brass or Nickel Silver I find the best results are from HSS tools ground, then stoned, with a nice sharp point. The text books tell us that no top rake is required and that is true for leaded brass. However I find NS turns best with about 3-5 degrees of top rake especially on 1-2mm diameter rod which I suspect is drawn so likely to be work hardened.
Ian.
I shall try that next time I need some pins.
Rob Pulham
Western Thunderer
This weekend has been about working out how to fix the firebox and boiler together and to the footplate. I put a couple of 12ba screws through the bottom of the firebox utilising the two holes etched in the footplate. The ultimate intention is to use adhesive but also to use the hole to dd a mechanical element to the fixing so the screws are temporary to allow me to get everything in place. I would also like to get all the soldering done around where the firebox and the lower sections will sit since resin is susceptible to heat damage if I am not careful. Picking up a tip from John Dale I elected to screw the front end of the boiler in place and I was rather reluctant to use just a nut on an internal curve as I didn't want it to come adrift sometime in the future. A rummage in my useful bits of brass recycling box yielded a former frame spacer from a set of frames that I had replaced with new ones. As a bonus it was already tapped 8BA. I filed the ends to help it seat in the curve and after marking and drilling a hole in the front saddle casting and transferring that through to the bottom of the smokebox I soldered it in.
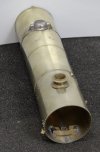
A dry fit of the boiler and firebox and all of a sudden it starts to look like a loco.
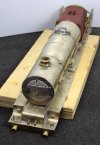

A dry fit of the boiler and firebox and all of a sudden it starts to look like a loco.

Compton castle
Western Thunderer
Lovely work Rob, the princess has been on my want list for a long time and watching this one come together puts it higher up the list!
Rob Pulham
Western Thunderer
The next bit of the puzzle before permanently fitting the firebox, is the vacuum ejector pipe running from the casting at the firebox to the smokebox pipe elbow fitted some time ago. Making up the pipe was relatively easy, make up the bends and kee trimming the ends until it fit in the right place.

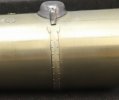
The ejector pipe is retained by four pipe clips. In the kit these are provided by 1.5mm wide etched strips.
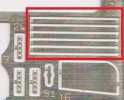
However upon checking photos these retaining clips were not flat but rounded like a big handrail knob. A couple of years ago when a friend passed away I inherited a box of 1 metre x 1.5mm brass brazing rods. I cut five lengths and soldered them to a piece of thick brass to hold them while I worked on them.
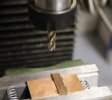
I then milled off 0.75mm leaving them as half round pieces.
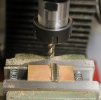
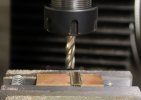
These I removed from the block and scraped off most of the solder. I annealed them and then bent them round a length of the 1.5mm brass rod to form what are effectively brass split pins.
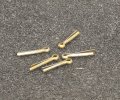
Finally I cut them to length. They look much bigger than they are in the photos
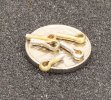
Next up is drilling the boiler and firebox to accept them.

The ejector pipe is retained by four pipe clips. In the kit these are provided by 1.5mm wide etched strips.

However upon checking photos these retaining clips were not flat but rounded like a big handrail knob. A couple of years ago when a friend passed away I inherited a box of 1 metre x 1.5mm brass brazing rods. I cut five lengths and soldered them to a piece of thick brass to hold them while I worked on them.

I then milled off 0.75mm leaving them as half round pieces.


These I removed from the block and scraped off most of the solder. I annealed them and then bent them round a length of the 1.5mm brass rod to form what are effectively brass split pins.

Finally I cut them to length. They look much bigger than they are in the photos

Next up is drilling the boiler and firebox to accept them.
michael mott
Western Thunderer
Nice way to create the split pins Rob, I shall file that one away for future use. The overall loco looks great.
Michael
Michael
michael mott
Western Thunderer
But that would mean getting some…. When working out how to do it is so much harder and challenging and satisfying… of course only really viable when not racing the clock, been there.You could have just used D section brass wire
Michael
mickoo
Western Thunderer
I never found struggling or challenging satisfying, I found it an intolerable waste of timeBut that would mean getting some…. When working out how to do it is so much harder and challenging and satisfying… of course only really viable when not racing the clock, been there.
Michael

Even so, milling round wire to make it half round, whatever happened to just filling a flat on it

