Peter Insole
Western Thunderer
Ah yes indeed Giles! Thank you again for clarifying an important point! I always understood it to be correct practice to fill my own little 16mm Merlin engine's "through type" lubricator right up to the hole - then remember to stand well back when that first charge shot up the chimney and delivered a load of it back !
My "arbitrary" comment was about the model shown in the image, rather than the prototype. I would have thought that a very simple jig for use when soldering the pipe into the chamber would have ensured a precisely consistent gap at the top. In the photo however, it just looks as if someone has either left a rough saw cut without cleaning up, or later attacked the end of the pipe with a coarse file to reduce it?!
I have been pottering on today, and even had a bit of fun with a ball game...
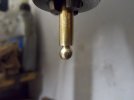
I started by drilling a hole down the centre of a length of rod and tapping it M3. Then set it in the drill chuck, and spun an almost complete sphere, taking great care not to cut right through to the hole - in order to avoid pinging it off, and all the hard won being inevitably lost to that otherworld!
It was easier to thread the ball onto the thinner lever shaft while holding the remaining stock bar, and when fully tightened up, I found that I could simply snap the ball cleanly off at that very slender waist section!
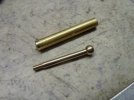
Mind you, by the time I had worked out how to get the job done, located suitable materials and completed the first lever, I found myself in breach of the "noise curfew"!
Mrs. I., had to descend the cellar stairs and personally insist that I desist with immediate effect!
In daring and dangerous defiance, I resolutely determined to remain at the "dungeon" bench... but avoided her direct displeasure by obtaining permission to quietly expose some photographs down there instead...
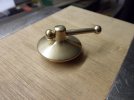

When both levers are done, I am thinking of permanently fixing one ball to each end with solder, and securing the opposites with a drop of thread locking compound.
It might be late in the day, but I really don't want to lose 'em!
Pete.
My "arbitrary" comment was about the model shown in the image, rather than the prototype. I would have thought that a very simple jig for use when soldering the pipe into the chamber would have ensured a precisely consistent gap at the top. In the photo however, it just looks as if someone has either left a rough saw cut without cleaning up, or later attacked the end of the pipe with a coarse file to reduce it?!
I have been pottering on today, and even had a bit of fun with a ball game...

I started by drilling a hole down the centre of a length of rod and tapping it M3. Then set it in the drill chuck, and spun an almost complete sphere, taking great care not to cut right through to the hole - in order to avoid pinging it off, and all the hard won being inevitably lost to that otherworld!
It was easier to thread the ball onto the thinner lever shaft while holding the remaining stock bar, and when fully tightened up, I found that I could simply snap the ball cleanly off at that very slender waist section!

Mind you, by the time I had worked out how to get the job done, located suitable materials and completed the first lever, I found myself in breach of the "noise curfew"!
Mrs. I., had to descend the cellar stairs and personally insist that I desist with immediate effect!
In daring and dangerous defiance, I resolutely determined to remain at the "dungeon" bench... but avoided her direct displeasure by obtaining permission to quietly expose some photographs down there instead...


When both levers are done, I am thinking of permanently fixing one ball to each end with solder, and securing the opposites with a drop of thread locking compound.
It might be late in the day, but I really don't want to lose 'em!
Pete.
Last edited:


