Getting On The Weed.....The Hunt for Missing Mojo
- Thread starter marsa69
- Start date


marsa69
Western Thunderer
Hi all,
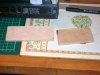
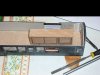
After Steve's gentle probings I've actually picked up the mantle once more on this project and managed to get some work done this week. I've nearly finished the interior of the tool van by making up a new floor and end bulkheads. I inserted some 'ply offcuts' into the well in the floor to add a bit of weight and lined the sides with some 2mm card to even out the walls either side of the roller shutter doors. I'll paint the back of the doors before fitting the 'generator', it will be a bit of MDF painted and lined as a a generic piece as there are no pictures available. Why bother you may ask? Because by careful deduction I think it sits right opposite the solitary window in this coach
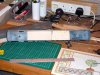
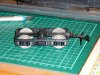
I've also smoothed down the roof and I'm awaiting some roof vents from Peter Clark before I can finish this part. In the meantime I've started on the bogies. The bogies on the prototypes are B4's so as ever, to save some money, I've used the bogies off some Big Bigs Mk2's. I was lucky in that I already had a pair with scale wheels fitted that I acquired from a Guild member. The real thing apparently has 3ft wheels fitted but the wheels I have scale in at about 3'1" (what's an inch between friends ). I wasn't happy with the brake shoes on the bogies so I cut them off and then repositioned them closer to the wheels. Because there wasn't a lot on the bogie to attach them to I've only been able to move them back about 2mm. A small improvement I know but I'm much happier with them. All that is left for me to do is to add some styrene strips to the bogies as per the real thing and then slap a coat of paint on.
I decided to remove the excuse called 'V' hangers on the underframe and will scratchbuild some more and put them where they are actually supposed to sit. I then need to remove some of the battery boxes and add one or two other bits. This is going to prove difficult as I can't find any detailed references or photos of the undeframe on the prototype. Worst case is that I will have to guess and approximate. Much like a lot of other things I do") I've also cut out the styrene panels ready to laminate onto the coachsides. I intend to glue these in place then gently warm them up and manipulate them to simulate that sheet steel ripple effect of the original. I'll then fill in any joins and gaps with some superfine Milliput before concentrating on the coachends.
I've also cut out the styrene panels ready to laminate onto the coachsides. I intend to glue these in place then gently warm them up and manipulate them to simulate that sheet steel ripple effect of the original. I'll then fill in any joins and gaps with some superfine Milliput before concentrating on the coachends.
I will try to post some photos to show what I've achieved(?) but I'll warn you now, the purists won't like it
)")
Cheers,
Mark
After Steve's gentle probings
I've actually picked up the mantle once more on this project and managed to get some work done this week. I've nearly finished the interior of the tool van by making up a new floor and end bulkheads. I inserted some 'ply offcuts' into the well in the floor to add a bit of weight and lined the sides with some 2mm card to even out the walls either side of the roller shutter doors. I'll paint the back of the doors before fitting the 'generator', it will be a bit of MDF painted and lined as a a generic piece as there are no pictures available. Why bother you may ask? Because by careful deduction I think it sits right opposite the solitary window in this coach I've also smoothed down the roof and I'm awaiting some roof vents from Peter Clark before I can finish this part. In the meantime I've started on the bogies. The bogies on the prototypes are B4's so as ever, to save some money, I've used the bogies off some Big Bigs Mk2's. I was lucky in that I already had a pair with scale wheels fitted that I acquired from a Guild member. The real thing apparently has 3ft wheels fitted but the wheels I have scale in at about 3'1" (what's an inch between friends
). I wasn't happy with the brake shoes on the bogies so I cut them off and then repositioned them closer to the wheels. Because there wasn't a lot on the bogie to attach them to I've only been able to move them back about 2mm. A small improvement I know but I'm much happier with them. All that is left for me to do is to add some styrene strips to the bogies as per the real thing and then slap a coat of paint on.I decided to remove the excuse called 'V' hangers on the underframe and will scratchbuild some more and put them where they are actually supposed to sit. I then need to remove some of the battery boxes and add one or two other bits. This is going to prove difficult as I can't find any detailed references or photos of the undeframe on the prototype. Worst case is that I will have to guess and approximate. Much like a lot of other things I do
I've also cut out the styrene panels ready to laminate onto the coachsides. I intend to glue these in place then gently warm them up and manipulate them to simulate that sheet steel ripple effect of the original. I'll then fill in any joins and gaps with some superfine Milliput before concentrating on the coachends.I will try to post some photos to show what I've achieved(?) but I'll warn you now, the purists won't like it
Cheers,
Mark
Attachments
-
 P1010121.JPG72.6 KB · Views: 34
 -
 P1010124.JPG109.1 KB · Views: 33
 -
 P1010131.JPG154.5 KB · Views: 33
 -
 P1010132.JPG70.5 KB · Views: 33
 -
 P1010133.JPG78.9 KB · Views: 33
 -
 P1010122.JPG106.4 KB · Views: 33
 -
 P1010127.JPG93 KB · Views: 33
 -
 P1010129.JPG98.8 KB · Views: 33
 -
 P1010135.JPG75.7 KB · Views: 33
 -
 scan0004.jpg471.5 KB · Views: 34
 -
 scan0005.jpg463.6 KB · Views: 33
lancer1027
Western Thunderer
Thats progressing nicely Mark.
How much were the Peter Clark roof vents ?. and for how many ?.
I look forward to the next installment
Rob")
How much were the Peter Clark roof vents ?. and for how many ?.
I look forward to the next installment
Rob
marsa69
Western Thunderer
A whole £1 queens pounds effi for a strip of 10 plus another queens pound for P+P up to a max of 8 strips
Don't hold your breath, look how long that's taken me
I look forward to the next installment
Don't hold your breath, look how long that's taken me
marsa69
Western Thunderer
Some more digging has revealed that the coaches were rebuilt as air brake stock only. So I'm going to cut off the crude representation of the vac cylinder and air brake actuator. After digging through my bits box I found a new pack of GJH air brake actuators and a JPL models vac cylinder casting. Th vac cylider will provide the new V hangers I need but what I really need is a clear photo of the underside of a Mk1 to show the air brake actuator arrangement. Any help would be much appreciated Right then, I'm off to trawl the Mk1 resource thread
Mark
Right then, I'm off to trawl the Mk1 resource thread Mark
Dog Star
Western Thunderer
I have some photos which may help you... I just need to crop and re-size, so expect something later in the day. When a Mk.1 was converted from vac to dual brake the conversion process seemed to retain all of the vac-gear and hence the air-brake used the original brake cross-shaft and V-hangers. As your prototype has B4 bogies then I would expect the V-hangers to be of the assymetric type and the bogie pull-rod to connect to the cross-shaft above the shaft centreline.... what I really need is a clear photo of the underside of a Mk1 to show the air brake actuator arrangement ...
regards, Graham
lancer1027
Western Thunderer
Mark, can you take a pic and post on here of the type of roof vent from Peter Clark please mate.
Rob
Rob
Dog Star
Western Thunderer
I shall post the Mk.1 air brake photos in the Mk.1 Resources thread so as to keep the photos and comments in one place.I look forward to the photos Graham...
regards, Graham
marsa69
Western Thunderer
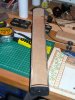
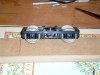
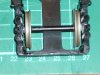
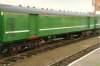
A bit more work achieved today on the bogies. As you can see from the photo of the prototype the B4 bogie has been modified by the addition of what appear to be some small steel brackets towards the top, 6 in total on each side in groups of 3 above each wheel

You can see what I mean in the above photo. So luckily for me I had some small strips of styrene left over so I shortened them ready for fitting. I then noticed that each bracket has what appears to be 2 rivets in them. So I punched the rivet detail with a scribe ready for fitting. Then it dawned on me I was actually rivet counting nooooooooooooooooooo. Ah well nevermind, it's there on the real thing plain as day so it's something easily enough achievable for me to copy. Whether the rivet detail remains visible after I've sloshed it in black enamel paint we'll have to wait and see.The brackets were super-glued in place and hours of fun was had especially after glueing my fingers together for the 9th time
  No matter how careful you are superglue will get you! I think the brackets look ok if slightly a bit too wide but I wasn't going to attempt trying to narrow them.
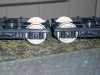
I then turned to keeping the Colonel happy (he'd run out of tuffin again) by making up some earth bonding straps for the bogies. I just cut some small bits of electrical wire, bent to shape then super-glued in place. Once the bogie has been painted up and weathered I'm hoping they won't be as prominent. Excuse the crudiness  of the photos but hopefully the bogies are now an improvement compared to how they started life.


Observations and critique, as always, very much welcome. I have the barricades manned already
Mark
You can see what I mean in the above photo. So luckily for me I had some small strips of styrene left over so I shortened them ready for fitting. I then noticed that each bracket has what appears to be 2 rivets in them. So I punched the rivet detail with a scribe ready for fitting. Then it dawned on me
I was actually rivet counting nooooooooooooooooooo. Ah well nevermind, it's there on the real thing plain as day so it's something easily enough achievable for me to copy. Whether the rivet detail remains visible after I've sloshed it in black enamel paint we'll have to wait and see.The brackets were super-glued in place and hours of fun was had especially after glueing my fingers together for the 9th time No matter how careful you are superglue will get you! I think the brackets look ok if slightly a bit too wide but I wasn't going to attempt trying to narrow them.I then turned to keeping the Colonel happy (he'd run out of tuffin again)
by making up some earth bonding straps for the bogies. I just cut some small bits of electrical wire, bent to shape then super-glued in place. Once the bogie has been painted up and weathered I'm hoping they won't be as prominent. Excuse the crudiness of the photos but hopefully the bogies are now an improvement compared to how they started life. Observations and critique, as always, very much welcome. I have the barricades manned already
Mark
Dog Star
Western Thunderer
I think that the brackets were the attachment points for the footboards.As you can see from the photo of the prototype the B4 bogie has been modified by the addition of what appear to be some small steel brackets...
lancer1027
Western Thunderer
Nice work Mark.
Would it have been easier to place the styrene strips on dry, hold down with a knife blade or something pointy then using a paint brush , brush plastic weld or the like to fix them.
Rob
Would it have been easier to place the styrene strips on dry, hold down with a knife blade or something pointy then using a paint brush , brush plastic weld or the like to fix them.
Rob