Ian Rathbone's Workshop

Johnm123

New Member
Thank you all for your compliments.

First off this time is a 7mm Claughton, bought secondhand by my customer, stripped and refurbished by Lee Marsh. No chassis I’m afraid.

View attachment 153866

Next, a simple job, a 1361 built by Mike Edge from his own etches, the first of a pair.

View attachment 153867

I’ve had a few jobs which came to me in bits, and left that way so I couldn’t photograph them. One was this King Arthur built by Phil Gomm and photographed by him.

View attachment 153868

Another was this as-built Evening Star built by Bill Davis.

View attachment 153869
I now own the Evening star model above, had some clearance issues with the rods thumping brake shoes though is rectified and runs fine now.


The plates and garter crests (from Derek Mundy) for the Taff Vale 0-6-2T finally arrived so here it is posed on ‘Bucks Hill’.

View attachment 153870

Ian R
 

Attachments

  • IMG_2810.jpeg
    IMG_2810.jpeg
    317.8 KB · Views: 78

Ian Rathbone

Western Thunderer
My next project has been a bit of a one off for me. The construction of a Cambrian Mutton Van from a mix of two kits and a degree of scratch building. My customer originally bought a Worsley Works kit which, after being with two ‘kit builders’, was effectively a piece of scrap. I suggested he bought another kit and I would start it again.

I bought a Gladiator 30’ LNWR underframe kit and built that (lengthening it to 31’ to suit the body) with bits from the scrap box to make some generic brake gear and brass angle for the foot boards.

The new superstructure kit arrived recently so, paint pots to one side, I got on with it. There were numerous errors - twenty of the hinge positions were incorrect so I had to cut twenty slots in the correct position, the etched door handle holes were in the wrong place, the floor featured fold up edges to attach to the sides but these clashed with the lower hinge positions so had to come off. The floor itself was slightly too narrow to attach to the sides so I used the ends from the old kit to make internal partitions to fit the floor and strengthen the sides. The roof was far too thin for a Cambrian van, a feature of which are the thick roofs, so after putting the roof through the rollers I added an additional two layers of scrap etch around the edges. I made the hinges from spare boiler band strips, folded double to give a rounded end and a hint of a gap between the two parts.

I’ve built it with a removable roof and underframe for ease of painting and any future maintenance. On with the painting now!IMG_7552.jpeg

Ian R
 
Last edited:

Ian Rathbone

Western Thunderer
Painting the Mutton Van continues. At the same time I’ve done a repaint job on this Hawksworth County. Originally in BR livery with a double chimney and messed up cab sides where number plates had been removed. I replaced the chimney, stripped the smoke box, cab sides and cylinders and rubbed down the boiler, fire box and tender. Bare parts were etch primed then all painted in GW 1946 livery - no lining on black or red parts and only the cab angle lined on the cab front. The cab interior had been painted cream (!), so as the backhead was not removable I had to brush paint the interior.

IMG_7555.jpeg

Ian R
 

James Spooner

Western Thunderer
The ‘Right Track 3’ video ‘Painting and Lining’ is now officially available on YouTube.

The link to it is:

https://www.youtube.com/@chriswalsh9962/playlists

Chris Walsh was the original creator of the video series.

Ian R
Ian,

Many thanks for posting this link. I have just viewed the whole thing from end to end and not only is it very helpful but it is also awesome watching you lining the locos and carriages. Truly a master at work!

Nigel
 

Ian Rathbone

Western Thunderer
Further progress - I commissioned the roof board and waist panel lettering from Precision Labels; I made the roof boards from bits of scrap etch and painted them Cambrian White ie white with a drop of green in it. The roof itself is a not-quite-white with the edges painted green. The iron work attached to the solebars is lined on the edges and the footboards are a dirty pine colour. The door handles are soldered to copper clad (4mm sleeper strip) glued behind the doors.

I am waiting for further transfers for its CR identity, a few tweaks to the lining and varnish to finish. Don’t worry about the gap between body and underframe, it’s not screwed together yet.

IMG_7574.jpeg

Ian R
 

Ian Rathbone

Western Thunderer
Finished today, in fact some of the paint is still wet. A Roundhouse Model live steam, 45mm gauge Campbeltown & Machrihanish Light Railway 0-6-2T. The body is supplied in plain green with the remainder, apart from buffer beams, in plain black. Precision Paints supply the exact colour match so I was able to paint the valance, cylinders and smoke box saddle green. The superstructure is simply bolted to the running plate so it came off easily. A lot of the lining can be done using compasses offset from the adjacent edge so the execution is straightforward, there’s just a lot of it.

There is a good broadside photo of the engine in the C & M Railway book so I was able to copy it and print to scale. I cut out the name and garter in a strip and stuck it to the loco at the top of the side tank and then marked out the spacing of the letters along the previously dotted in upper and lower edges of the letters. I should have photographed that stage, so apologies.

IMG_7613.jpeg

I painted Atlantic’s sister engine, Argyll, in 2021. Same manufacturer but a slightly different body & chassis. This one is sprung, the other rigid but then it had black spoked wheels, which look better. Both models have lined buffer beams, which is incorrect, but the owner specified it.

The final photo of the mutton van, which is now with a satisfied owner.

IMG_7576.jpeg

I’ve also done a couple of these gauge 1 Southern Pacific Daylight car bodies -

IMG_7597.jpeg

Ian R
 

Ian Rathbone

Western Thunderer
Work continues with conversion of a Finescale Brass GWR Manor in plain green to a BR period lined green livery. It involved matching the colour in order to paint the valances green.

IMG_7673.jpeg

Nick Dunhill’s amazing Cambrian 2-4-0 tanks passed through so I was able to photograph those in my usual format -

IMG_7652.jpeg
IMG_7679.jpegIMG_7688.jpegIMG_7690.jpegIMG_7660.jpeg

Beautiful modelling. No. 56 carries the Temperance Movement star on the smoke box door.

Ian R
 

Ian Rathbone

Western Thunderer
By contrast I had another Bassett-Lowke clockwork engine to restore. This was their LSWR M7 but issued as NER engine, over 100 years old and very rare. It came to me like this -

IMG_7692.jpeg

And left like this -

IMG_7693.jpeg

The essence is to allow some distress so that it looks like a well preserved model that has seen some use. Dead crude by modern standards but very valuable.

Finally Frank Davies’s Q1 in P4 in early LNER lined livery, gently weathered. The loco has its motor in the tender with a shaft drive to the gear box in the fire box. The boiler is filled with lead. The kit is Frank’s design and is now with London Road Models.

IMG_0967.jpeg

Ian R
 
Last edited:

Ian Rathbone

Western Thunderer
It is the Warley at Statfold exhibition on Saturday/Sunday next, where I will be demonstrating Painting & Lining. Statfold has an extensive narrow gauge railway system and a large collection of locomotives from around the world. Rides and parking are included in the ticket price but book in advance as there may be ticket limitations on the day.

My workload at the moment -

IMG_7728.jpeg

And a couple from the archive, both built by the late Graham Varley.

IMG_0301.jpegIMG_0316.jpeg

It was a simple but elegant livery, providing it was kept clean!

Ian R
 

Ian Rathbone

Western Thunderer
Well it’s been a while since I last posted. Two of the coaches on the bench from my last post are these -

A GWR Dreadnought Brake Third in 7mm, built by Dave Studley.

IMG_7754.jpeg

And a GWR non-corridor compo built by Phil Gomm, also in 7mm. This is early BR as, although in Choc & Cream, it has BR lettering.

IMG_7752.jpeg


The other coaches on the bench were bodies only.

The 4mm T6 (ancient Jidenco kit) was a challenge. A poor kit but also not built well, so I had to do a fair bit of remedial work before I could start. In this type of livery a lot of the lining is parallel to an edge so I use the compasses as odd-legs to get the lining in the right place; not this model though as few edges were smooth and true so much adjustment of the lining with a fine brush and white spirit. Anyway, here it is -

IMG_7734.jpeg

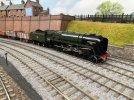
On to my next project, which is for me. A DA Royal Scot for which Pete Silvester has already done an excellent job on the chassis, as a barter.

IMG_7755.jpeg

It’s gone together nicely but with a lot of work to get the fire box to sit properly against the cab front and over the splashers. More anon.

Ian R
 
Last edited:

sjp23480

Active Member
Hi @Ian Rathbone,

The coaches look great.

I have been painting a GWR railcar and experienced quite a lot of bleed between the chocolate and cream panels around the door furniture.

Its a bit late for me, but do you have any top tips to stop this issue?

Or is it a case of living with it and tidying up afterwards.

Thank you
Stephen
 

Ian Rathbone

Western Thunderer
Hello Stephen, if you’re painting a kit then it’s best to fit the door furniture after painting. If the furniture is already fitted then you’re just going to have to mask around them. On the compo above I sprayed the chocolate first because there was the additional problem of the bolection mouldings lying on the colour boundary. I could get a straight masking line by laying the tape directly below the mouldings between the door handles. At the handles the masking is a mix of thin tape and masking fluid (Copydex) - all very laborious. I didn’t bother to stop paint going on the handles themselves as it was an easy job to scrape it off.

Ian R
 

sjp23480

Active Member
Thank you Ian,

That makes a lot of sense - I had already fitted all the furniture. I like to solder these in place and have always worried that soldering on afterwards would blister the paint.

About to sit down and touch up all the oversprays - shouldn't take too long just a bit of a nuisance.

Stephen
 

LarryG

Western Thunderer
I used brushed Mascol (still do) around handles and other awkward bits before putting on masking tape. Removing the tape after spraying rips most of the Mascol off with it.
 

CoVianna

Member
Well it’s been a while since I last posted. Two of the coaches on the bench from my last post are these -

A GWR Dreadnought Brake Third in 7mm

View attachment 228584

And a GWR non-corridor compo built by Phil Gomm, also in 7mm. This is early BR as, although in Choc & Cream, it has BR lettering.

View attachment 228585


The other coaches on the bench were bodies only.

The 4mm T6 (ancient Jidenco kit) was a challenge. A poor kit but also not built well, so I had to do a fair bit of remedial work before I could start. In this type of livery a lot of the lining is parallel to an edge so I use the compasses as odd-legs to get the lining in the right place; not this model though as few edges were smooth and true so much adjustment of the lining with a fine brush and white spirit. Anyway, here it is -

View attachment 228617

On to my next project, which is for me. A DA Royal Scot for which Pete Silvester has already done an excellent job on the chassis, as a barter.

View attachment 228618

It’s gone together nicely but with a lot of work to get the fire box to sit properly against the cab front and over the splashers. More anon.

Ian R
A very recent acquisition of mine. A poor runner so that is my Christmas project. A T6 as well. I did wonder who manufactured the kit so thank you for the information.
IMG_3183.jpeg
 
Top