7mm Mickoo's Commercial Workbench

mickoo

Western Thunderer
Well there’s a thing :))

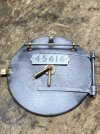
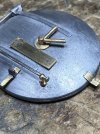
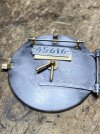
If I just stick the number plate on there will be a gap and look odd, as will bending the plate to the door profile.

Being as the bracket is now soldered on I will simply run around the edge with some fine Miliput to make it solid and fettle smooth. Then the number plate can trimmed to fit the bracket for a uniform finish. The plate looks too large anyway, maybe designed like that to trim back?
IMG_0811.jpeg

IMG_0812.jpeg

IMG_0813.jpeg
 

oldravendale

Western Thunderer
Mick - that numberplate still looks a smidge (standard smidge, you understand) too wide. There was not as much border between the edges of the figures to the edge of the cast plate. I have one I gave to club which I can photograph if it will help. I'm also a bit concerned about the flare around the rivets/screw/nuts. I can't immediately find one of Tim's photos to describe this so here's one of mine - can't remember where or when.

45731.  Location and Date Unknown.  12A Carlisle Kingmoor Shedplate.  FINAL.  Photo by Brian D...jpg

Nameplates were so important to the smokebox of a loco any error in this area stands out for me.

Brian
 

richard carr

Western Thunderer
I agree with Brian, the lower edge of the number plate is too wide, I can't tell from the that photo about the top edge but it might be right.

Richard
 

mickoo

Western Thunderer
To refresh from previously, the number plate needs trimming to the correct size, the tabs on the sides are from the etch process to hold the part and need cleaning up as well.
 
Last edited:

oldravendale

Western Thunderer
Hi Mick. Yes, I get that, but thought (obviously incorrectly) that your last photo showed the plate in place.

Only trying to be helpful, you understand. :)

B
 

mickoo

Western Thunderer
This is about as good as it’s going to get (help on with sticky glue for photos), sans filling in behind with Miliput. Maybe a final waft to straighten the edges a touch more, some of that is shadow from the harsh lights and 10x zoom close up though, sat on my bench 2' I can't even read the number, let alone see if it's wonky :))

IMG_0815.jpeg

IMG_0816.jpeg
 
Last edited:

OzzyO

Western Thunderer
Hello all,

as I sort of started this off about the number plates on L.M.S. locos, here are the drawing that I told you about.
Copyright John Hinchliffe. These are shown as an aide to this discussion.

LMS number plates 02.jpg

The size for a five figure number, with the numbers at these sizes. 4 1/4" tall. The plate at 1'9 3/4" long X 5 7/8" tall so that leaves 13/16" top and bottom.
On the top view of the plate the sizes go like this, plate 1/4" thick 1/8" gap that is covered by the 3/8" lip that runs around the inside of the plates, Then the curved part that's 3/8" thick that's the smokebox door.

I think that they would cast the plates with the inside lip running around plate at the deepest they would need and then grind the lip to suit the smokebox door.

ATB

OzzyO.
 

mickoo

Western Thunderer
Better week this week (well the last three days) and onto a new project, Gladiator ROD (BRE 04).

An old kit going by the box but nothing to untoward so far other than the rave angles, they're not fitted as yet as they need battering into shape to fit, neither is the fall plate as I need to make sure there's not one on the engine and they conflict.

There's an awful lot of white metal in the box, most can be used but I opted to not fight the axle boxes and springs for two reasons, I already had the correct GCR axle box and spring drawn up for a previous customer and second, the kit axle box covers were not the right type for this particular engine.

In all fairness the axle box castings are rather nice so I've kept them for possible use in the future with a 3D spring and hangers. Sadly the springs and snubbers in this kit went straight in the bin.

The kit builds tenders with a tombstone (on it's back) type combined filler and scoop dome, but I needed a later non scoop set up with modified division plate (basically an arched top edge...and I do still need to add a beaded strip across the top of the rear edge).

The rear division plate also needs to be moved back several feet, which increased the coal capacity slightly; the new tank filler is nothing more complicated than a turned down length of tube with a lid on top. The coal space is pending feedback from the client as to how much coal he wants.


IMG_5496.jpg

IMG_5497.jpg

IMG_5498.jpg

IMG_5499.jpg

IMG_5500.jpg
 

Genghis

Western Thunderer
The axlebox/spring/supports/damper assembly on this tender is a nightmare to build. So much so to the point where I have already asked someone to come up with a resin replacement. If I had known you had one in the works................

We usually pack the parts necessary to convert the standard Robinson tender into the ROD type with the simple filler and modified division plate.

This is one of my least favourite kits to pack: loads of small whitemetal pieces and a selection of chimneys (3), domes (3), washouts (3 types, 8 of each) etc. We can now supply lost wax brass chimneys and domes for the GCR and LNER variants and do so on request. It's too expensive to pack all of the brass alternatives. Happy to let you have a brass set for your model.

Dave
 

mickoo

Western Thunderer
The axlebox/spring/supports/damper assembly on this tender is a nightmare to build. So much so to the point where I have already asked someone to come up with a resin replacement. If I had known you had one in the works................

We usually pack the parts necessary to convert the standard Robinson tender into the ROD type with the simple filler and modified division plate.

This is one of my least favourite kits to pack: loads of small whitemetal pieces and a selection of chimneys (3), domes (3), washouts (3 types, 8 of each) etc. We can now supply lost wax brass chimneys and domes for the GCR and LNER variants and do so on request. It's too expensive to pack all of the brass alternatives. Happy to let you have a brass set for your model.

Dave
Dave,

'nightmare'.....Yeah you could say that :cool:, the small brass angled fixing plate is a good idea (but you have no reference where to fit it so it all sort of floats around until the spring and axle box are in place) however it's the white metal spring with dropper and snubber that are the pain.

To be fair there are probably dozens of types of axle box covers to choose from and I just happened to have this one from a previous job, as well as two others with the pinned link fixings for long and short springs.

Image.jpg

I suspect the problem with these engines are the multitude of variations spread over decades and railway companies, let alone the rebuilds and different variations.

This kit is very old, one of the old blue box kits so I suspect the water filler and division plate were not options back then as I can't find any reference in the instructions.

I'll have a look at the boiler fittings later but if the white metal is in good shape (not oval or heavily pock marked) I'll try and use it, if not I know I have a back up option :thumbs:
 

Genghis

Western Thunderer
I'll take a large number of the one on the left with both short and long spring options.......................

I fitted the axleboxes then used the springs to identify where the brass plates should go, then soldered these in place and fitted the other whitemetal bits. Not perfect but it will do.
 

mickoo

Western Thunderer
I'll take a large number of the one on the left with both short and long spring options.......................

I fitted the axleboxes then used the springs to identify where the brass plates should go, then soldered these in place and fitted the other whitemetal bits. Not perfect but it will do.
Do you want me to modify the print for white metal casting, there’s a couple of areas that might not cast well with under cuts etc.

If I’d used the white metal that’s how I’d have done it; but, I use an RSU to attach the angled plates and I would have struggled. The best place to get a good contact is the riveted flat plate that attaches to the frames and to position that you need the spring in place and the dropper is right in the way.

Just my ham fisted way of doing things making it more difficult for me :))
 
Top