It’s cliche time at Monks once again.
To start: ‘Every cloud….?’
Running out of adhesive as per my previous saw me turning my attention elsewhere, and on this occasion it was attaching the point motors to the bases of the points (I’m doing this the old fashioned way as time isn’t on my side with a rather tight, self imposed deadline to meet, so I suppose that’s all hope of making the track look realistic well and truly out of the window).
I did try a recommended way of doing this once, which involved twisting the metal tabs which attach the motor to the base of the point instead of folding over the sleeper in the intended way, and then snipping them off after supergluing and filing the remainder, which did the job nicely - until I had to remove the motor at a later stage, a process which not only destroyed the point base but rendered the motor minus its tabs useless. Thus I decided fir long term peace of mind, this method wasn’t for me.
So what’s the silver lining?
Well, having ‘struggled’ to fit one or two (more of which later) I decided to test fit one of the points using my witness marks as a guide, whereupon I realised I’d boobed in relation to the size of the rectangles I’d cut in the baseboard for the point motors: it transpired that not only are the motors slightly wider than the point base, but the presence of protruding metal tags either side of the motor increase its width again. Despite the generous allowance in the cuts for tolerance, they didn’t allow for wiggle room due to the unanticipated increase in motor size, so it was out with the jig saw once more to increase each hole by six milli., which was the easier option than trying to file off all the tags from the motors……. So clouds of saw dust and noise were the order of the day once more, which after clearing up for an hour or so the first time, I thought I’d left well and truly behind me.
The good part was that at least I’d discovered now and not later when I’d completed the underlay……Thankfully only one or two area required careful measures with the saw.
Now onto fitting the point motors, which you may recall are a mixed bag of second hand (working job lot from the Bay of Plenty and several unemployed of my own from yesteryear).
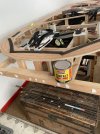
Having to remove some of the plastic accessory bases from many, and straightening the fixing tabs with all wasnt a problem…….until trying to fit them, when it appeared that the holes in the sleeoer base of the new Hornby points were a) slightly narrower in width than the tags and b) slightly inbound of the tag settings of the (mainly) Peco point motors. A real bl**dy faff. And not only were the points of slightly different dimensions in this respect, but they’re not as robust as of old or the Peco versions, and several had one sleeoer split/burst despite judicious handling:

You can see what I mean on this example to the left as you look. It only happened on the one side and to every case in point; the other side was fine as here:

Don’t worry: they’ll be rewired were required (as above), although the main wiring will be of three pin/core.
They were also of a mixed bag in terms of length of pin, the longer pinned variety being easier to thread onto the tie bar whilst trying to fit the tags at the same time, than the shorter versions which were a real pain requiring a third hand…..
Despite the fact that all the bought jobbies were working, it was only later I discovered that one or two of the tags were missing rendering them useless, as well as me breaking one or two of my older ones whilst trying to narrow the separation of the tags, so I decided to fork out for some new ones to finish the job: six pack (the long pin variety of course for reason given), as I only noticed after fitting several that the pins are sliding up and down in their housing for some reason or another, so they’ll have to go (not trusting long term to superglue and not sure whether solder will work on the different materials).
Oh yes, and another purchase is required: a new set of snips to cut the longer pins as my rather elderly ones have given up the ghost.
So there we go.
And to finish with a cliche: ‘one step forward…..’.
jonte
")


")


