You are using an out of date browser. It may not display this or other websites correctly.
You should upgrade or use an alternative browser.
You should upgrade or use an alternative browser.
Monks Ferry: a layout for the Grandchildren.
- Thread starter jonte
- Start date
jonte
Western Thunderer
Just caught up again Jon all going very well as in the finished results not the have to redo bits!
On cleaning your air brush have a look at Boomer Diorama's on You Tube he uses a lot of IPA to thin his paint and in the air brush never has to clean it he says! The videos are searchable to find a relevant one.
On cleaning rail tops I just use a piece of wood run along the painted tops might drag the odd bit of paint off but easy touching in.
Keep up the good work.
Happy New Year.
Your kind and keen interest, Ade, is not only welcome but helps spur me on

It’s so easy with a project of this size to get distracted, especially when things become a bit of a chore, so when another WT-er like your good self shows interest, it comes to mind and serves as a boost to morale; thanks once again.
Boomer: what a modeller and such a keen eye. He makes it all look so easy!
I don’t doubt any of his valuable experience, especially with a ‘brush, which shows in the generous sharing of his helpful vids.
In my case, aware that I’ve to face the inevitable cleaning at the end, my head starts to drop, but for me it’s essential. If I skip the cleaning out and the darned thing is clogged up the next time I pick it up, it’s not too much of a problem as I’vea couple of others in the wings, and I can kid myself into thinking I’llgive it a good scrubbing in future

No, Ade, my greatest fear is of the nozzle clogging up whilst using it, perhaps then having to mix up a new batch of paint wasting both time and materials, to say nothing of having to start cleaning it any way. Perhaps if I was as knowledgeable and experienced as Boomer, this might never be the case………but as a fully paid up pessimist, I’ll err on the side of caution
")
I’ve copious amounts of screen wash, distilled water and IPA under the bench which I use for cleaning the brush (there was a recipe I found a while ago for using these items to make a cheap airbrush cleaning substance but as usual, I’ e forgotten it, so tend to do an initial clean with the screen wash, followed up by a thorough clean - after stripping the parts - with IPA).
In the main, Iuse Tamiya acrylics (although I’ve Humbrol, Revell and AK in the boxes) and use their designated thinner, X20A, to mix it to a ‘squirtable’ consistency which helps with the clogging issue. I’m aware that others have successfully used water with the other makes mentioned, but I’m with Boomer on that one and use IPA as a thinner
Many thanks once again, Ade, and Happy New Year!
Jon
P.S. Almost forgot to mention many thanks for the tip about the wooden rail cleaner. I’m beginning to look favourably at the block sections on the bench in the images
Last edited:
AdeMoore
Western Thunderer
Sorry Simon I missed the vital bit! With preparatory air brush cleaner! IPA for everything from paint thinning to airbrush cleaning. One bottle of Tamiya paint he immediately turns into two bottles by half ing with IPA into a spare bottle. I have copied this and it works perfectly. As Jon says his methods and 10s of years of experience once as a professional modeller make it all look so easy and certainly has a keen eye.“Never has to clean his airbrush”…. Until it clogs up completely, I expect!
simond
Western Thunderer
Thanks Ade,
well, my experience with IPA is that it thins some and coagulates other brands of acrylic paint, and I can’t remember which do what!
I use Vallejo thinner which is slightly soapy, and lots of water, which is cheap, and doesn’t smell…. These seem to work well with the GW paints as well as Vallejo. And my cyclone was a bright idea!
best
Simon
jonte
Western Thunderer
So, with the plain rail cleaned of salt residue (each needed several go’s to remove from sleepers and rail, a drawback of this method), attention turned to the points as mentioned last.
Here are a couple of examples having had the salt brushed off as before:


……..followed by a wash of water and washing up liquid:


From the photos I’ve attempted to follow of the real thing, the points seem to have a more pronounced staining than most of the plain rails, so on this occasion, several passes with the airbrush were made.
They’ll probably require further cleaning as per the plain track, however once completed, I can start cleaning the rail heads.
jonte
Here are a couple of examples having had the salt brushed off as before:
……..followed by a wash of water and washing up liquid:
From the photos I’ve attempted to follow of the real thing, the points seem to have a more pronounced staining than most of the plain rails, so on this occasion, several passes with the airbrush were made.
They’ll probably require further cleaning as per the plain track, however once completed, I can start cleaning the rail heads.
jonte


Roger Pound
Western Thunderer
Nice to see the track laying under way - a New Years Resolution no doubt. Happy New Year to you too, my good friend.
Roger
Roger
jonte
Western Thunderer
Nice to see the track laying under way - a New Years Resolution no doubt. Happy New Year to you too, my good friend.
Roger
Happy New year to you too, Roger, and thanks for your continued interest and support of this meandering thread over the last year or so
Unfortunately, I’ve currently picked up another virus (how many’s that since September? Scratches head….) so I’m not sure when I’ll be able to venture out to clean the rail tops and start laying, I’m afraid.
To add insult to injury, despite the presence of an oil heater in my (garage) workshop, the combination of cold and damp air is aggravating my arthritis to the point where I’m in almost total pain

My brother in law has kindly offered me the use of his humidifier, however, I’m reluctant to try at present, especially coupled with feeling unwell.
There’s a plan B however: I’m thinking of turning the spare bedroom into a temporary pod until the weather improves, and whilst I won’t be allowed inside with chemicals and such like lest I upset the domestic authorities, I’m considering bringing in card of different sorts in an attempt to finish off the station building and perhaps a signal box too, which should see me through until at least March/April, by which time our nearest star should have revealed itself once more……
Moral of story, Roger: don’t get old, it’s bl**dy awful
Jon
simond
Western Thunderer
Moral of story, Roger: don’t get old, it’s bl**dy awful
so it is, but it’s infinitely better than any alternatives of which I’m aware!
hang in there, and have a wonderful 2026!
AdeMoore
Western Thunderer
Feel your pain Jon as an arthritis suffer. ill health brought me back to the hobby. I remember your great support back then so thanks for that. But yes cold and damp with viruses too a nasty mix. Indoors in the warm is best obviously. Nab the room you won’t regret it. All the very best for 2026. Happy New Year.
Roger Pound
Western Thunderer
I'm well ahead of you with that one, Jon. I won't risk boring your followers with all my health and mobility problems - suffice to say they are many and I totally agree - this being old is greatly over-rated.Happy New year to you too, Roger, and thanks for your continued interest and support of this meandering thread over the last year or so
Moral of story, Roger: don’t get old, it’s bl**dy awful
Jon
Roger
jonte
Western Thunderer
Indeed!so it is, but it’s infinitely better than any alternatives of which I’m aware!
hang in there, and have a wonderful 2026!
Thanks, Simon, and all the very best to you in 2026.
Jon
Feel your pain Jon as an arthritis suffer. ill health brought me back to the hobby. I remember your great support back then so thanks for that. But yes cold and damp with viruses too a nasty mix. Indoors in the warm is best obviously. Nab the room you won’t regret it. All the very best for 2026. Happy New Year.
Cheers, Ade, and a Happy (and hopefully) pain free New Year to you too
Jon
John57sharp
Western Thunderer
Happy New Year, Jon, and very best get-well wishes. Keep warm but keep moving that's my motto! I hope you’re back on the project asap and look forward to seeing more progress soon.
Cheers!
John
Cheers!
John
Lyndhurstman
Western Thunderer
Happy New Year to you and yours, Jon. I hope your health issues subside, and you can keep up the excellent progress.
Cheers
Jan
Cheers
Jan
jonte
Western Thunderer
Happy New Year, Jon, and very best get-well wishes. Keep warm but keep moving that's my motto! I hope you’re back on the project asap and look forward to seeing more progress soon.
Cheers!
John
Happy New Year to you and yours, Jon. I hope your health issues subside, and you can keep up the excellent progress.
Cheers
Jan
Thanks chaps, and here’s to a prosperous one for you both!
Jon
jonte
Western Thunderer
For the first time in several days, I ventured out briefly to the workshop to carry out a brief but long overdue tidy up of the table.
Curiosity killing the cat, I grabbed a couple of points at random to see how they’d dried after the clean up shown before and suffice to say, they’ll do for this project:


In between guesting family from overseas and nursing my latest malady, thoughts turned to considering the completion of the station building and ‘forecourt’, and to a potential and suitable signal box.
The ‘box’ is straightforward as it’s a reduced version of Waterloo, materials and accessories already hoarded for when the time arrived.
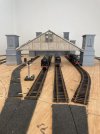
The station building, especially the incomplete track/platform side is a different kettle of fish, as I’ve a plethora of images and ideas to boot of prototypes across London to assist, but sometimes spoilt for choice is agony…….. The deciding factor here will be the complication of seating the end of the roof with its vertical support cross member and still allow ease of access for easy removal, to say nothing of the columns either side and how it will all fit with the already completed side. Here’s a photo I’ll be studying to assist:

It will also have to be raised to allow the curved track to pass underneath.
Thus the next few days will be spent pondering and poring over stored images to come up with a mental plan.
Then it will be back out to recover the materials and tools required to complete the task ahead in my temporary place of work indoors, and then popping out to stock up on extra styrene sheet and section that may be required.
In fact that activity has already commenced as I await the arrival of four 3-D printed hydraulic buffer stops and some ancient Bayka casement windows which will play the part of those in the concrete huts situated above the buffers in the earlier shot posted of Waterloo.
It may be a couple of weeks or so before I commence the build(s), but I’ll try and post as often as possible once work starts.
Till then.
jonte
Curiosity killing the cat, I grabbed a couple of points at random to see how they’d dried after the clean up shown before and suffice to say, they’ll do for this project:
In between guesting family from overseas and nursing my latest malady, thoughts turned to considering the completion of the station building and ‘forecourt’, and to a potential and suitable signal box.
The ‘box’ is straightforward as it’s a reduced version of Waterloo, materials and accessories already hoarded for when the time arrived.
The station building, especially the incomplete track/platform side is a different kettle of fish, as I’ve a plethora of images and ideas to boot of prototypes across London to assist, but sometimes spoilt for choice is agony…….. The deciding factor here will be the complication of seating the end of the roof with its vertical support cross member and still allow ease of access for easy removal, to say nothing of the columns either side and how it will all fit with the already completed side. Here’s a photo I’ll be studying to assist:
It will also have to be raised to allow the curved track to pass underneath.
Thus the next few days will be spent pondering and poring over stored images to come up with a mental plan.
Then it will be back out to recover the materials and tools required to complete the task ahead in my temporary place of work indoors, and then popping out to stock up on extra styrene sheet and section that may be required.
In fact that activity has already commenced as I await the arrival of four 3-D printed hydraulic buffer stops and some ancient Bayka casement windows which will play the part of those in the concrete huts situated above the buffers in the earlier shot posted of Waterloo.
It may be a couple of weeks or so before I commence the build(s), but I’ll try and post as often as possible once work starts.
Till then.
jonte
jonte
Western Thunderer
With ideas still aplenty as mentioned in my last, it was determined after much cogitation, that any prospective design of the platform facing side of the station would have to perch on a plinth of sorts to allow circuitry tracks to pass beneath. Once constructed, the ensemble could be taken indoors in the interests of wellbeing and a final plan of construction determined before building could commence, so designing and building a plinth became the order of the day.
Despite a reluctance to venture out into these current freezing temperatures, I reckoned that an early start would see the bulk of the build out of the way, so with a plan of attack to work in short bursts seeming favourable, I grabbed the step ladders and began searching through a collection of offcuts stored above my mini workshop in the garage to find something suitable. An elderly piece of weathered but stable six milli ply looked favourable for a base to the plinth and beneficial in as much as not having to struggle down a ladder with something of seemingly excessive mass, although the odd shape made gripping with frozen fingers a chore. Not so easy was wrestling with a 4’x2’ section of twelve milli ply, although the more geometrical shape made handling easier (what you lose on the swings, as they say). This was intended for the supports to the plinth, their thicker profile providing a generous area for gluing to.
Then it was into the model room to establish dimensions.
Critical was the height of the plinth above the tracks to allow stock to pass through, although this was limited to a maximum determined by the low hanging rear cross member of the station roof (in order to allow the roof to be removed for track cleaning, the plinth had to sit below it).
Not much room to manoeuvre admittedly, but testing with a freewheeling tender driven loco helped to determine something fitting. Then respective sections of curved track were located and placed in order to determine the swing of stock negotiating the tunnel to ensure that the sides of the tunnel/plinth didn’t obstruct. Tests were once again conducted with the loco. It was found that to err on the side of caution, the support for the plinth should lie outside of the frame, thus it will sit against the outside of the frame and on the table.
Some photos. Testing for fit:

Essential ‘witness marks’ to remind me when I’m working away from the layout:

The awful (temporary) warped clear section styrene which helped when forming the roof will be replaced during construction.
The plinth seated roughly on its supports:

Looking through to see how the roof beam clears the plinth (I’ve some scraps from a water tower kit that will be customised to hide the join):


The overhanging plinth covers the lengthier centre tracks which should help to mask the area behind as I’m hoping to avoid modelling a forecourt with all the added details it entails. It will also help to hide the relatively thin profiles of some buildings above the buffers which I’m intending to model in low relief to save space.
The elevated position of the building due to the plinth:


Just as the owners of the railway company had decreed.
I’d hoped to have the parts glued by the end of play, but once again this inclement spell has proved an obstacle yet again as the glue was frozen almost solid in its container!
Ah well, once it’s glued up, and with all the info and locations of roof handles etc. scribed on, I will have something tangible to play with which should ease the final design of the building. Additionally, I’ll be able to complete that long list of extras to help it materialise; I hope.
jonte
Despite a reluctance to venture out into these current freezing temperatures, I reckoned that an early start would see the bulk of the build out of the way, so with a plan of attack to work in short bursts seeming favourable, I grabbed the step ladders and began searching through a collection of offcuts stored above my mini workshop in the garage to find something suitable. An elderly piece of weathered but stable six milli ply looked favourable for a base to the plinth and beneficial in as much as not having to struggle down a ladder with something of seemingly excessive mass, although the odd shape made gripping with frozen fingers a chore. Not so easy was wrestling with a 4’x2’ section of twelve milli ply, although the more geometrical shape made handling easier (what you lose on the swings, as they say). This was intended for the supports to the plinth, their thicker profile providing a generous area for gluing to.
Then it was into the model room to establish dimensions.
Critical was the height of the plinth above the tracks to allow stock to pass through, although this was limited to a maximum determined by the low hanging rear cross member of the station roof (in order to allow the roof to be removed for track cleaning, the plinth had to sit below it).
Not much room to manoeuvre admittedly, but testing with a freewheeling tender driven loco helped to determine something fitting. Then respective sections of curved track were located and placed in order to determine the swing of stock negotiating the tunnel to ensure that the sides of the tunnel/plinth didn’t obstruct. Tests were once again conducted with the loco. It was found that to err on the side of caution, the support for the plinth should lie outside of the frame, thus it will sit against the outside of the frame and on the table.
Some photos. Testing for fit:
Essential ‘witness marks’ to remind me when I’m working away from the layout:
The awful (temporary) warped clear section styrene which helped when forming the roof will be replaced during construction.
The plinth seated roughly on its supports:
Looking through to see how the roof beam clears the plinth (I’ve some scraps from a water tower kit that will be customised to hide the join):
The overhanging plinth covers the lengthier centre tracks which should help to mask the area behind as I’m hoping to avoid modelling a forecourt with all the added details it entails. It will also help to hide the relatively thin profiles of some buildings above the buffers which I’m intending to model in low relief to save space.
The elevated position of the building due to the plinth:
Just as the owners of the railway company had decreed.
I’d hoped to have the parts glued by the end of play, but once again this inclement spell has proved an obstacle yet again as the glue was frozen almost solid in its container!
Ah well, once it’s glued up, and with all the info and locations of roof handles etc. scribed on, I will have something tangible to play with which should ease the final design of the building. Additionally, I’ll be able to complete that long list of extras to help it materialise; I hope.
jonte
jonte
Western Thunderer
Hope nobody minds me sharing, as there’s still not a lot of modelling going on at present, so if it’s a bit boring please feel free to move swiftly on.
How I wish I could………
But it’s not as simple as that; unfortunately. I’ve been deliberating on the dimensions of the plinth upon which the station building will be seated. Despite double checking, then checking again (and again) its tight dimensions - everything must fit together seamlessly (?) and come apart easily for ease of track maintenance - knowing my luck, there’ll be something I overlooked! To cut, or not to cut……..
Anyway, I’ve done me damndest and have begun gluing up. If I’ve cocked up, I’ll just have to live with it I’m afraid.
To ensure the top of the plinth aligns with my painfully gathered pencil marks, I’ve decided to glue one of the three supports at a time, so it’ll be taking a couple more visits or so before it’s ready to bring inside, bearing in mind that the cold climate at present is increasing the drying time. The external support being glued to the plinth top using the partly assembled building to weight it down:

Incidentally, the prolonged drying time is neither here nor there at present as much cogitation continues to determine the rest of the build.
I’ve begun whittling it down using saved images to assist, and I’m leaning towards a rendered finish for the side walls and rear aspect, sported by older stations such as Leamington Spa, Oxford Road and Grange Lane on’t Wirral:


The feint and haphazard mortar lines combined with an eroded finish are particularly appealing - as well as being quicker to paint and weather than say brick - and I’m considering utilising a method involving plaster as deployed before in my unfinished turn table and shed project ( I’ve binned the photos sadly, but the topic should out there somewhere).
The area of the station immediately to the rear of the platforms (located below the plinth line which affords some welcome shadow) is the subject of my current ramblings. As mentioned, I’m intending to mask forecourt detail with the cabins like those above the buffers in my previous photos of Waterloo, but still, some detail will be required as the ends of the platforms will be open and thus the area behind will be on view. Staircases are in the running like many termini, but I’ve still a hankering for some sort of edifice.
Thus I dug out a half relief structure, recovered from an archaeological dig conducted amongst the carcasses and wot not of failed projects scattered thereabouts, and tried it for fit to give me a better idea of whether or not I was barking up the wrong tree…..again!
This:


……built from this, the Triang Hornby Ticket Office purchased locally for a couple of denarii:

Here it is tried for fit (the supports to the left of the roof will need raising slightly to straighten things up):

Yep, it’s too tall (and obviously too short) especially with the architraving I applied to the top, but in any case, things would get worse bearing in mind that I still have to allow for it to be perched on top of a platform. But still, I like the idea.
So another half hour or so was spent scrutinising the model image, and I reckon that if the model was cut horizontally just above the openings and decorated with just the tiniest amount of architrave, I think it would work, bearing in mind it would only be glimpsed through the platform entrances. So, I’ll measure up the structure to see if it will work, and if so I’ll purchase a couple more ticket offices - if I can find ‘em - which should be long enough when cut in half like the current incarnation to run the length of the building.
Further to the above about my leaning towards the finish of older buildings, Oxford Road in Manchester has already been an influence over the creation of this which I’m hoping to use:

……so perhaps deep down, I’ve already made my mind up.
Thanks to those of you who’ve persisted with these ramblings this far, but I hope it’s of interest.
jonte
How I wish I could………
But it’s not as simple as that; unfortunately. I’ve been deliberating on the dimensions of the plinth upon which the station building will be seated. Despite double checking, then checking again (and again) its tight dimensions - everything must fit together seamlessly (?) and come apart easily for ease of track maintenance - knowing my luck, there’ll be something I overlooked! To cut, or not to cut……..
Anyway, I’ve done me damndest and have begun gluing up. If I’ve cocked up, I’ll just have to live with it I’m afraid.
To ensure the top of the plinth aligns with my painfully gathered pencil marks, I’ve decided to glue one of the three supports at a time, so it’ll be taking a couple more visits or so before it’s ready to bring inside, bearing in mind that the cold climate at present is increasing the drying time. The external support being glued to the plinth top using the partly assembled building to weight it down:
Incidentally, the prolonged drying time is neither here nor there at present as much cogitation continues to determine the rest of the build.
I’ve begun whittling it down using saved images to assist, and I’m leaning towards a rendered finish for the side walls and rear aspect, sported by older stations such as Leamington Spa, Oxford Road and Grange Lane on’t Wirral:
The feint and haphazard mortar lines combined with an eroded finish are particularly appealing - as well as being quicker to paint and weather than say brick - and I’m considering utilising a method involving plaster as deployed before in my unfinished turn table and shed project ( I’ve binned the photos sadly, but the topic should out there somewhere).
The area of the station immediately to the rear of the platforms (located below the plinth line which affords some welcome shadow) is the subject of my current ramblings. As mentioned, I’m intending to mask forecourt detail with the cabins like those above the buffers in my previous photos of Waterloo, but still, some detail will be required as the ends of the platforms will be open and thus the area behind will be on view. Staircases are in the running like many termini, but I’ve still a hankering for some sort of edifice.
Thus I dug out a half relief structure, recovered from an archaeological dig conducted amongst the carcasses and wot not of failed projects scattered thereabouts, and tried it for fit to give me a better idea of whether or not I was barking up the wrong tree…..again!
This:
……built from this, the Triang Hornby Ticket Office purchased locally for a couple of denarii:
Here it is tried for fit (the supports to the left of the roof will need raising slightly to straighten things up):
Yep, it’s too tall (and obviously too short) especially with the architraving I applied to the top, but in any case, things would get worse bearing in mind that I still have to allow for it to be perched on top of a platform. But still, I like the idea.
So another half hour or so was spent scrutinising the model image, and I reckon that if the model was cut horizontally just above the openings and decorated with just the tiniest amount of architrave, I think it would work, bearing in mind it would only be glimpsed through the platform entrances. So, I’ll measure up the structure to see if it will work, and if so I’ll purchase a couple more ticket offices - if I can find ‘em - which should be long enough when cut in half like the current incarnation to run the length of the building.
Further to the above about my leaning towards the finish of older buildings, Oxford Road in Manchester has already been an influence over the creation of this which I’m hoping to use:
……so perhaps deep down, I’ve already made my mind up.
Thanks to those of you who’ve persisted with these ramblings this far, but I hope it’s of interest.
jonte
John57sharp
Western Thunderer
I’m enjoying reading about your processing as you go along Jonte. Hope it all works out….
That Grange Lane is intriguing…I only found out it what the remains were a few weeks ago….driven past them so often.
Stay warm
John
That Grange Lane is intriguing…I only found out it what the remains were a few weeks ago….driven past them so often.
Stay warm
John